Adorable Crochet Lamb Amigurumi Pattern: A Step-by-Step Tutorial
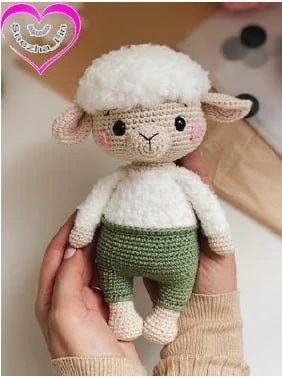
There is nothing quite as heartwarming as a soft, cuddly little lamb. Whether you are looking to create a unique gift for a baby shower, a charming nursery decoration, or just want to treat yourself to a new crochet project, this adorable amigurumi lamb is the perfect choice. This little fellow features a fluffy white mane, sweet pink cheeks, and even comes dressed in a tiny pair of sage green pants!
This pattern is designed to be beginner-friendly, focusing on fundamental crochet techniques like the magic ring, increases, and decreases. While it looks professional and polished, the process is straightforward enough for anyone with a basic understanding of single crochet. By the time you finish, you’ll have a little friend about 8.5 to 9 inches tall, ready to bring smiles to everyone they meet.
Materials & Abbreviations
Before we pick up our hooks, let’s make sure you have everything you need. For the best results, try to use cotton or cotton-blend yarns similar to those listed below to maintain the shape of your lamb.
Yarn Requirements
- Beige Yarn: A medium-weight cotton (such as YarnArt Jeans) for the head, nose, legs, arms, and body base.
- White Fluffy Yarn: A textured, “eyelash” or chenille-style yarn (such as Sirdar Snuggly Bunny) for the lamb’s hair and the fluffy part of the body.
- Sage Green Yarn: A medium-weight cotton for the little pants.
- Light Pink Yarn: For the inner ears and adorable cheeks.
- Dark Pink Yarn: For detailing if desired.
- Embroidery Thread: Black and white for the facial features.
Tools & Notions
- Crochet Hook: 2.2 mm (or the size recommended to achieve a tight tension).
- Safety Eyes: 10 mm black safety eyes.
- Stuffing: High-quality polyester fiberfill.
- Stitch Markers: To keep track of your rounds.
- Tapestry Needle: For sewing pieces together and weaving in ends.
- Scissors.
Abbreviations (US Terms)
- MR: Magic Ring
- ch: Chain
- sc: Single crochet
- inc: Increase (2 sc in one stitch)
- dec: Decrease (sc 2 together)
- sl st: Slip stitch
- BLO: Back loop only
- FLO: Front loop only
- R: Round
- st: Stitch
Note: Always work in a continuous spiral unless otherwise stated. Do not join rounds with a slip stitch unless specifically instructed.
Step-by-Step Instructions
The Head
Start with your Beige Yarn.
- R1: 6 sc in a MR (6)
- R2: 6 inc (12)
- R3: (1 sc, inc) x 6 (18) (Work in BLO)
- R4: (2 sc, inc) x 6 (24) (Work in BLO)
- R5: (3 sc, inc) x 6 (30) (Work in BLO)
- R6: (4 sc, inc) x 6 (36) (Work in BLO)
- R7: (5 sc, inc) x 6 (42) (Work in BLO)
- R8: (6 sc, inc) x 6 (48) (Work in BLO)
- R9: (7 sc, inc) x 6 (54) (Work in BLO)
- R10-12: 1 sc in each st (54) (Work in BLO)
- R13-15: 1 sc in each st (54)
- R16: 12 sc, 3 inc, 24 sc, 3 inc, 12 sc (60)
- R17-21: 1 sc in each st (60)
Eye Placement: Before continuing, insert your 10 mm safety eyes between rounds 17 and 18, leaving approximately 8 stitches between the eyes.
- R22: (8 sc, dec) x 6 (54)
- R23: (7 sc, dec) x 6 (48)
- R24: (6 sc, dec) x 6 (42)
- R25: (5 sc, dec) x 6 (36)
- R26: (4 sc, dec) x 6 (30)
Stuff the head firmly with fiberfill. Continue with the decreases:
- R27: (3 sc, dec) x 6 (24)
- R28: (2 sc, dec) x 6 (18)
Finish with a sl st, cut the yarn, and leave a long tail for sewing.
The Fluffy Hair
Using the White Fluffy Yarn:
Attach your yarn to the remaining loop from the BLO in Round 12 of the head.
R1: Ch 5, then work 2 sc back into the first chain. Sl st to finish.
Fasten off and secure.
The Nose
Using Beige Yarn:
- R1: 6 sc in a MR (6)
- R2: 6 inc (12)
- R3: 2 sc, 3 inc, 3 sc, 3 inc, 1 sc (18)
- R4-5: 1 sc in each st (18)
Stuff lightly and sew onto the face between rounds 17 and 23.
The Ears (Make 2)
Inner Ear: Use Pink Yarn.
- R1: 6 sc in a MR (6)
- R2: 6 inc (12)
- R3: (1 sc, inc) x 6 (18)
- R4: (2 sc, inc) x 6 (24)
- Fasten off.
Outer Ear: Use Beige Yarn.
- R1: 6 sc in a MR (6)
- R2: 6 inc (12)
- R3: (1 sc, inc) x 6 (18)
- R4: (2 sc, inc) x 6 (24)
Assembly: Place the inner ear inside the outer ear (wrong sides facing each other). Crochet through both layers: Using Pink Yarn: Fasten off and sew to the face approximately 4-5 stitches away from the nose, positioned between rounds 18-20. Start with Beige Yarn. Switch to Sage Green Yarn: Stuff the leg. Fasten off the first leg. For the second leg, do not fasten off! We will join them together. Using the second leg (still attached to the green yarn), work across the first leg to join them: Switch to White Fluffy Yarn: Switch to Beige Yarn: Stuff the body firmly and fasten off. Start with Beige Yarn. Switch to White Fluffy Yarn: Fasten off the beige, leaving a tail. Stuff the arms halfway. Continue: Fasten off, leaving a long tail for sewing to the body. Now it is time to bring your lamb to life! Follow these steps carefully:
R5: (3 sc, inc) x 6 (30).
The Cheeks (Make 2)
The Legs (Make 2)
The Body
The Arms (Make 2)
Finishing
Assembly & Face Details
Tips for Success