Spooky Crochet Hand Pattern: A Step-by-Step Amigurumi Tutorial
Introduction
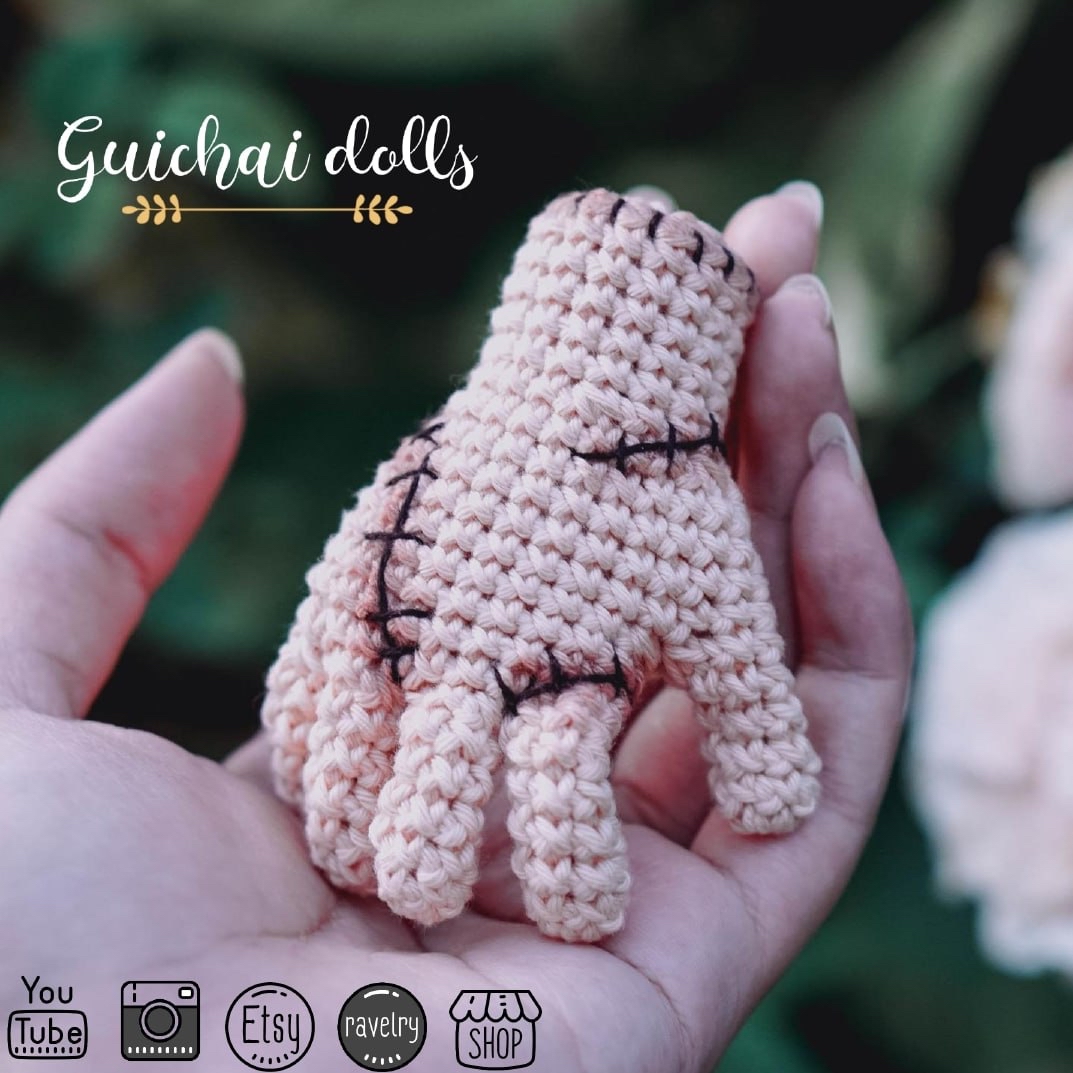
Are you looking for a unique, slightly eerie, and absolutely adorable project to add to your crochet collection? Whether you are preparing for the spooky season or just love the “creepy-cute” amigurumi aesthetic, this crochet hand pattern is the perfect project. This tiny, stitched-up hand is ideal as a keychain, a spooky desk companion, or even a character accessory for your larger amigurumi dolls.
This tutorial is designed to be beginner-friendly. We will be breaking the process down into manageable chunks: first, we will create the individual fingers, then we will join them together to form the hand, and finally, we will add those iconic “stitched” details that give this piece its personality. Grab your favorite cream-colored cotton yarn and let’s get started!
Materials & Abbreviations
To achieve the best results and ensure your hand has a clean, defined look, I recommend using a smooth cotton yarn. Cotton holds stitch definition beautifully, which is vital for the small, intricate stitches used in amigurumi.
What You Will Need
- Yarn: Fine or light-weight cotton yarn in a cream or beige color.
- Crochet Hook: A hook appropriate for your yarn weight (typically a 2.5mm to 3.5mm hook).
- Stuffing: Poly-fill or similar toy stuffing.
- Wire (Optional): Thin floral wire or craft wire if you want to be able to pose the fingers.
- Embroidery Thread: Thin black thread for the “stitched” look.
- Tapestry Needle: For sewing pieces together and weaving in ends.
- Scissors.
Abbreviations (US Terms)
Please ensure you are familiar with these standard US crochet terms before beginning:
- MR: Magic Ring
- ch: Chain
- sc: Single crochet
- inc: Increase (2 sc in the same stitch)
- dec: Decrease (sc 2 together)
- sl st: Slip stitch
- hdc: Half double crochet
- dc: Double crochet
- tr: Treble crochet
- BLO: Back loop only
- FLO: Front loop only
- st(s): Stitch(es)
Step-by-Step Instructions
This pattern is worked in several stages. We will start by making the fingers as separate pieces and then assemble them into a single hand shape.
Phase 1: Crafting the Three Main Fingers
First, we will create three identical finger pieces. These will become your index, middle, and ring fingers.
Instructions for one finger:
- Rounds 1-6: Make a Magic Ring and work 5 sc into the ring. (5 stitches total).
- Finish the round with a sl st to the first sc.
- Fasten off and weave in the yarn end.
Repeat this entire process two more times so you have a total of three finger pieces.
Phase 2: Creating the Thumb and Pinky
Next, we need to make two more pieces. These will be slightly shorter and will serve as the thumb and the pinky finger.
Instructions for Piece 1 (The Thumb):
- Rounds 1-5: Make a Magic Ring and work 5 sc into the ring. (5 stitches total).
- Fasten off with a sl st and weave in the yarn end. This piece is now complete.
Instructions for Piece 2 (The Pinky):
- Rounds 1-5: Make a Magic Ring and work 5 sc into the ring. (5 stitches total).
- Important: Do NOT fasten off this piece. We will use this yarn to continue into the joining process.
Phase 3: Joining the Pieces and Shaping the Hand
This is the most critical part of the pattern. We are going to work around the edges of our finger pieces to connect them into one continuous piece that forms the hand.
Round 6 (The Joining Round):
You will now work your stitches around the perimeter of the pieces you just made, essentially “sewing” them together with your crochet hook.
- Start with the Pinky (@2): Work 2 sc into the pinky piece.
- Continue into the Ring Finger (@1): Work 2 sc.
- Continue into the Middle Finger (@1): Work 2 sc.
- Continue into the Index Finger (@1): Work 5 sc.
- Continue into the Middle Finger (@1) on the other side: Work 3 sc.
- Continue into the Ring Finger (@1) on the other side: Work 3 sc.
- Finish by joining into the Pinky (@2) on the other side: Work 3 sc.
You should now have 20 stitches in your round.
Rounds 7-9: Work 20 sc in each round (3 rounds total).
Round 10 (The Thumb Extension):
- Work 9 sc.
- Continue working around the Thumb (@2) piece: Work 5 sc.
- Continue working around the rest of the hand: Work 11 sc.
You should now have 25 stitches in this round.
Rounds 11-13: Work 25 sc in each round (3 rounds total).
Pro Tip: If you want the fingers to be posable, this is the perfect time to insert a small piece of wire into the fingers before you finish stuffing.
Round 14: dec, 9 sc, dec, 10 sc, dec. (22 stitches).
Round 15: 8 sc, dec, 1 sc, dec, 9 sc. (20 stitches).
Round 16: [3 sc, dec] repeat 4 times. (16 stitches).
Rounds 17-21: Work 16 sc in each round (5 rounds total).
Round 22 (Shaping the Base): Work in the Back Loops Only (BLO): [2 sc, dec] repeat 4 times. (12 stitches).
Round 23: [1 sc, dec] repeat 4 times. (8 stitches).
Round 24: 4 dec, then finish with a sl st. (4 stitches).
Finishing
Now that you have completed the crochet portion, it’s time to bring your little hand to life!
Stuffing and Closing
Carefully stuff the hand with poly-fill. Be sure to push the stuffing all the way into the individual finger tubes so they stay firm and upright. Once stuffed, use your tapestry needle to weave the yarn through the remaining 4 stitches, pull tight to close the base, and hide the yarn end inside the hand.
The “Stitched” Embroidery
The signature look of this pattern comes from the embroidery. Using your thin black thread and a tapestry needle, embroider short, horizontal lines across the “joints” and the palm area to mimic surgical stitches. Don’t worry about making them perfectly straight—the slightly uneven, hand-stitched look adds to the spooky charm!
Adding Depth (Optional)
For an advanced, professional look, you can use a tiny bit of fabric paint or a diluted dark marker to apply a light “shading” or “toning” around the embroidery. This creates a subtle shadow effect that makes the stitches look like they are actually sunken into the skin.
Tips for the Perfect Spooky Hand
To ensure your amigurumi turns out looking just like the photos, keep these tips in mind:
- Tension is Key: When working amigurumi, try to keep your tension slightly tight. This prevents the white stuffing from peeking through your stitches.
- Magic Ring Security: When making the fingers, make sure your Magic Ring is pulled very tight. This prevents a hole from appearing at the very tip of the fingers.
- Wire Placement: If you use wire, make sure to wrap the ends of the wire in a little bit of extra stuffing or tape so they don’t poke through the crochet fabric.
- Embroidery Placement: When doing the black thread embroidery, try to go through both the front and back of the stitches to ensure the thread is secure and won’t snag.
Happy crocheting! You now have a custom, spooky little hand ready to haunt your home or join your favorite doll collection.