Easy Plush Crochet Bunny Pattern: A Step-by-Step Amigurumi Tutorial
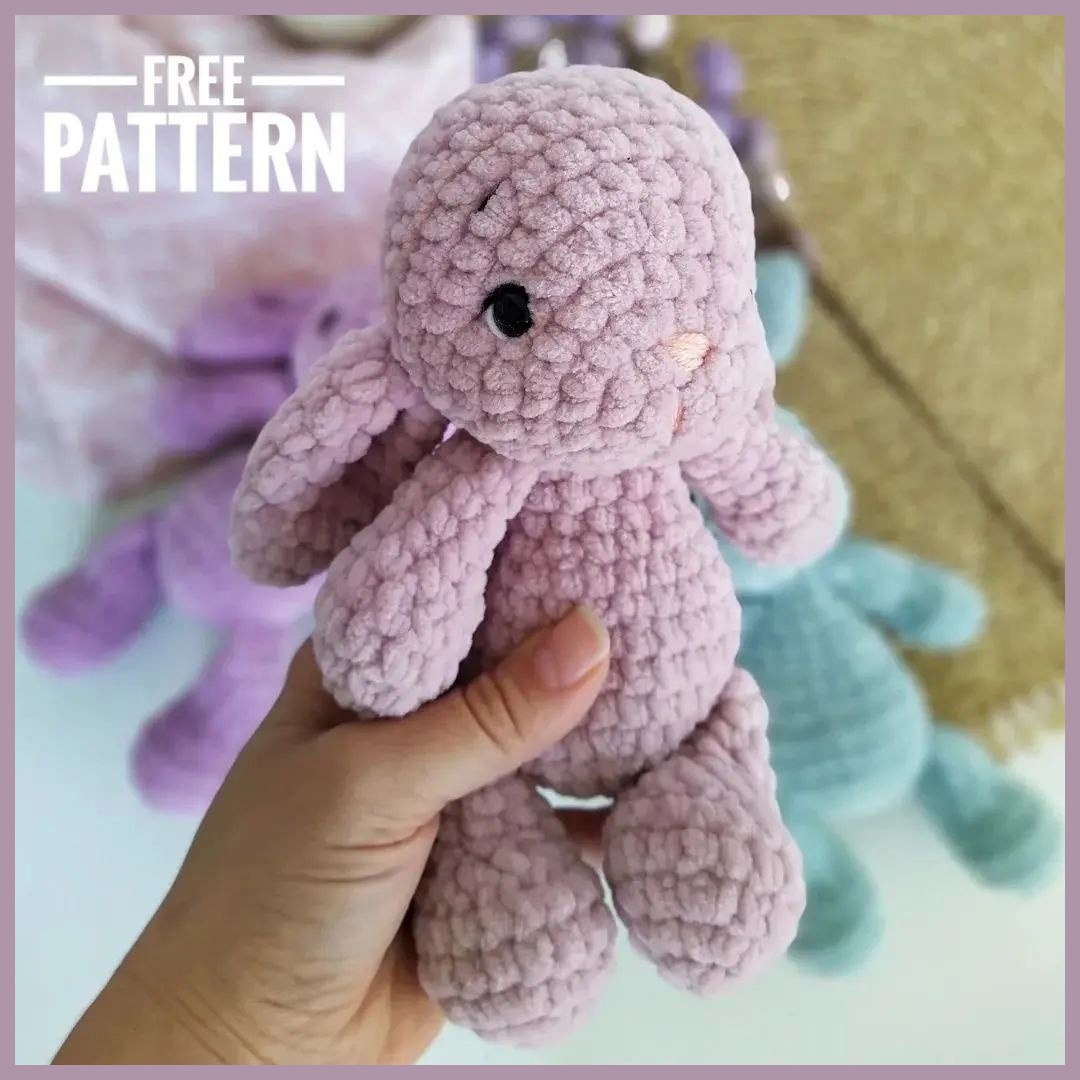
There is something undeniably magical about a handmade plushie. Whether it is a gift for a newborn, a nursery decoration, or a cozy companion for a child, a crochet bunny made from soft, velvet-style yarn is a timeless treasure. If you are looking for a project that is both quick to complete and incredibly rewarding, you have come to the right place!
This plush bunny pattern is designed with beginners in mind. Using chunky, “chenille” or plush yarn, you can create a large, squishy, and adorable character in a relatively short amount of time. The texture of the yarn hides many of the imperfections that often challenge new crocheters, making it the perfect medium for practicing your amigurumi skills. In this tutorial, we will walk through every single step, from the tiny magic ring to the final embroidered details that bring this little bunny to life.
Materials & Abbreviations
Before we pick up our hooks, let’s make sure you have everything you need. Because we are working with plush yarn, the thickness of your hook and the size of your safety eyes are important for achieving the right look and feel.
Required Materials
- Plush/Velvet Yarn: A soft, child-friendly plush yarn in your choice of color (the example shown is a lovely lavender/purple).
- Crochet Hook: 4 mm (standard for this weight of yarn to ensure tight stitches).
- Safety Eyes: 9 mm to 12 mm black safety eyes.
- Embroidery Thread: A small amount of white cotton thread (for eye highlights), black cotton thread (for eyebrows and eye details), and pink thread (for the nose).
- Stuffing: High-quality polyester fiberfill.
- Tools: A large tapestry needle for sewing pieces together and a fine embroidery needle for facial details.
Abbreviations (US Terms)
- MR: Magic Ring
- sc: Single crochet
- inc: Increase (2 sc in the same stitch)
- dec: Decrease (sc 2 stitches together)
- st(s): Stitch(es)
- [ ] x 6: Repeat the instructions inside the brackets 6 times
Step-by-Step Instructions
The Head
The head is the centerpiece of your bunny. Following these steps carefully will ensure you create a nice, rounded shape that is easy to stuff.
- 6 sc in MR (6)
- 6 inc (12)
- (1 inc, 1 sc) x 6 (18)
- (1 inc, 2 sc) x 6 (24)
- (1 inc, 3 sc) x 6 (30)
- 30 sc (30)
- (1 inc, 4 sc) x 4, 10 sc (34)
- Rounds 8, 9, and 10: 34 sc (34)
- 1 dec, 6 sc, 1 dec, 7 sc, 1 dec, 6 sc, 1 dec, 7 sc (30)
Eye Placement: Before continuing, insert your safety eyes between rounds 5 and 6. Aim for approximately 11 stitches between the eyes. You can adjust this slightly depending on how wide you want the bunny’s gaze to be.
- (1 dec, 3 sc) x 6 (24)
Stuff the head firmly with fiberfill.
- (1 dec, 2 sc) x 6 (18)
- (2 dec, 1 sc) x 6 (12)
- 6 dec (0)
Fasten off and leave a long tail for sewing.
The Body
The body features a slight “belly” shaping to give the bunny a cute, pear-like silhouette.
- 6 sc in MR (6)
- 6 inc (12)
- (1 inc, 1 sc) x 6 (18)
- (1 inc, 2 sc) x 6 (24)
- (1 inc, 3 sc) x 6 (30)
- Rounds 6, 7, and 8: 30 sc (30)
- (1 dec, 1 sc) x 6, 12 sc (24) — This round creates the belly shape.
- 24 sc (24)
- (1 dec, 2 sc) x 6 (18)
- 18 sc (18)
- (1 dec, 4 sc) x 3 (15)
- 15 sc (15)
Stuff the body firmly.
The Ears
Make two ears. You can make them longer or shorter by adding more rounds to the middle section if you prefer a different look.
- 6 sc in MR (6)
- (1 inc, 1 sc) x 3 (9)
- (1 inc, 2 sc) x 3 (12)
- (1 inc, 3 sc) x 3 (15)
- Rounds 5 through 9: 15 sc (15)
Fasten off, leaving a tail for sewing. To close the bottom of the ear, crochet one single round of sc through the sides of the piece to flatten it.
The Arms
Make two arms.
- 6 sc in MR (6)
- 6 inc (12)
- Rounds 3 and 4: 12 sc (12)
- (1 dec, 2 sc) x 3 (9)
- Rounds 6 through 9: 9 sc (9)
Stuff lightly. Close the sides with one round of sc. Fasten off, leaving a tail for sewing.
The Legs
Make two legs.
- 6 sc in MR (6)
- 6 inc (12)
- (1 inc, 1 sc) x 6 (18)
- Rounds 4 and 5: 18 sc (18)
- 4 dec, 10 sc (14)
- 2 dec, 10 sc (12)
- Rounds 8, 9, and 10: 12 sc (12)
Stuff lightly. Close the sides with one round of sc. Fasten off, leaving a tail for sewing.
The Tail
- 6 sc in MR (6)
- 6 inc (12)
- (1 inc, 1 sc) x 6 (18)
- Rounds 4 and 5: 18 sc (18)
- (1 dec, 1 sc) x 6 (12)
Stuff and fasten off.
Finishing
Assembly is where your bunny truly starts to look like a character! Take your time with this part to ensure everything is symmetrical.
Assembly Steps
- The Head: Sew the head to the top of the body.
- The Body: Ensure the “belly” (the wider part of the body) is facing forward.
- The Arms: Sew the arms directly underneath the head area on the sides of the body.
- The Legs: Sew the legs to the bottom of the body, positioned between rounds 5 and 6.
- The Tail: Sew the tail onto the back of the body.
- The Ears: Sew the ears to the top of the head or slightly to the sides, depending on your preferred style.
Facial Details
To give your bunny its personality, follow these final artistic steps:
- Shaping: Use your cotton thread to pull the skin slightly between and around the safety eyes. This creates a “dimpled” look that makes the eyes appear deep-set and expressive.
- Eyes: Use white thread to stitch a tiny vertical line or dot in the corner of each eye to create a “sparkle” or reflection.
- Eyebrows & Eye Lines: Use black thread to embroider cute eyebrows and small lines around the eyes to give the bunny a gentle, sleepy expression.
- Nose: Use your pink thread to embroider a small, cute nose right between the eyes.
Tips for Success
Crocheting with plush or velvet yarn is a bit different than working with standard cotton or acrylic. Here are a few professional tips to help you succeed:
Working with Plush Yarn
Plush yarn can be tricky because the “fuzz” often hides your stitches. I highly recommend using a stitch marker for every single round. If you lose count, it can be very difficult to find your place once the yarn is worked up. Also, try to maintain consistent tension; if you pull too hard, the yarn can stretch, but if it’s too loose, you might see the stuffing through the holes.
Perfect Stuffing
When stuffing amigurumi, aim for a firm shape but avoid overstuffing to the point where the stitches stretch or look distorted. For the head, you want it quite firm to maintain the round shape. For the limbs, a lighter stuff is better so they remain soft and “floppy” enough for a child to play with.
Hiding the Gaps
If you notice small holes appearing where you join pieces (like where the arms meet the body), don’t panic! You can easily hide these by using a bit of extra yarn to weave through the stitches and “seal” the gap, or by slightly pulling the surrounding stitches tighter during assembly.
Happy crocheting! You now have a beautiful, cuddly bunny ready to find its forever home.