Adorable Amigurumi Crochet Bunny Pattern: A Step-by-Step Guide
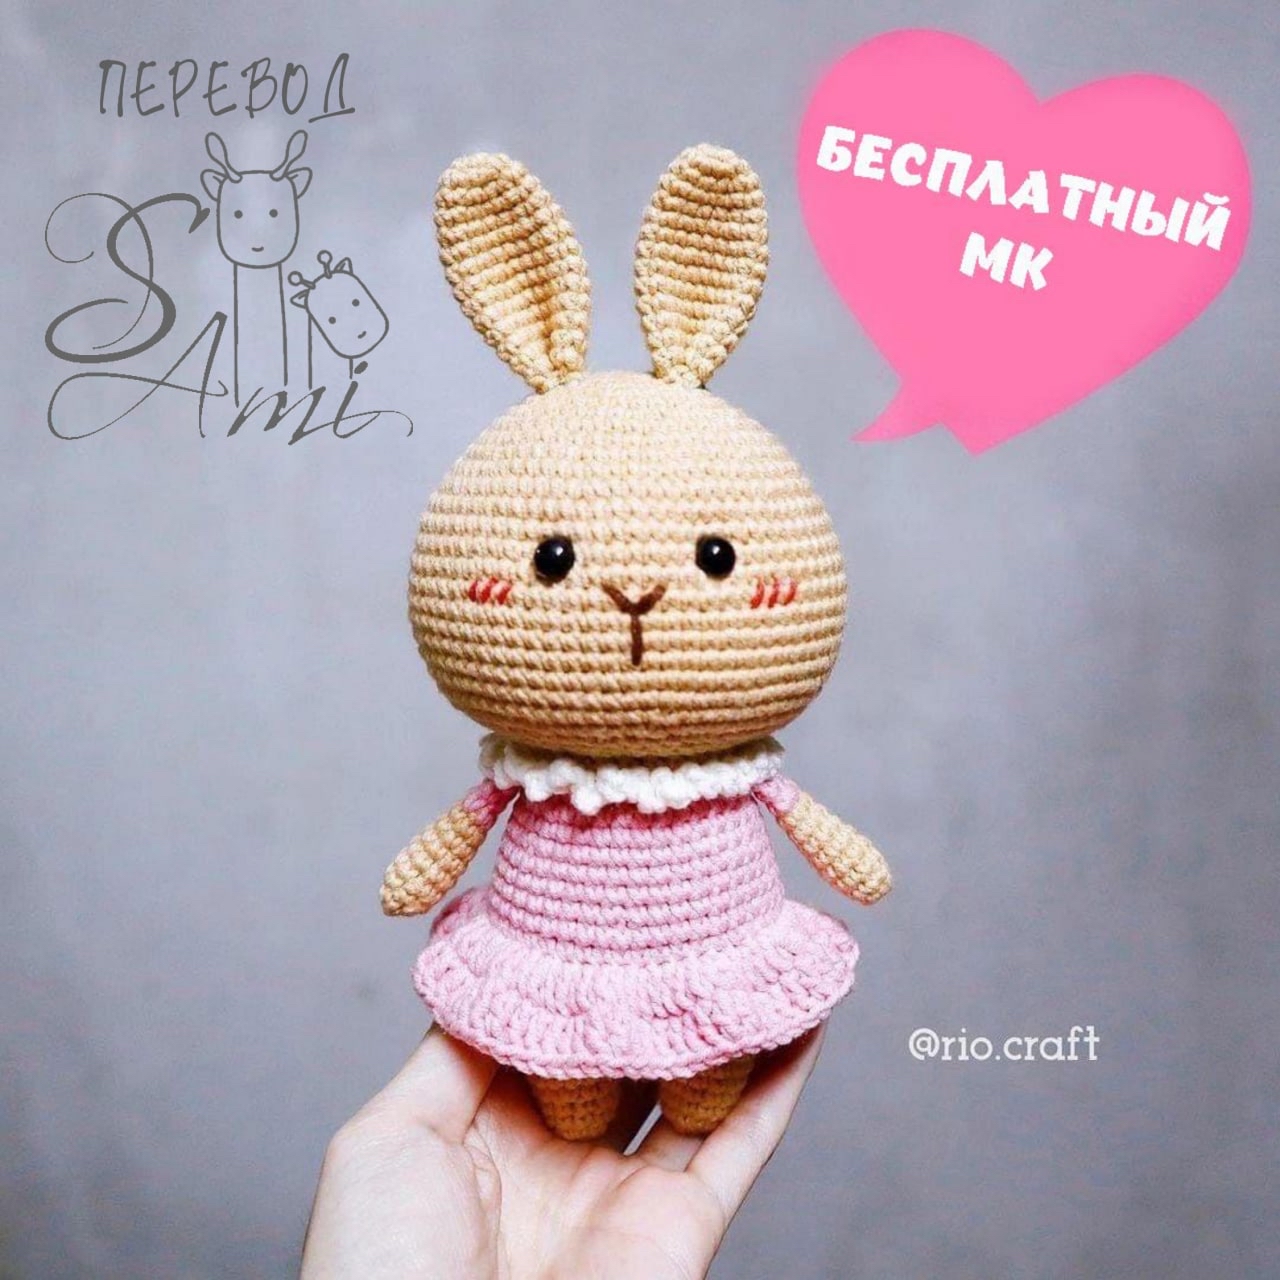
Are you looking for your next perfect crochet project? Whether you are searching for a sweet nursery decoration, a handmade gift for a loved one, or simply a relaxing weekend project, this adorable amigurumi bunny is the answer. This little bunny, with its oversized ears and charming pink dress, is designed to be both cute and beginner-friendly. If you have mastered the basics of single crochet, you are ready to bring this little friend to life!
In this detailed tutorial, we will walk you through every single stitch. From shaping the round head to creating that dainty ruffled collar, this pattern is structured to ensure you have a smooth and enjoyable crafting experience. Grab your favorite yarn and your crochet hook, and let’s get started on this whimsical crochet rabbit!
Materials and Abbreviations
Before you dive into the stitches, it is important to have all your supplies ready. Using the right tools will help ensure your bunny looks professional and holds its shape well.
Required Materials
- Yarn: Medium weight (worsted) crochet yarn in three colors: Beige (for the head, ears, arms, and legs), Pink (for the dress and arm accents), and White (for the collar). We recommend a cotton or cotton-blend yarn for better stitch definition. You will need approximately 150-200 yards total.
- Crochet Hook: A 2.5 mm (B-1) crochet hook. If your yarn is slightly thicker, a 3.0 mm hook may work, but a smaller hook helps keep the stuffing from showing through.
- Safety Eyes: 8 mm (approximately 5/16 inch) safety eyes.
- Stuffing: High-quality polyester fiberfill.
- Extras: A yarn needle for sewing, stitch markers to keep track of your rounds, and sharp scissors.
- Embroidery Thread: Brown yarn or embroidery floss for the nose and red yarn or floss for the rosy cheeks.
Abbreviations (US Terms)
Please ensure you are using US crochet terminology to follow this pattern accurately:
- MR: Magic Ring (also known as Magic Circle)
- Ch: Chain
- Sc: Single Crochet
- Dc: Double Crochet
- Inc: Increase (2 sc in one stitch)
- Dec: Decrease (use the invisible decrease method for a cleaner look)
- Sl st: Slip Stitch
- BLO: Back Loop Only
- St(s): Stitch(es)
- ( ): Repeat the instructions within the parentheses the specified number of times.
Step-by-Step Instructions
General Note: Work in continuous rounds. Do not join each round with a slip stitch unless specifically instructed. Use a stitch marker to mark the beginning of every round.
The Head
Using beige yarn, start with a magic ring.
- Round 1: 6 sc in MR (6)
- Round 2: 6 inc (12)
- Round 3: (1 sc, inc) x 6 (18)
- Round 4: (inc, 2 sc) x 6 (24)
- Round 5: (3 sc, inc) x 6 (30)
- Round 6: (2 sc, inc, 2 sc) x 6 (36)
- Round 7: (inc, 5 sc) x 6 (42)
- Round 8: (3 sc, inc, 3 sc) x 6 (48)
- Round 9: (7 sc, inc) x 6 (54)
- Round 10: (4 sc, inc, 4 sc) x 6 (60)
- Round 11: (9 sc, inc) x 6 (66)
- Round 12: (5 sc, inc, 5 sc) x 6 (72)
- Rounds 13-22: 72 sc (10 rounds total)
- Round 23: (34 sc, dec) x 2 (70)
- Round 24: (5 sc, dec) x 10 (60)
- Round 25: (2 sc, dec, 2 sc) x 10 (50)
- Round 26: (3 sc, dec) x 10 (40)
- Round 27: (1 sc, dec, 1 sc) x 10 (30)
Fasten off, leaving a tail for sewing. Placement: Insert your 8 mm safety eyes between Rounds 15 and 16, ensuring they are approximately 8 stitches apart. Once the eyes are secure, stuff the head firmly with fiberfill.
The Legs (Make 2)
Using beige yarn, start with a magic ring.
- Round 1: 6 sc in MR (6)
- Round 2: 6 inc (12)
- Rounds 3-4: 12 sc (12)
- Round 5: (3 sc, inc) x 3 (15)
- Rounds 6-8: 15 sc, then join with a slip stitch. Fasten off.
The Body
To begin the body, join white yarn to the last slip stitch of the second leg using your crochet hook. We will work the body around both legs to connect them.
- Round 1: Ch 3, then work 15 sc around the first leg (starting from the slip stitch), 3 sc along the side of the foundation chain, 15 sc around the second leg (starting from the slip stitch), and 3 sc along the other side of the foundation chain (36)
- Round 2: (5 sc, inc) x 6 (42)
- Rounds 3-7: 42 sc. Stuff the legs firmly with fiberfill as you work.
Fasten off the white yarn and join pink yarn to the body.
- Round 8: 42 sc in BLO (Back Loop Only)
- Round 9: 42 sc
- Round 10: (6 sc, dec, 6 sc) x 3 (39)
- Rounds 11-12: 39 sc
- Round 13: (11 sc, dec) x 3 (36)
- Rounds 14-15: 36 sc
- Round 16: (4 sc, dec) x 6 (30)
- Round 17: 30 sc
Fasten off the pink yarn and join beige yarn to the bottom edge.
- Round 18: 30 sc in BLO. Fasten off, leaving a long tail for sewing the body to the head later.
The Pink Dress
Turn the body inside out to work the dress on the exterior. Join pink yarn to the last front loop of Round 7 of the body.
- Round 1: Ch 2, 2 dc in the same stitch, 2 dc in the next st, 1 dc in the next st, (2 dc in the next st, 2 dc in the next st, 1 dc in the next st) repeat the pattern within parentheses until the end of the round, join with a slip stitch to the first dc of the round (70)
- Round 2: Ch 2, 1 dc in the same st, 1 dc in every stitch around, join with a slip stitch. Fasten off.
The Sweet White Collar
Turn the body upside down (so the top of the body is facing you). Join white yarn to the last front loop of Round 18 of the body.
- Round 1: (Ch 4, sl st in the next st) repeat from start to finish around the entire edge. Fasten off.
Now, finish stuffing the body with fiberfill.
The Long Ears (Make 2)
Using beige yarn, start with a magic ring.
- Round 1: 6 sc in MR (6)
- Round 2: 6 inc (12)
- Round 3: 12 sc (12)
- Round 4: (3 sc, inc) x 3 (15)
- Round 5: 15 sc (15)
- Round 6: (4 sc, inc) x 3 (18)
- Round 7: 18 sc (18)
- Round 8: (8 sc, inc) x 2 (20)
- Rounds 9-14: 20 sc (6 rounds)
Fasten off, leaving a long tail. To give the ears their shape, flatten them out (do not stuff) and sew them together along the edge.
The Tiny Arms (Make 2)
Using beige yarn, start with a magic ring.
- Round 1: 6 sc in MR (6)
- Round 2: (1 sc, inc) x 3 (9)
- Rounds 3-8: 9 sc (6 rounds)
Fasten off the beige yarn and join pink yarn to the arm.
- Round 9: 9 sc
- Round 10: 1 dec, 7 sc (8)
- Round 11: 2 sc, then fold the arm in half so the two sides meet. Join the two sides together by crocheting 4 sc through both layers at once. Fasten off, leaving a long tail for sewing.
Finishing
Assembly and Decoration
Now comes the most rewarding part: putting your bunny together!
- Ears: Sew the ears to the top of the head. Position them according to your preference for a cute, upright look.
- Arms: Sew the arms to the sides of the body, just below the neckline/collar area.
- Head to Body: Use the long tail from the body to sew the head onto the body. Ensure it is centered and secure.
- Face Details: Using brown embroidery thread or yarn, stitch a small “Y” shape to create the nose and mouth. Finally, use red thread to stitch two small horizontal lines on the cheeks to give your bunny a sweet, blushing expression.
Tips for Success
- Invisible Decreases: When working on the head and body, always use the “invisible decrease” (inserting the hook into the front loops only of the next two stitches) to prevent gaps in your amigurumi.
- Tension Control: Try to keep your tension consistent. If your stitches are too loose, the stuffing will peek through; if they are too tight, it will be difficult to insert your hook.
- Stuffing: Stuff your pieces firmly but avoid overstuffing to the point where the stitches stretch or distort.
- Color Changes: When changing colors, try to change the yarn on the last pull-through of the stitch before the new color to make the transition look seamless.