Crochet Convertible Blanket Bag Pattern: Step-by-Step Tutorial
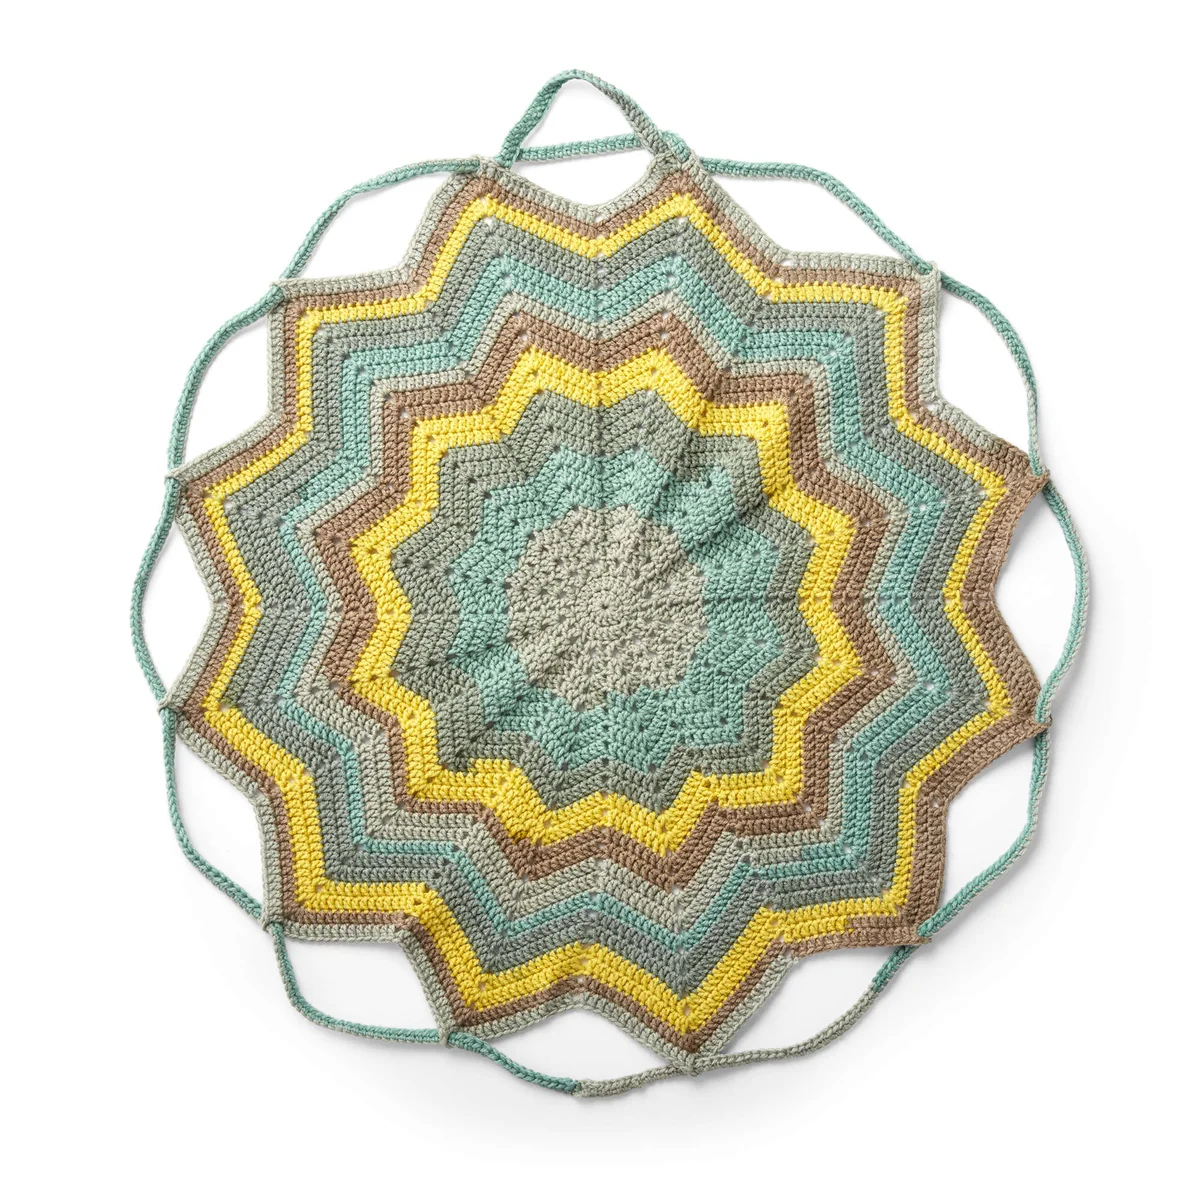
Imagine heading to the park or beach with a stylish tote bag, laying it down, and transforming it instantly into a cozy, 12-pointed circular picnic blanket. That is the magic of the crochet convertible blanket bag! This clever 2-in-1 project combines function and beauty, making it one of the most versatile accessories you can stitch up this season.
Designed with a textured starburst motif, this blanket utilizes clever increases and built-in cinch channels. When you are done relaxing outdoors, simply pull the drawstring, and the blanket gathers right back into a portable tote bag with a comfortable shoulder strap. Whether you are an adventurous beginner looking to expand your skills or an experienced crocheter seeking a practical weekend project, this step-by-step tutorial will guide you through every stitch.
Materials & Abbreviations
Required Materials
- Yarn: Medium Weight / Worsted Weight Yarn (Category 4), approximately 840 yards total (3 cakes/skeins of 280 yards / 5 oz each). Self-striping cake yarn creates beautiful color rings automatically!
- Crochet Hook: Size US H/8 (5.0 mm), or size needed to obtain gauge.
- Notions: Tapestry needle for weaving in ends, scissors, and a measuring tape.
Gauge & Finished Size
- Gauge: 12 single crochet stitches and 13 rows = 4 inches.
- Finished Measurement: Approximately 33 inches in diameter when laid flat as a blanket.
Abbreviations (US Crochet Terms)
- Beg: Beginning
- Ch: Chain
- Dc: Double crochet
- Hdc: Half double crochet
- Pat: Pattern
- Rep: Repeat
- Rnd(s): Round(s)
- Sc: Single crochet
- Sl st: Slip stitch
- Sp(s): Space(s)
- St(s): Stitch(es)
Special Stitches
- V-Stitch (V-st): (1 dc, ch 2, 1 dc) in the specified stitch or space.
- Shell: (2 dc, ch 2, 2 dc) in the specified stitch or space.
- Beginning Shell (Beg Shell): (Ch 3, 1 dc, ch 2, 2 dc) in the specified stitch or space.
Step-by-Step Instructions
Note: The beginning chain-3 (ch 3) of every round counts as 1 double crochet (dc) throughout the pattern.
Section 1: The Blanket Body
To begin, chain 4. Join with a slip stitch to the first chain to form a central ring.
1st Round: Ch 3. Work 11 dc into the ring. Join with a sl st to the top of the beg ch-3. (12 dc)
2nd Round: Ch 3. Work 1 dc in the same space as the last sl st. Work 2 dc in each dc around. Join with a sl st to the top of the beg ch-3. (24 dc)
3rd Round: Ch 5 (counts as 1 dc and ch 2). Work 1 dc in the same space as the last sl st. *Skip the next dc. Work a V-st (1 dc, ch 2, 1 dc) in the next dc. Rep from * around to the last dc. Skip the last dc. Join with a sl st to the 3rd chain of the beg ch-5. (12 V-stitches)
4th Round: Sl st into the first ch-2 space. Ch 3, then work (1 dc, ch 2, 2 dc) in the same space—beg Shell made. *Work a Shell (2 dc, ch 2, 2 dc) in the ch-2 sp of the next V-st. Rep from * around. Join with a sl st to the top of the beg ch-3. (12 Shells)
5th Round: Sl st in the next dc. Ch 3. *Work a Shell in the next ch-2 sp. 1 dc in the next dc. Skip the next 2 dc. 1 dc in the next dc. Rep from * around to the last ch-2 sp. Work a Shell in the next ch-2 sp. 1 dc in the next dc. Skip the last dc. Join with a sl st to the top of the beg ch-3.
6th Round: Sl st in the next dc. Ch 3. 1 dc in the next dc. *Work a V-st in the next ch-2 sp. 1 dc in each of the next 2 dc. Skip the next 2 dc. 1 dc in each of the next 2 dc. Rep from * around. Join with a sl st to the top of the beg ch-3.
7th Round: Sl st in the next dc. Ch 3. 1 dc in the next dc. *Work a Shell in the next ch-2 sp. 1 dc in each of the next 2 dc. Skip the next 2 dc. 1 dc in each of the next 2 dc. Rep from * around. Join with a sl st to the top of the beg ch-3.
8th Round: Sl st in the next dc. Ch 3. 1 dc in each of the next 2 dc. *Work a Shell in the next ch-2 sp. 1 dc in each of the next 3 dc. Skip the next 2 dc. 1 dc in each of the next 3 dc. Rep from * around. Join with a sl st to the top of the beg ch-3.
9th Round: Sl st in the next dc. Ch 3. *1 dc in each dc up to the next ch-2 sp. Work a V-st in the next ch-2 sp. 1 dc in each dc to the center 2 dc of the valley. Skip the next 2 dc. Rep from * around. Join with a sl st to the top of the beg ch-3.
10th and 11th Rounds: Sl st in the next dc. Ch 3. *1 dc in each dc up to the next ch-2 sp. Work a Shell in the next ch-2 sp. 1 dc in each dc to the center 2 dc of the valley. Skip the next 2 dc. Rep from * around. Join with a sl st to the top of the beg ch-3.
Continuing the Blanket Pattern: Repeat the last 3 rounds (Rounds 9, 10, and 11), keeping in mind that 2 rounds of “Shell in next ch-2 sp” will alternate with 1 round of “V-st in next ch-2 sp”. Continue this repeating sequence until your work measures approximately 33 inches in diameter across. Fasten off and weave in loose ends.
Section 2: Crafting the Drawstring
The drawstring creates the cinch mechanism that turns the blanket into a bag.
Chain Creation: Work a foundation chain long enough to thread loosely through all 12 outer points (ch-2 spaces) of your finished blanket edge (approximately 80 to 90 inches long).
1st Row: Work 1 hdc in the 3rd chain from the hook, then work 1 hdc in each chain stitch to the end of the chain. Fasten off.
Section 3: Crafting the Handle
The shoulder strap gives you a comfortable way to carry your gathered tote bag.
Chain Creation: Work a foundation chain long enough to stretch comfortably between 2 outer points of your blanket (approximately 20 to 24 inches long).
1st Row: Work 1 dc in the 4th chain from the hook, then work 1 dc in each chain stitch across to the end of the chain. Fasten off.
Finishing
Assembling your convertible blanket bag takes only a few quick steps:
- Thread the Drawstring: Take your finished drawstring strap and thread it through the peak ch-2 spaces at each of the 12 star points along the outer round of the blanket.
- Secure the Drawstring Ends: Bring the two ends of the drawstring together and firmly sew them to each other using your yarn needle.
- Attach the Handle: Position the ends of your handle strap at two adjacent outer points on the drawstring. Securely sew each end of the handle directly to the drawstring.
- Convert into a Bag: Place your items in the center of the blanket, pull the drawstring tight to gather the points upward, and knot or tie the drawstring secure. You are ready to carry your tote!
Tips
- Yarn Selection: Self-striping cake yarns work wonderfully for this pattern because the color shifts accentuate the radiating star points without requiring you to weave in dozens of yarn ends.
- Checking Your Gauge: Take a moment to check your gauge after completing the first few rounds. If your circle buckles into a bowl, your stitches may be too tight; if it ruffles heavily, your stitches might be too loose. Adjust your hook size accordingly.
- Counting Stitches: Always make sure you skip the exact 2 center stitches in each “valley” between the points. Skipping these stitches keeps your star shape flat and perfectly balanced.
- Customizing the Size: Want a larger throw blanket? Simply continue repeating the 3-round pattern sequence until it reaches your desired size before making your drawstring and handle!