Free Chill Duck Amigurumi Crochet Pattern: Easy Step-by-Step Guide
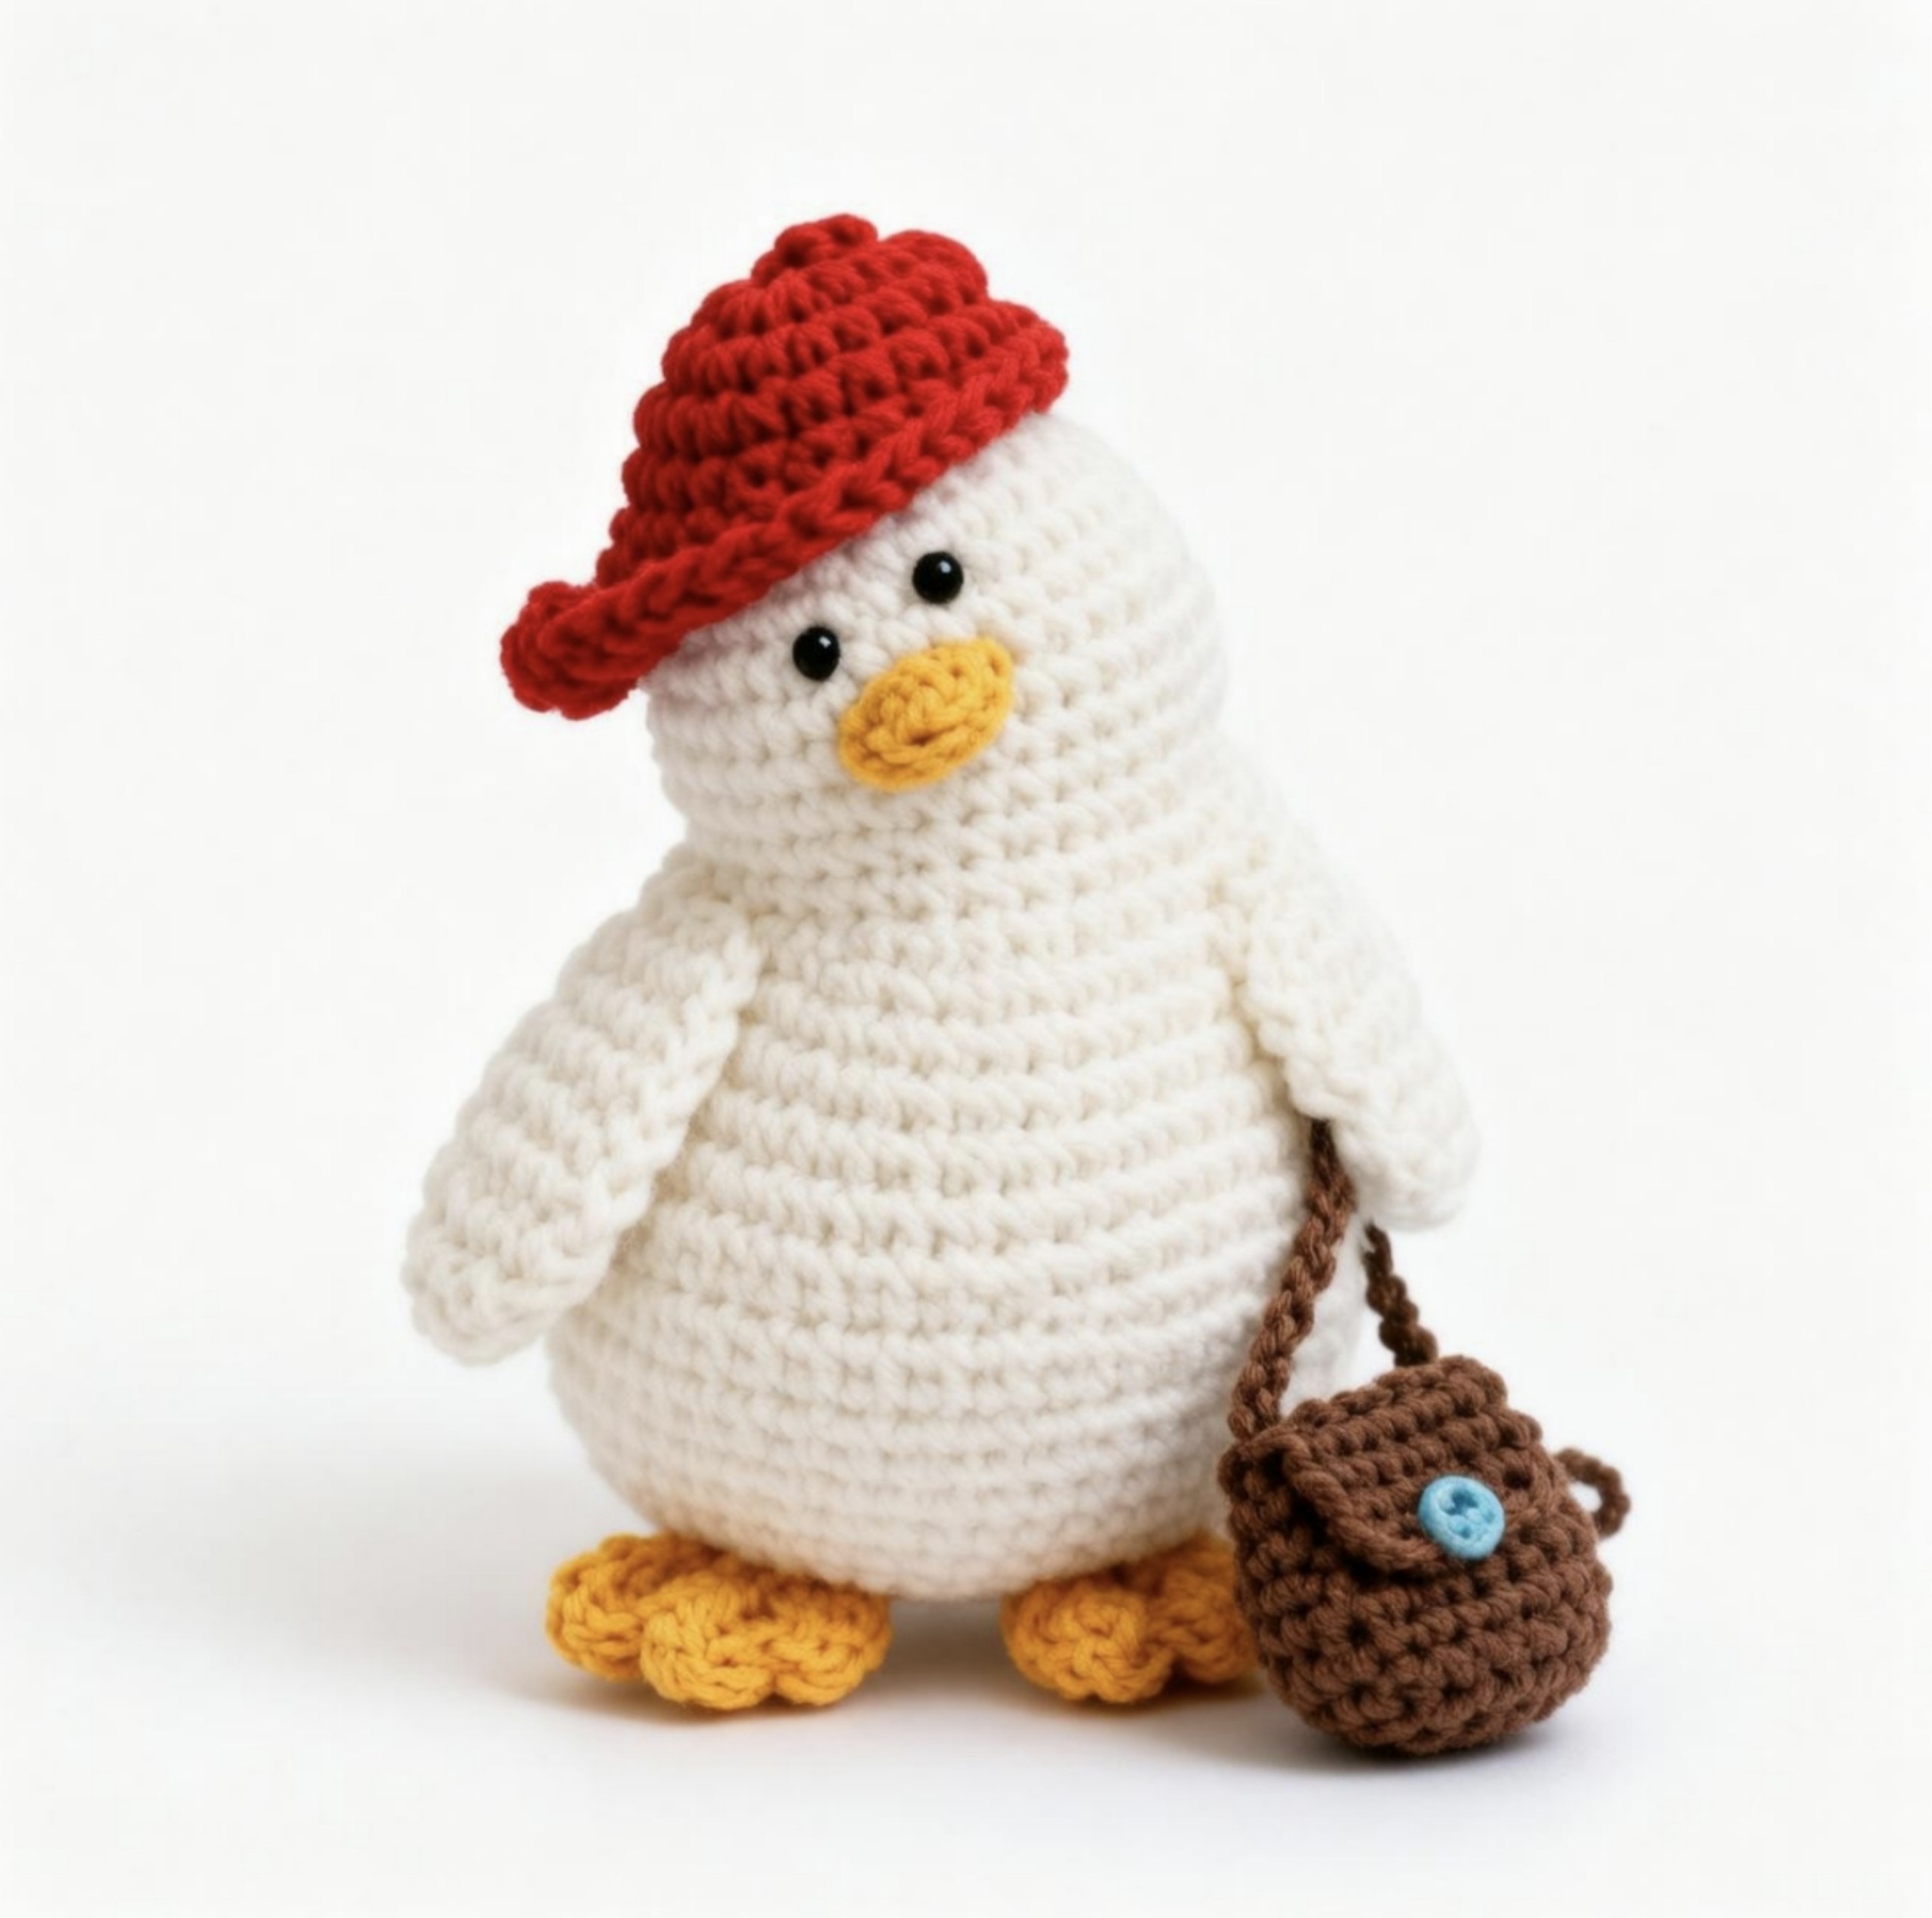
Looking for a fun, relaxed crochet project with tons of personality? This free chill duck amigurumi crochet pattern is the perfect plushie project for beginners and seasoned crocheters alike. Featuring a laid-back slouchy cap, a cute mini crossbody bag, webbed feet, and an adorable squishy shape, this little duck brings endless charm to any desk, shelf, or gift basket.
This tutorial is written in standard US crochet terminology with clear step-by-step instructions. The finished amigurumi duck stands approximately 5 to 6 inches tall using worsted weight yarn, making it a fast and satisfying stash-buster project!
Introduction
Amigurumi ducks have taken the crafting community by storm, but this cool duck takes relaxation to a whole new level. Equipped with his cozy red beanie cap and a handy side satchel, he looks ready to stroll through the park or sip a lukewarm iced coffee. Whether you are crafting for a animal lover or adding to your own plushie collection, this detailed tutorial will guide you through every stitch from beak to webbed feet.
Materials & Crochet Abbreviations
Materials Needed
- Yarn: Worsted weight yarn (#4 medium) in Off-White/Cream (approx. 60 yards), Yellow/Orange (approx. 15 yards), Red (approx. 10 yards), and Brown (approx. 10 yards).
- Crochet Hook: Size E-4 / 3.5 mm crochet hook (or size needed to obtain tight stitches so stuffing won’t show).
- Safety Eyes: 1 pair of 6 mm black safety eyes.
- Fiberfill Stuffing: High-quality polyester stuffing.
- Tapestry Needle: Large-eye yarn needle for weaving ends and sewing pieces together.
- Stitch Marker: Essential for keeping track of continuous rounds.
- Scissors: For trimming yarn tails.
- Optional Button: Small 6 mm blue button for the bag flap accent.
Crochet Abbreviations (US Terms)
- ch: chain
- sc: single crochet
- inc: single crochet increase (2 single crochets in the same stitch)
- dec: single crochet decrease (sc2tog)
- hdc: half double crochet
- dc: double crochet
- tr: treble (triple) crochet
- sl st: slip stitch
- st(s): stitch(es)
- MR: magic ring
- BLO: back loop only
- FLO: front loop only
- [ ] x N: repeat the instructions inside brackets N times
- (N): total stitch count at the end of the round/row
Step-by-Step Instructions
1. Head and Body
The head and body are worked in one continuous piece from top to bottom, shaping the relaxed posture of the duck as you stitch down.
Using Off-White/Cream yarn:
- Round 1: 6 sc in a MR (6)
- Round 2: [inc] x 6 (12)
- Round 3: [1 sc, inc] x 6 (18)
- Rounds 4–6: 18 sc around (18)
- Round 7: Sl st to the 7th st of Round 6, then work 6 sc (6)
- Round 8: Sl st to the 6th st of Round 6, then work [2 sc, inc, 2 sc, inc, 2 sc] (8)
- Round 9: Sl st to the 5th st of Round 6, then work 12 sc (12)
- Round 10: Sl st to the 4th st of Round 6, then work [5 sc, inc, 2 sc, inc, 5 sc] (14)
- Round 11: Sl st to the 1st st of Round 6, then work 22 sc (22)
- Round 12: Sl st to the 7th st of Round 11, then work 10 sc (10)
- Round 13: Sl st to the 6th st of Round 11, then work [4 sc, inc, 2 sc, inc, 4 sc] (12)
- Round 14: Sl st to the 5th st of Round 11, then work 16 sc (16)
- Round 15: Sl st to the 4th st of Round 11, then work [7 sc, inc, 2 sc, inc, 7 sc] (18)
- Round 16: Sl st to the 1st st of Round 11, then work 26 sc (26)
- Round 17: 26 sc around (26)
- Round 18: [12 sc, inc] x 2 (28)
- Round 19: [3 sc, inc, 3 sc] x 4 (32)
- Rounds 20–23: 32 sc around (32)
Note: Insert safety eyes between Rounds 5 and 6, spaced about 4 stitches apart. Begin stuffing the head firmly and continue stuffing the body as you close it.
- Round 24: [1 sc, dec, 1 sc] x 8 (24)
- Round 25: [1 sc, dec] x 8 (16)
- Round 26: [dec] x 8 (8)
Fasten off, weave the tail through the front loops of the remaining 8 stitches, pull tight to close, and hide the end inside the body.
2. Duck Wings (Make 2)
The wings are worked in short turned rows, then finished with a clean single crochet edge.
Using Off-White/Cream yarn:
- Row 1: Ch 2, turn, starting in 2nd ch from hook: inc (2). Turn.
- Row 2: Ch 1, turn: 1 sc, inc (3). Turn.
- Rows 3–4: Ch 1, turn: 3 sc (3). Turn.
- Row 5: Ch 1, turn: dec, 1 sc (2).
Wing Edging: Work sc stitches evenly down both side edges of the wing piece. At the sharp corner tip, work 3 sc into the same corner space to round it smoothly. Fasten off, leaving a long tail (approx. 8 inches) for sewing.
3. Webbed Feet (Make 2)
Using Yellow/Orange yarn:
- Round 1: 6 sc in a MR (6)
- Round 2: In BLO: [inc] x 6 (12)
- Round 3: [Ch 2, 1 dc, ch 2, sl st into same base st, ch 2, 1 dc, ch 2] x 2 to form webbed toes.
Foot Edging: Join yarn to the remaining free front loops (FLO) from Round 2 and work 6 sc across to form the heel base. Fasten off, leaving a long yarn tail for assembly.
4. Duck Beak
Using Yellow/Orange yarn:
- Row 1: Ch 3, turn, starting in the 2nd ch from hook: 2 sc (2).
Fasten off, leaving a 6-inch tail for sewing onto the face between the eyes.
5. Stylish Red Cap
Using Red yarn:
- Round 1: 6 sc in a MR (6)
- Round 2: [inc] x 6 (12)
- Round 3: [1 sc, inc] x 6 (18)
- Round 4: 18 sc around (18)
- Round 5 (Brim): In FLO: ch 2, 1 dc, 2 tr, 1 dc, ch 2, 1 sl st.
Fasten off, leaving a tail to attach securely or tilt cockily on top of the duck’s head.
6. Crossbody Satchel Bag
Using Brown yarn:
- Round 1: Ch 5, turn, starting in 2nd ch from hook: inc, 2 sc, 3 sc in last ch, turn to work on opposite side of foundation chain: 2 sc, 1 sc (10)
- Rounds 2–4: 10 sc around (10)
Bag Flap:
- Row 5: 5 sc across front half (5). Turn.
- Row 6: Ch 1, turn: dec, 1 sc, dec (3). Turn.
- Row 7: Ch 1, turn: dec, 1 sc (2). Fasten off.
Shoulder Strap: Join brown yarn to one upper side seam of the bag. Chain approximately 35 to 40 chains (about 6 to 7 inches in length), then slip stitch to attach to the opposite side seam. Fasten off and weave in loose ends. Sew a small decorative button onto the front flap if desired.
Assembly & Finishing
- Attach the Beak: Position the beak directly between the safety eyes on Rounds 5–6. Use a tapestry needle to stitch it flat against the face.
- Sew on Wings: Attach the wings onto the sides of the body around Rounds 8–12, angling them slightly backwards for a relaxed posture.
- Attach the Feet: Position the webbed feet on the bottom of Round 23, centered with the face. Sew securely so your duck can sit upright.
- Add Accessories: Place the red hat tilted over one side of the head, securing with a few subtle stitches if desired. Drape the crossbody bag strap over one shoulder and across the body.
Helpful Crochet Tips for Success
- Maintain Tight Tension: Amigurumi requires snug stitches so the fiberfill stuffing does not show through. If your stitches look loose, try stepping down half a hook size (e.g., to a 3.0 mm hook).
- Use Stitch Markers: Working in spiral rounds means it is easy to lose track of where a round begins. Mark the first stitch of every round.
- Stuff Incrementally: Add small clumps of stuffing bit by bit as you go, pushing it towards the outer walls to maintain a smooth shape without lumps.
- Custom Colorways: While cream, red, and yellow create a classic duck look, feel free to try pastel yellow, mallard green, or lilac for fun seasonal variations!