Crochet Frilled-Neck Lizard Pattern: A Complete DIY Amigurumi Guide
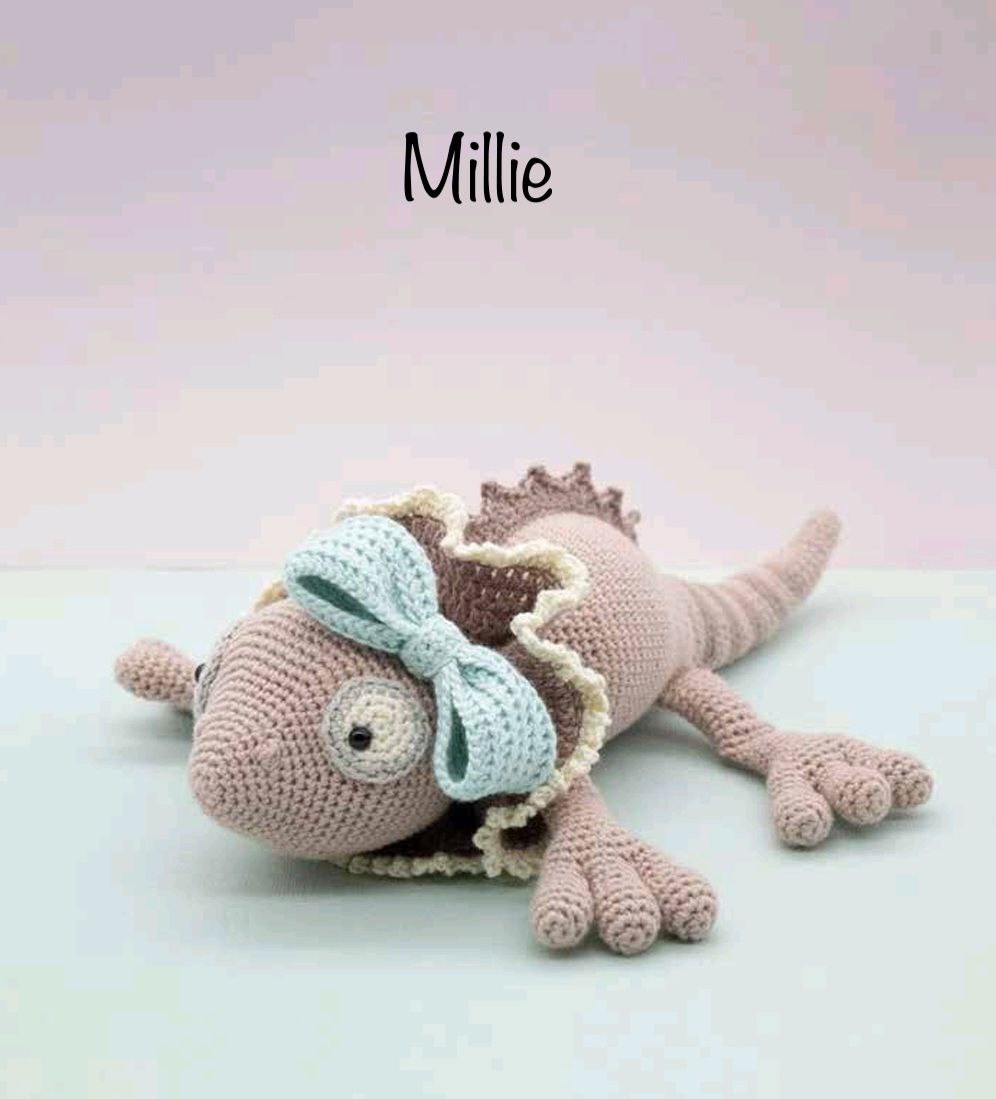
Are you looking for your next adorable crochet project? If you love prehistoric creatures with a touch of whimsy, you are going to adore making this frilled-neck lizard! Often affectionately called “Frilly,” this little amigurumi friend is the perfect size for nursery decor, a unique gift for dinosaur lovers, or a charming addition to your own crochet collection.
This pattern creates a lovable, soft lizard measuring approximately 10.5 inches long. While the design features some intricate details like the delicate neck frill and a cute bow, I have written this tutorial with a friendly, accessible tone to help you navigate the process. Grab your hook, pick out some pretty colors, and let’s bring this little lizard to life!
Materials & Abbreviations
To ensure your lizard turns out looking just like the pictures, I recommend using a smooth, fingering weight cotton yarn. This provides great stitch definition, which is helpful for the smaller details.
What You Will Need
- Yarn: Fingering weight cotton yarn (approximately 180 yards total). You will need the following colors:
- Pink (2 balls)
- Dusty Pink
- Off-white
- Light Aqua
- Light Gray
- Crochet Hook: 2.5 mm (B-1)
- Safety Eyes: 6 mm
- Other Supplies: Fiberfill stuffing, yarn needle, stitch markers, pins, and scissors.
Abbreviations (US Terms)
All measurements are in inches and counts are provided in brackets [ ] at the end of each round.
- ch: chain
- sc: single crochet
- inc: increase (2 sc in the same stitch)
- dec: decrease (sc 2 stitches together)
- slst: slip stitch
- hdc: half double crochet
- dc: double crochet
- BLO: back loop only
- st(s): stitch(es)
- rnd: round
- magic ring: a circular start to crochet work
Step-by-Step Instructions
The Eye Patch
Start with off-white yarn.
Round 1: Start with a magic ring and work 6 sc into it [6].
Round 2: Inc in every stitch around [12].
Round 3: (sc in the next st, inc in the next st) repeat 6 times [18].
Change to light gray yarn.
Round 4: (sc in the next 2 st, inc in the next st) repeat 6 times [24].
Slst in the next st. Fasten off, leaving a long yarn tail for sewing. Weave in your ends carefully.
The Head
Start with pink yarn.
Round 1: Start with a magic ring and work 6 sc into it [6].
Round 2: Inc in every stitch around [12].
Round 3: (sc in the next 2 st, inc in the next st) repeat 4 times [16].
Round 4: (sc in the next 3 st, inc in the next st) repeat 4 times [20].
Round 5: (sc in the next 4 st, inc in the next st) repeat 4 times [24].
Round 6: Sc in each of the 24 stitches [24].
Round 7: sc in next 2 st, inc in next st, sc in next 4 st, inc in next st, 3-dc-bobble in next st, sc in next st, inc in next st (mark this inc, it is the top center), sc in next 2 st, inc in next st (mark this inc, it also indicates the top center), sc in next st, 3-dc-bobble in next st, inc in next st, sc in next 4 st, inc in next st, sc in next 2 st [30].
Note: Gently push the 3-dc-bobbles outward to create the nostrils.
Round 8: Sc in each of the 30 stitches [30].
Round 9: sc in next 2 st, inc in next st, sc in next 5 st, (inc in next st, sc in next 3 st, inc in next st, sc in next 4 st) repeat 2 times, sc in next st, inc in next st, sc in next 2 st [36].
Round 10: Sc in all 36 stitches [36].
Round 11: sc in next 3 st, inc in next st, sc in next 6 st, (inc in next st, sc in next 4 st) repeat 3 times, inc in next st, sc in next 6 st, inc in next st, sc in next 3 st [42].
Round 12: sc in next 4 st, inc in next st, sc in next 7 st, inc in next st, sc in next 5 st, inc in next st, sc in next 6 st, inc in next st, sc in next 5 st, inc in next st, sc in next 7 st, inc in next st, sc in next 2 st [48].
Round 13: sc in next 5 st, inc in next st, sc in next 8 st, (inc in next st, sc in next 6 st) repeat 3 times, inc in next st, sc in next 8 st, inc in next st, sc in next 3 st [54].
Round 14: sc in next 5 st, inc in next st, sc in next 9 st, inc in next st, sc in next 7 st, inc in next st, sc in next 8 st, inc in next st, sc in next 7 st, inc in next st, sc in next 9 st, inc in next st, sc in next 3 st [60].
Round 15: sc in next 16 st, (inc in next st, sc in next 5 st) repeat 2 times, inc in next st, sc in next 4 st, inc in next st, (sc in next 5 st, inc in next st) repeat 2 times, sc in next 14 st [66].
Rounds 16-26: Sc in each of the 66 stitches [66].
Round 27: (sc in next 9 st, dec) repeat 6 times [60].
Round 28: (sc in next 8 st, dec) repeat 6 times [54].
Round 29: (sc in next 7 st, dec) repeat 6 times [48].
Round 30: (sc in next 6 st, dec) repeat 6 times [42].
Round 31: (sc in next 5 st, dec) repeat 6 times [36].
Stop and stuff the head firmly with fiberfill.
Round 32: (sc in next 4 st, dec) repeat 6 times [30].
Round 33: (sc in next 3 st, dec) repeat 6 times [24].
Round 34: Sc in all 24 stitches [24].
Round 35: (sc in next 2 st, dec) repeat 6 times [18].
Round 36: (sc in next st, dec) repeat 6 times [12].
Round 37: Dec 6 times [6].
Slst in the next st. Fasten off, leaving a tail for sewing. Use your needle to weave the tail through the front loops of the remaining stitches and pull tight to close.
The Body
Start with pink yarn.
Round 1: Start with a magic ring and work 6 sc into it [6].
Round 2: Inc in every stitch [12].
Round 3: (sc in next st, inc in next st) repeat 6 times [18].
Round 4: (sc in next 2 st, inc in next st) repeat 6 times [24].
Round 5: (sc in next 3 st, inc in next st) repeat 6 times [30].
Round 6: Sc in all 30 stitches [30].
Round 7: sc in next 10 st, inc in next st, sc in next 2 st, inc in next st (mark this inc as top center), sc in next 2 st, inc in next st (mark this inc as top center), sc in next 2 st, inc in next st, sc in next 10 st [34].
Round 8: Sc in all 34 stitches [34].
Round 9: sc in next 11 st, (inc in next st, sc in next 3 st, inc in next st, sc in next 2 st) repeat 2 times, sc in next 9 st [38].
Round 10: Sc in all 38 stitches [38].
Round 11: sc in next 12 st, (inc in next st, sc in next 3 st, inc in next st, sc in next 4 st) repeat 2 times, sc in next 8 st [42].
Round 12: Sc in all 42 stitches [42].
Round 13: sc in next 13 st, (inc in next st, sc in next 4 st) repeat 4 times, sc in next 9 st [46].
Round 14: Sc in all 46 stitches [46].
Round 15: sc in next 13 st, (inc in next st, sc in next 5 st, inc in next st, sc in next 6 st) repeat 2 times, sc in next 7 st [50].
Round 16: Sc in all 50 stitches [50].
Round 17: sc in next 14 st, (inc in next st, sc in next 6 st) repeat 4 times, sc in next 8 st [54].
Round 18: sc in next 13 st, (inc in next st, sc in next 4 st, inc in next st, sc in next 5 st) repeat 3 times, sc in next 8 st [60].
Round 19: sc in next 15 st, (inc in next st, sc in next 5 st) repeat 2 times, inc in next st, sc in next 4 st, inc in next st, (sc in next 5 st, inc in next st) repeat 2 times, sc in next 15 st [66].
Rounds 20-30: Sc in all 66 stitches [66].
Round 31: sc in next 17 st, (dec, sc in next 5 st) repeat 2 times, dec, sc in next 4 st, dec, (sc in next 5 st, dec) repeat 2 times, sc in next 13 st, (dec, sc in next 3 st) repeat 2 times, sc in next 13 st [60].
Round 32: sc in next 17 st, (dec, sc in next 4 st) repeat 6 times, sc in next 7 st [54].
Round 33: Sc in all 54 stitches [54].
Round 34: sc in next 15 st, (dec, sc in next 4 st, dec, sc in next 3 st) repeat 3 times, sc in next 6 st [48].
Round 35: Sc in all 48 stitches [48].
Round 36: sc in next 14 st, (dec, sc in next 3 st) repeat 2 times, dec, sc in next 2 st, dec, (sc in next 3 st, dec) repeat 2 times, sc in next 8 st [42].
Mark the 21st/22nd and 27th/28th stitches on Round 36; these indicate the top center of the body.
Round 37: Sc in all 42 stitches [42].
Round 38: sc in next 12 st, (dec, sc in next 2 st, dec, sc in next 3 st) repeat 3 times, sc in next 3 st [36].
Round 39: Sc in all 36 stitches [36].
Round 40: sc in next 12 st, (dec, sc in next 3 st, dec, sc in next 4 st) repeat 2 times, sc in next 2 st [32].
Round 41: Sc in all 32 stitches [32].
Round 42: BLO sc in all 32 stitches [32].
Slst in next st. Fasten off, leaving a long tail. Stuff the body firmly with fiberfill.
The Neck Frill
Start with dusty pink yarn.
Attach your yarn to the last front loop of Round 42 of the body. Work in joined rounds.
Round 1: ch 2, start in the same front loop where you joined, 2 dc in next 32 st, slst in first st [64].
Round 2: ch 2, dc back in the same st as the last slst, 2 dc in next st, (dc in next st, 2 dc in next st) repeat 31 times, slst in first st [96].
Rounds 3-5: ch 2, start in the same st where you made the last slst, dc in all 96 st, slst in first st [96].
Change to off-white yarn.
Round 6: ch 1, sc back in the same st as the last slst, ch 3, sc back in the same st, (sc in next st, ch 3, sc back in the same st) repeat 95 times, slst in first st [480].
Fasten off and weave in ends.
Toes, Feet, and Legs
Start with pink yarn.
Toes (Make 12):
Round 1: Magic ring, 6 sc [6].
Round 2: Inc in all 6 st [12].
Rounds 3-5: Sc in all 12 st [12].
Round 6: (sc in next st, dec) repeat 4 times [8].
Rounds 7-8: Sc in all 8 st [8].
Note: On two toes for each foot, slst and fasten off. On the third toe, do not fasten off; you will use this to continue the foot.
Foot and Leg (Make 4):
Round 1: Start after the marked last slst of toe 2, sc in next 4 st, insert hook after the marked last slst of toe 1, sc in next 8 st, sc in remaining 4 st on toe 2, sc in next 8 st on toe 3 [24].
Round 2: Sc in all 24 st [24].
Round 3: (sc in next 6 st, dec) repeat 3 times [21].
Round 4: (sc in next 5 st, dec) repeat 3 times [18].
Use toe yarn tails to sew gaps between toes.
Round 5: (sc in next 4 st, dec) repeat 3 times [15].
Round 6: (sc in next 3 st, dec) repeat 3 times [12].
Rounds 7-11: Sc in all 12 st [12].
Stuff the foot/lower leg firmly.
Round 12: Flatten the top of the lower leg to create a “knee.” Sc in next 6 st through both layers to close [6].
Round 13: ch 1, turn, sc in next 6 st using the front edges of Rnd 12, ch 1, turn, sc in next 6 st using the remaining unworked edges [12].
Rounds 14-21: Sc in all 12 st [12].
Round 22: sc in next 2 st [2]. Leave remaining stitches unworked. Stuff the upper leg, flatten the top, and sc in next 6 st through both layers to close.
The Tail
Start with pink yarn.
Round 1: Magic ring, 6 sc [6].
Round 2: Sc in all 6 st [6].
Round 3: (sc in next 2 st, inc in next st) repeat 2 times [8].
Round 4: Sc in all 8 st [8].
Round 5: (sc in next 3 st, inc in next st) repeat 2 times [10].
Round 6: Sc in all 10 st [10].
Round 7: (sc in next 4 st, inc in next st) repeat 2 times [12].
Round 8: Sc in all 12 st [12].
Round 9: (sc in next 5 st, inc in next st) repeat 2 times [14].
Round 10: Sc in all 14 st [14].
Color changes between pink and dusty pink.
Round 11: sc in next 4 st, (dusty pink) sc in next 6 st, (pink) sc in next 4 st [14].
Round 12: dec, sc in next 2 st, (dusty pink) sc in next st, inc in next 4 st, sc in next st, (pink) sc in next 2 st, dec [16].
Rounds 13-14: Sc in all 16 st [16].
Round 15: sc in next st, dec, sc in next st, (dusty pink) sc in next 3 st, inc in next 4 st, sc in next 3 st, (pink) dec [18].
Round 16: sc in next 3 st, (dusty pink) sc in next 14 st, (pink) sc in next st [18].
Rounds 17-18: Sc in all 18 st [18].
Round 19: sc in next 2 st, dec, sc in next st, (dusty pink) sc in next st, (sc in next st, inc in next st) repeat 4 times, sc in next 2 st, (pink) dec [20].
Round 20: sc in next 4 st, (dusty pink) sc in next 15 st, (pink) sc in next 4 st [24].
Round 21: dec 2 times, sc in next 4 st, (inc in next st, sc in next st) repeat 4 times, sc in next 4 st [22].
Round 22: Sc in all 22 st [22].
Round 23: sc in next 2 st, dec, sc in next st, (dusty pink) (sc in next 2 st, inc in next st) repeat 4 times, sc in next 2 st, (pink) sc in next st, dec [24].
Round 24: sc in next 4 st, (dusty pink) sc in next 18 st, (pink) sc in next 2 st [24].
Round 25: sc in next 2 st, dec, sc in next 4 st, (inc in next st, sc in next 2 st) repeat 4 times, sc in next 2 st, dec [26].
Round 26: Sc in all 26 st [26].
Round 27: sc in next 3 st, dec, sc in next st, (dusty pink) sc in next 2 st, (inc in next st, sc in next 3 st) repeat 3 times, inc in next st, sc in next 2 st, (pink) sc in next st, dec [28].
Round 28: sc in next 5 st, (dusty pink) sc in next 21 st, (pink) sc in next 2 st [28].
Round 29: sc in next 3 st, dec, sc in next 4 st, (inc in next st, sc in next 3 st) repeat 4 times, sc in next st, dec [30].
Round 30: Sc in all 30 st [30].
Round 31: sc in next 2 st [2]. Leave remaining stitches unworked. Slst in next st. Fasten off and stuff firmly.
Back Ridge
Use dusty pink yarn. Crochet in rows.
Row 1: Skip first ch on hook, sc in next 29 ch, ch 1, turn [29].
Row 2: Skip first ch, sc in next st, skip next st, (hdc + dc + ch 3-picot + dc + hdc) in next st, skip next st, (sc in next st, skip next st, hdc + dc + ch 3-picot + dc + hdc in next st, skip next st) repeat 6 times, sc in next st [43].
Fasten off and weave in ends.
The Bow
Use light aqua yarn.
The Main Bow:
Round 1: Join with a slst into the first ch to form a circle, ch 2, hdc in next 55 ch [55].
Rounds 2-6: BLO hdc in all 55 st [55].
Round 7: BLO hdc in next 3 st [3]. Leave remaining stitches unworked. Slst in next st. Fasten off. Wind a yarn tail around the middle of the bow to squeeze it together, make a knot, and weave in ends.
The Center:
Ch 11. Row 1: Skip first ch, sc in next 10 ch, ch 1, turn [10].
Row 2: Skip first ch, sc in next 10 st, ch 1, turn [10].
Row 3: Skip first ch, sc in next 10 st [10].
Fasten off. Wrap this around the middle of the bow and sew the ends together on the back.
Finishing
Assembly Guide
Assembly is where your lizard truly comes to life! Follow these steps carefully for the best results:
- Eye Patches: Sew the eye patches onto the head over rounds 12 to 19 using the light gray yarn tail. Ensure they are balanced evenly on both sides.
- Attaching the Head: Sew the body to the back of the head. Use the marked stitches on rounds 7 and 36 of the body as a guide for the top center. The top of the body should be sewn between rounds 33 and 34 on the top of the head, and the bottom of the body between rounds 29 and 30 on the bottom of the head.
- The Neck Frill: Pin the frill against the head through rounds 2 and 3 of the frill. Note that it will ruffle! Using the dusty pink tail, sew stitches all around the frill through rounds 1 and 2 at regular intervals.
- Front Legs: Sew the front legs to the underside of the body. The flat top edge of each leg should be sewn over rounds 34 to 40. Keep the legs 14 stitches apart.
- Back Legs: Sew the back legs to the underside of the body. The flat top edge should be sewn over rounds 11 to 16. Keep the legs 14 stitches apart.
- The Tail: Sew the tail over rounds 1 to 6 of the back of the body. Use the marked stitch on round 7 of the body as a guide to position the top of the tail (ensure stripes face upwards).
- Back Ridge: Attach the ridge to the top center of the body using the marked stitches on rounds 7 and 36 as a guide. The back corner should be sewn between rounds 6 and 7, and the front corner where the frill meets the body.
- The Bow: Sew the bow to the front left of the head, just above the left eye.
Tips for Success
To make your Millie the lizard truly spectacular, keep these tips in mind:
- Tension is Key: When working on the legs and toes, try to keep your tension consistent so the limbs look uniform.
- Stuffing: Don’t be afraid to stuff firmly! Amigurumi looks best when it is well-shaped and doesn’t have “lumps.”
- Safety First: When inserting safety eyes, make sure they are secure. For young children, consider embroidering the eyes with yarn instead of using plastic safety eyes.
- Use Pins: Always pin your pieces (especially the frill and legs) in place before you start sewing. This prevents the fabric from shifting and helps you get the placement perfect.