How to Crochet a Cute Amigurumi Puppy: A Step-by-Step Beginner Tutorial
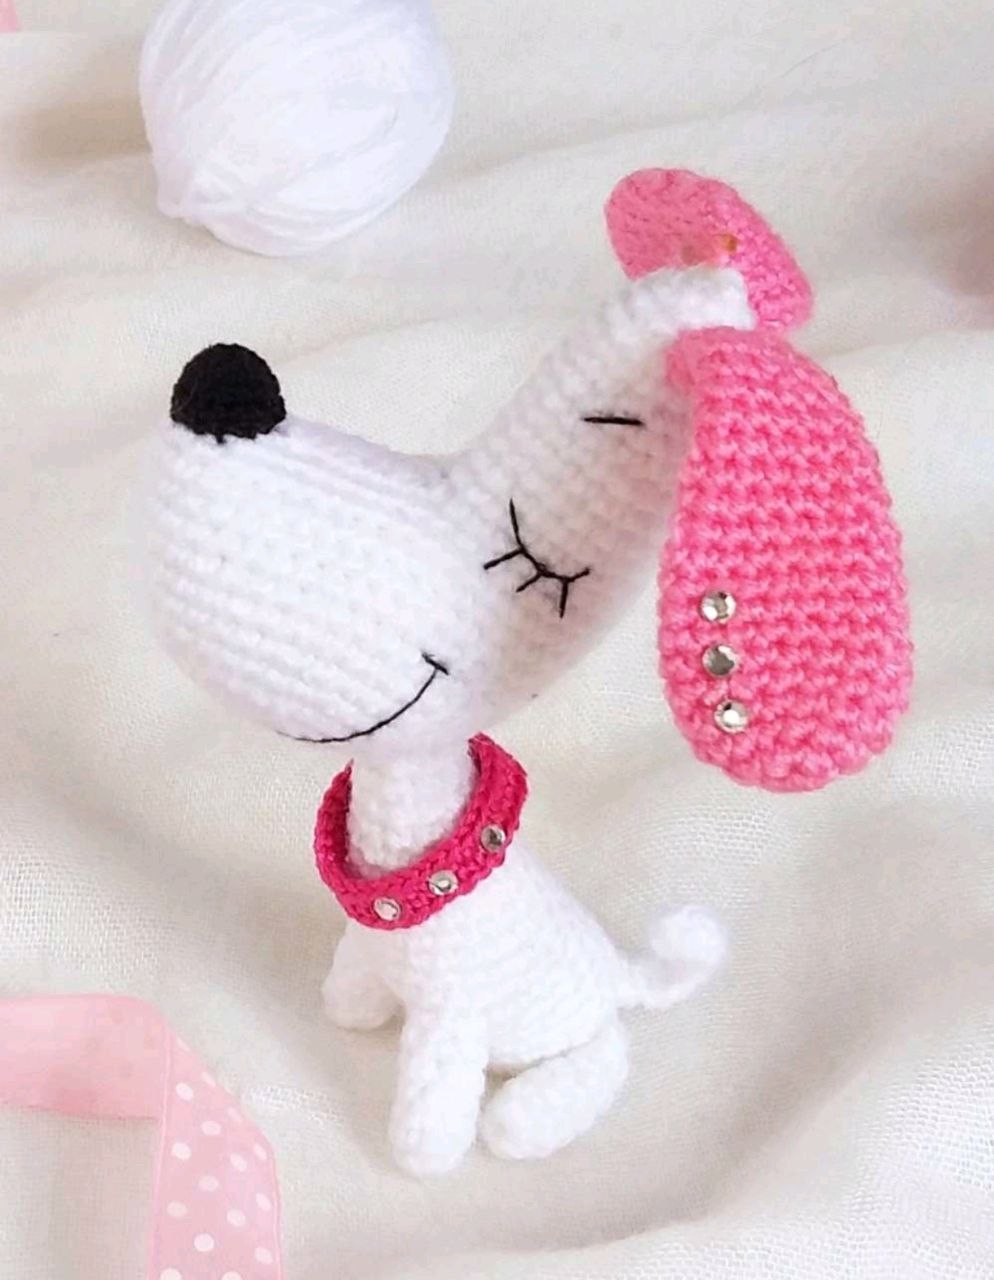
Are you looking for your next adorable crochet project? There is nothing quite as heartwarming as a tiny, wide-eyed puppy to brighten up your home or serve as a perfect handmade gift. This cute amigurumi puppy is designed with a charming, cartoon-like aesthetic that is sure to capture anyone’s heart. Whether you want to make a keychain or a small shelf companion, this pattern is a delightful way to practice your crochet skills.
In this tutorial, we will walk through the entire process of creating this little pup, from the initial magic ring to the final embroidered smile. This project is perfect for intermediate beginners who are comfortable with basic stitches and are looking to try something a bit more structural with wire armatures and shaping.
Materials & Abbreviations
Before we pick up our hooks, let’s make sure you have everything you need. Because this puppy is quite small and detailed, using a finer hook will help keep your stitches tight so the stuffing doesn’t peek through.
What You’ll Need
- Yarn: A medium-weight yarn (such as a wool/acrylic blend) in your choice of color for the body and ears. You will also need a small amount of black yarn for the nose.
- Crochet Hook: A small hook, approximately 1.25mm (or the size most appropriate for your chosen yarn to ensure tight tension).
- Stuffing: Polyfill or any standard fiberfill.
- Eyes: 6mm safety eyes or small black beads.
- Embroidery Floss: Black cotton embroidery floss for the mouth and eyebrows.
- Wire: A piece of 1–1.5mm gauge craft wire, approximately 6 inches long. This will act as an internal skeleton to help the head stay upright.
- Tools: Scissors, a large-eye tapestry needle, and needle-nose pliers (for working with the wire).
Abbreviations (US Terms)
Please note that this pattern is worked in a continuous spiral. Unless otherwise stated, work in single crochet stitches.
- MR: Magic Ring
- ch: Chain
- sc: Single crochet
- hdc: Half double crochet
- sl st: Slip stitch
- inc: Increase (two stitches in one)
- dec: Decrease (two stitches worked together)
- *N: Repeat the sequence N times
Step-by-Step Instructions
The Head
The head is shaped to create a distinct muzzle, giving the puppy its characteristic look. Make sure to stuff the head firmly as you go.
- R1: 7 sc in MR (7)
- R2: (inc) * 7 (14)
- R3: (1 sc, inc) * 7 (21)
- R4: (2 sc, inc) * 7 (28)
- R5: (3 sc, inc) * 7 (35)
- R6: (4 sc, inc) * 7 (42)
- R7–15: sc in each stitch (42)
- R16: 20 sc, skip 21 stitches, 1 sc (21)
- R17–18: sc in each stitch (21)
- R19: 9 sc, dec, 10 sc (20)
- R20–21: sc in each stitch (20)
- R22: 5 sc, dec, 6 sc, dec, 5 sc (18)
- R23: sc in each stitch (18)
- R24: 7 sc, dec, 7 sc, dec (16)
- R25: sc in each stitch (16)
- R26: 8 sc, dec, 6 sc (15)
- R27: (3 sc, dec) * 3 (12)
- R28: (2 sc, dec) * 3 (9)
- R29: 3 dec. Fasten off and weave in ends.
Note on Head Assembly: Stuff the top of the head first, then move to the muzzle area. Using a tapestry needle and a long piece of thread, sew the muzzle opening closed starting from the “bridge” of the nose, stopping about 0.3 inches from the tip. Add a little extra stuffing into the muzzle through this opening to give it a nice, rounded shape.
The Legs (Make 4)
You will need four small legs to complete the puppy’s form.
- R1: 6 sc in MR (6)
- R2–6: sc in each stitch (6)
Tip: For two of the legs (the back legs), leave a long tail of approximately 8 inches for sewing later.
The Body
The body is worked in a way that incorporates the front legs directly into the rounds.
- R1: 6 sc in MR (6)
- R2: (inc) * 6 (12)
- R3: (1 sc, inc) * 6 (18)
- R4–7: sc in each stitch (18)
- R8: 6 sc, 2 sc on the inner side of the left leg, 2 sc, 2 sc on the inner side of the right leg, 6 sc (18)
- R9: 6 sc, 4 sc around the left leg, 2 inc, 4 sc around the right leg, 6 sc (24)
- R10: sc in each stitch (24)
Stuff the legs firmly and the bottom of the body as you work.
- R11: (6 sc, dec) * 3 (21)
- R12: sc in each stitch (21)
- R13: (5 sc, dec) * 3 (18)
- R14: sc in each stitch (18)
- R15: (4 sc, dec) * 3 (15)
- R16–17: sc in each stitch (15)
- R18: (3 sc, dec) * 3 (12)
- R19: sc in each stitch (12)
- R20: (2 sc, dec) * 3 (9)
- R21: sc in each stitch (9)
Fasten off, leaving a 6–8 inch tail for sewing.
The Ears (Make 2)
- R1: 7 sc in MR (7)
- R2: (inc) * 7 (14)
- R3: (6 sc, inc) * 2 (16). Place a stitch marker here; this is the edge of the ear.
- R4–10: sc in each stitch (16)
- R11: 8 sc, dec, 6 sc (15)
- R12: dec, 13 sc (14)
- R13: sc in each stitch (14)
- R14: 7 sc, dec, 5 sc (13)
- R15: dec, 11 sc (12)
- R16: sc in each stitch (12)
- R17: 3 sc, dec, 4 sc, dec, 1 sc (10)
- R18: sc in each stitch (10)
- R19: 2 sc, dec, 3 sc, dec, 1 sc (8)
- R20: 7 sc, sl st. Fasten off, leaving a 6–8 inch tail for sewing.
The Tail
- R1: Chain 11. In the 2nd chain from the hook, work: sl st, 2 sc, 2 hdc, 2 hdc in the next stitch, 2 hdc, 2 sc. Fasten off, leaving a tail for sewing.
The Nose
- R1: 6 sc in MR (6)
- R2: (inc) * 6 (12)
- R3: (3 sc, inc) * 3 (15)
- R4: 15 sc. Fasten off, leaving a 6–8 inch tail.
- R5: (4 sc, dec) * 3 (12)
- R6–7: 12 sc
- R8: (3 sc, dec) * 3 (9)
- R9: 9 sc
- R10: (2 sc, dec) * 3 (6)
- R11: 6 sc. Fasten off, leaving a 6–8 inch tail.
Finishing
Assembly Guide
Assembly is where your puppy truly comes to life! Follow these steps carefully to ensure your puppy can sit up and hold its head high.
Setting the Frame
Take your 6-inch piece of wire and bend one end slightly. This wire will act as the spine. Insert the bent end into the neck opening of the body and push it down through the torso. Add more stuffing into the neck and body to secure the wire in place.
Attaching the Head
On the head, mark a spot between rounds 7 and 8 to attach the neck. To make the connection strong, use a thick needle to widen the hole in the head. Insert the wire into the head and pull it through until it exits at the very top (the crown). Now, sew the body firmly to the head.
Eyes and Face
- Eyes: Mark the eye placement. To give the eyes a “deep” look, insert your needle near the neck, pull it through to the eye area, and then back to the starting point. Repeat this 2–3 times to create tension.
- Nose: Place the black nose over the muzzle opening. Add a tiny bit of stuffing inside the nose before sewing it on securely.
- Ears: Sew the ears onto the head approximately 1.5–2 inches below the crown.
- Details: Using your black embroidery floss, sew a small, happy smile starting around round 10 of the head. You can also stitch small, simple eyebrows to give your puppy more personality.
Final Touches
Sew the back legs to the body, ensuring they are positioned so the puppy can sit. Attach the tail to the rear. If you are making this as a keychain, use your pliers to create a small loop in the wire at the top of the head to attach a ring.
Tips
- Tight Tension is Key: When working amigurumi, keep your tension tight. If your stitches are too loose, the stuffing will show through, and the puppy won’t look as polished.
- The Wire Trick: If you find the wire is too stiff, you can use pliers to slightly curve it, which can help create a more natural sitting posture.
- Customization: Don’t be afraid to get creative! You can add a little “tuft” of yarn to the top of the head or even crochet a tiny colorful collar for your pup.
- Safety First: If you are making this for a small child, avoid using plastic safety eyes or small beads. Instead, embroider the eyes with black yarn to ensure it is safe for all ages.