Adorable Chubby Crochet Hamster Pattern: An Easy Amigurumi Tutorial
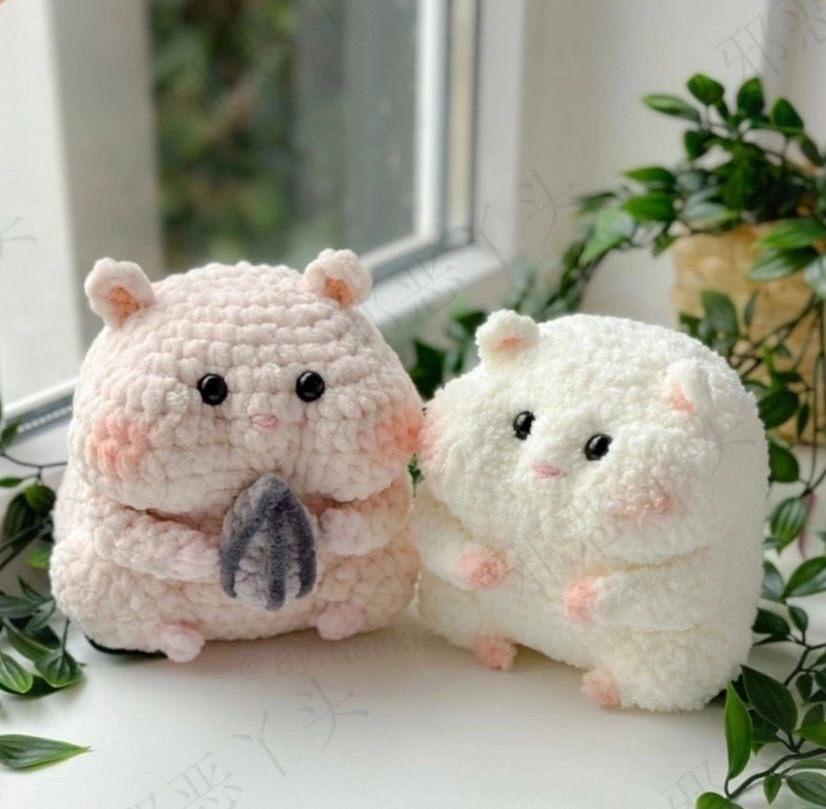
Are you looking for your next cozy crochet project? There is nothing quite as heartwarming as a tiny, chubby animal to brighten up your home or to gift to a loved one. Today, I am sharing a pattern for this incredibly cute, round, and squishy crochet hamster! This little guy is designed to be extra plump, making him the perfect companion for your desk or a nursery shelf.
This pattern is particularly fun because it uses velvet or chenille-style yarn, which gives the finished hamster a super-soft, boutique-quality feel. Whether you are a beginner looking to practice your amigurumi skills or an experienced crocheter wanting a quick and satisfying project, this chubby hamster tutorial is for you. Grab your hook and let’s get started on creating this tiny, seed-eating friend!
Materials & Abbreviations
To ensure your hamster turns out as squishy and adorable as the one in the photos, I recommend using high-quality chenille yarn. This type of yarn hides stitches well and creates a plush texture that is irresistible to touch.
What You Will Need
- Yarn: Chenille or Velvet yarn (such as Alize Softty Plus, Honey Gunny, or Baby Snuggles). You will need your main body color (cream or white), a pink color for the feet, tail, and cheeks, and a light grey color for the tiny seed.
- Crochet Hook: 5 mm (H) hook.
- Safety Eyes: 10 mm safety eyes.
- Stuffing: High-quality polyester fiberfill.
- Extras: Scissors, stitch markers, sewing needle, pins, and pink pastel (for blushing the cheeks).
US Crochet Abbreviations
Please note that this pattern uses standard US terminology. Ensure you are familiar with these terms before beginning:
- MR: Magic Ring
- ch: Chain
- sc: Single crochet
- inc: Increase (2 sc in one stitch)
- dec: Decrease (sc 2 stitches together)
- hdc: Half double crochet
- dc: Double crochet
- sl st: Slip stitch
- BLO: Back loop only
- FLO: Front loop only
Step-by-Step Instructions
The Head and Body
The head and body are worked as one continuous piece to create that signature chubby look. Use a stitch marker to keep track of your rounds.
Round 1: Start with a Magic Ring. Ch 8, then from the 2nd ch from the hook: 6 sc, inc, 1 sc, inc (16 stitches).
Round 2: (1 sc, inc) repeat 8 times (24 stitches).
Round 3: (1 sc, inc, 1 sc) repeat 8 times (32 stitches).
Round 4: 32 sc (32 stitches).
Round 5: 1 sc, (3 sc in 1 st) repeat 3 times, 1 sc, 3 inc, 1 sc, (3 sc in 1 st) repeat 3 times, (2 sc, inc, 2 sc) repeat 4 times (51 stitches).
Round 6: 1 sc, 9 hdc, 8 sc, 9 hdc, 24 sc (51 stitches).
Round 7: 1 sc, 9 hdc, 1 sc, 1 dec, 2 sc, 1 dec, 1 sc, 9 hdc, (5 sc, inc) repeat 4 times (53 stitches).
Round 8: 1 sc, 9 hdc, 2 sc, 1 dec, 2 sc, 9 hdc, 28 sc (52 stitches).
Round 9: 1 sc, 9 hdc, 5 sc, 9 hdc, 28 sc (52 stitches).
Round 10: 1 sc, (dec using 3 stitches together) repeat 3 times, 5 sc, (dec using 3 stitches together) repeat 3 times, (3 sc, inc, 3 sc) repeat 4 times (44 stitches).
Insert Eyes: Place your 10 mm safety eyes between rounds 5 and 6, leaving 5 stitches between them.
Round 11-12: 44 sc (44 stitches).
Round 13: 16 sc, inc, 3 sc, inc, 17 sc, inc, 3 sc, inc, 1 sc (48 stitches).
Round 14: (5 sc, inc) repeat 8 times (56 stitches).
Stuffing Tip: Begin stuffing the head now. Be sure to stuff the cheek areas firmly to help maintain the round shape.
Round 15: (3 sc, inc, 3 sc) repeat 8 times (64 stitches).
Round 16-17: 64 sc (64 stitches).
Round 18: (3 sc, dec, 3 sc) repeat 8 times (56 stitches).
Round 19: (5 sc, dec) repeat 8 times (48 stitches).
Round 20: (2 sc, dec, 2 sc) repeat 8 times (40 stitches).
Round 21: (3 sc, dec) repeat 8 times (32 stitches).
Round 22: (1 sc, dec, 1 sc) repeat 8 times (24 stitches).
Round 23: (1 sc, dec) repeat 8 times (16 stitches).
Round 24: 8 dec (8 stitches).
Fasten off and weave in your ends.
The Ears (Make 2)
Round 1: Ch 3. From the 2nd ch from the hook: 1 sc, 3 sc in the next stitch, 2 sc (6 stitches).
Fasten off, leaving a long tail for sewing.
The Arms (Make 2)
Start with your pink yarn for the hands, then switch to your body color.
Round 1: In a Magic Ring, 3 sc (3 stitches).
Round 2: 3 sc (3 stitches).
Round 3 (Body Color): 1 sc, inc, 1 sc (4 stitches).
Round 4: 2 sc, inc, 1 sc (5 stitches).
Round 5: 5 sc (5 stitches).
Round 6: 2 sc, inc, 2 sc (6 stitches).
Round 7: 2 sc, inc, 3 sc (7 stitches).
Round 8: 7 sc (7 stitches).
Round 9: 3 sc, inc, 3 sc (8 stitches).
Fasten off, leaving a long tail. Do not stuff the arms.
The Hips (Make 2)
Left Hip:
Round 1: 6 sc in a Magic Ring (6 stitches).
Round 2: 6 inc (12 stitches).
Round 3: 1 sc, 3 inc, 4 sc, 3 inc, 1 sc (18 stitches).
Round 4: 12 sc, 1 hdc, 3 dc, 1 hdc, 1 sc (18 stitches).
Fasten off, leaving a long tail.
Right Hip:
Follow the exact same instructions as the Left Hip.
The Feet (Make 2)
Use your pink yarn.
Round 1: Ch 2. In the 2nd ch from the hook: 1 inc, 1 sl st in the first ch (2 stitches).
Fasten off, leaving a long tail.
The Tail
Use your pink yarn.
Round 1: In a Magic Ring: 1 sc, ch 2, 1 sc (4 stitches).
Fasten off, leaving a long tail.
The Tiny Seed
Use light grey yarn.
Round 1: 6 sc in a Magic Ring (6 stitches).
Round 2: (1 sc, inc) repeat 3 times (9 stitches).
Round 3-4: 9 sc (9 stitches).
Round 5: 1 sc, 1 dec, 2 sc, 1 dec, 2 sc (7 stitches).
Round 6: 1 dec, 2 sc, 1 dec, 1 sc (5 stitches).
Round 7: 1 dec, 1 sc, 1 dec (3 stitches).
Fasten off and close the hole. Using dark grey yarn, embroider three small lines on the seed from top to bottom.
Finishing & Assembly
This is where your hamster truly comes to life! Take your time with the placement to ensure he looks symmetrical and cute.
- The Nose: Embroider a small nose in the center between the eyes, around rows 6-7.
- The Ears: Sew the ears onto the head between rows 2 and 5. Make sure they are approximately 7 stitches apart.
- The Arms: Sew the arms onto the body between rows 10 and 15.
- The Hips: Lightly stuff the hips and sew them to the body between rows 14 and 20. Make sure the hdc/dc side is facing the side of the body.
- The Feet: Sew the feet to the bottom of the hips (rounds 3-4 of the hip section).
- The Seed: Sew the tiny seed between the legs/hips.
- The Tail: Sew the tail to the back of the body between rows 18 and 19.
- The Blush: Use pink pastel and a small brush to gently shade the cheeks and the inner part of the ears for that adorable, blushing look.
Tips for Success
If you are working with velvet or chenille yarn, remember that it can be a bit slippery and the stitches can be harder to see. I highly recommend using a stitch marker in every single round. If you find it difficult to see your stitches, try using a light-colored yarn to practice first, or use your fingers to count the stitches carefully!
For the best stuffing results, push the fiberfill into the corners of the head and hips using your crochet hook. This prevents lumps and ensures your hamster stays perfectly round and squishy.
Happy crocheting!