Adorable Crochet Penguin Pattern: Step-by-Step Amigurumi Tutorial
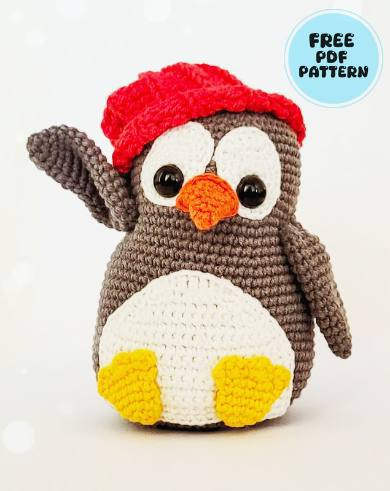
Looking for a cozy project to brighten up your day? There is nothing quite as charming as a little amigurumi penguin! Whether you are looking to make a sweet gift for a loved one or simply want to add a touch of winter magic to your home decor, this little penguin is the perfect project. With his round belly and cute little hat, he is sure to become a favorite in your crochet collection.
This pattern is designed to be beginner-friendly, using basic stitches and simple shaping. We will be creating a plush, cuddly companion using a few different colors of yarn to bring out his personality. If you have never made amigurumi before, don’t worry! This tutorial walks you through every step, from the magic ring to the final stitch.
Materials & Abbreviations
Before you pick up your hook, make sure you have all your supplies ready. Using a slightly smaller hook than recommended for your yarn will ensure the stitches are tight, so the stuffing doesn’t peek through.
Materials Needed
- Yarn: Medium weight (Size 4) acrylic or cotton yarn in the following colors:
- Brown (Main body)
- White (Belly and eye patches)
- Yellow (Feet)
- Orange (Beak)
- Red (Hat)
- Crochet Hook: 2.5mm or 3.0mm hook
- Safety Eyes: 8mm or 10mm black safety eyes
- Stuffing: Polyester fiberfill or similar stuffing material
- Tools: Yarn needle, scissors, and stitch markers
Abbreviations (US Terms)
- MR: Magic Ring
- Ch: Chain
- Sc: Single Crochet
- Inc: Increase (two sc in one stitch)
- Dec: Decrease (sc two stitches together)
- Sc3tog: Single crochet 3 together (decrease 3 stitches into 1)
- Sl st: Slip stitch
- BLO: Back Loop Only
- HDC: Half Double Crochet
- DC: Double Crochet
Step-by-Step Instructions
The White Eye Patches (Make 2)
These small white circles will act as the base for the penguin’s eyes, giving him a wide-eyed, cute look.
- Round 1: Create a MR and work 6 sc into the ring (6)
- Round 2: Inc in every stitch around (12)
- Round 3: (1 sc, 1 inc) repeat 6 times (18)
- Round 4: 1 sc, (2 hdc, 1 hdc inc) repeat 2 times, 12 sc (18)
Fasten off, leaving a short tail for sewing.
The Head and Body
The head and body are worked as one continuous piece to create a seamless, egg-shaped form. We will work in a continuous spiral; using a stitch marker is highly recommended.
- Round 1: Create a MR and work 8 sc into the ring (8)
- Round 2: Inc in every stitch around (16)
- Round 3: (1 sc, 1 inc) repeat 8 times (24)
- Round 4: (4 sc, 1 inc) repeat 6 times (30)
- Round 5: (5 sc, 1 inc) repeat 6 times (36)
- Round 6: (6 sc, 1 inc) repeat 6 times (42)
- Round 7: (7 sc, 1 inc) repeat 6 times (48)
- Round 8: (8 sc, 1 inc) repeat 6 times (54)
- Rounds 9-15: Sc in each stitch around for 7 rounds (54)
- Round 16: (17 sc, 1 inc) repeat 3 times (57)
- Round 17: (18 sc, 1 inc) repeat 3 times (60)
- Round 18: (19 sc, 1 inc) repeat 3 times (63)
- Rounds 19-21: Sc in each stitch around for 3 rounds (63)
- Round 22: (20 sc, 1 inc) repeat 3 times (66)
- Rounds 23-32: Sc in each stitch around for 10 rounds (66)
Eye Placement: Now is the time to install the safety eyes. Place them between rounds 15 and 16. For a professional look, push the eye through the white eye patch first, then through the head. Secure the washer on the inside.
- Round 33: (10 sc, 1 inc) repeat 6 times (72)
- Rounds 34-36: Sc in each stitch around for 3 rounds (72)
- Round 37: (10 sc, 1 dec) repeat 6 times (66)
- Round 38: (9 sc, 1 dec) repeat 6 times (60)
- Round 39: Working in BLO: (8 sc, 1 dec) repeat 6 times (54)
- Round 40: (7 sc, 1 dec) repeat 6 times (48)
- Round 41: (6 sc, 1 dec) repeat 6 times (42)
- Round 42: (5 sc, 1 dec) repeat 6 times (36)
- Round 43: (2 sc, 1 dec) repeat 9 times (27)
- Round 44: (1 sc, 1 dec) repeat 9 times (18)
- Round 45: 9 dec (9)
Fasten off and weave in the ends. Stuff the head and body firmly with fiberfill.
The Wings (Make 2)
- Round 1: Create a MR and work 6 sc into the ring (6)
- Round 2: (1 sc, 1 dec) repeat 3 times (9)
- Round 3: (2 sc, 1 dec) repeat 3 times (12)
- Round 4: Sc in each stitch around (12)
- Round 5: 4 sc, 4 inc, 4 sc (16)
- Rounds 6-7: Sc in each stitch around (16)
- Round 8: 6 sc, 4 inc, 6 sc (20)
- Round 9: Sc in each stitch around (20)
- Round 10: (4 sc, 1 inc) repeat 4 times (24)
- Rounds 11-14: Sc in each stitch around for 4 rounds (24)
- Round 15: (2 sc, 1 dec) repeat 6 times (18)
- Round 16: (1 sc, 1 dec) repeat 6 times (12)
Fasten off, leaving a long tail for sewing. Fold the wing flat and sew the opposite edges together with a few stitches. Do not stuff the wings.
The Beak
- Round 1: Create a MR and work 4 sc into the ring (4)
- Round 2: (1 sc, 1 inc) repeat 2 times (6)
- Round 3: (2 sc, 1 inc) repeat 2 times (8)
- Round 4: (3 sc, 1 inc) repeat 2 times (10)
- Round 5: (4 sc, 1 inc) repeat 2 times (12)
- Round 6: (3 sc, 1 inc) repeat 3 times (15)
Fasten off, leaving a long tail. Do not stuff the beak.
The Belly (Flat Piece)
The belly is worked in rows rather than rounds. Chain 21 and work back and forth.
- Row 1: Starting in the 2nd chain from the hook, work 1 sc in each chain across (20)
- Rows 2-8: Sc in each stitch across. Ch 1 and turn at the end of each row (20)
- Row 9: Sc3tog, 14 sc, Sc3tog (16)
- Row 10: Dec, 12 sc, Dec (14)
- Row 11: Sc3tog, 8 sc, Sc3tog (10)
- Row 12: Dec, 6 sc, Dec (8)
- Row 13: Sl st, 1 sc, 1 dc, 2 sc, 1 dc, 1 sc, sl st (8)
Work one final round of sc around the entire perimeter of the belly piece to clean up the edges, then fasten off.
The Feet (Make 2)
- Round 1: Create a MR and work 6 sc into the ring (6)
- Round 2: Inc in every stitch around (12)
- Rounds 3-4: Sc in each stitch around (12)
- Round 5: (3 sc, 1 inc) repeat 3 times (15)
- Round 6: (4 sc, 1 inc) repeat 3 times (18)
Flatten the piece and work 9 sc across the top, joining the two sides together. Now, we create the toes:
- Skip 1 stitch, (3 dc in the next stitch), skip 1 stitch, 1 sc, skip 1 stitch, (3 dc in the next stitch).
- Repeat this pattern to finish the foot. Fasten off, leaving a long tail. Do not stuff the feet.
Finishing
Now it is time to assemble your penguin! Use your yarn needle and a tapestry needle to sew the pieces together securely.
- The Belly: Pin the white belly piece to the front of the body and sew it in place using a whip stitch or invisible join.
- The Wings: Attach the wings to the sides of the body, roughly halfway between the head and the bottom.
- The Beak: Sew the beak centered between the eyes.
- The Feet: Attach the feet to the bottom of the body so that the penguin can sit upright.
- The Hat: Use red yarn to crochet a simple beanie or a small cap to fit the top of the head, securing it with a few stitches.
Tips for Success
To ensure your penguin looks as professional as possible, keep these tips in mind:
- Tension is Key: Keep your stitches tight. If you see holes where the stuffing is showing, try going down a hook size.
- Use a Stitch Marker: Since amigurumi is worked in a continuous spiral, it is very easy to lose your place. Place a marker in the first stitch of every round.
- Stuffing Technique: Stuff the body in small increments. Use your finger or a chopstick to push the stuffing into the bottom and the corners of the head to avoid lumps.
- The Invisible Decrease: For a smoother look, use the “invisible decrease” method: insert your hook into the front loop of the first stitch, then the front loop of the second stitch, and complete the sc.