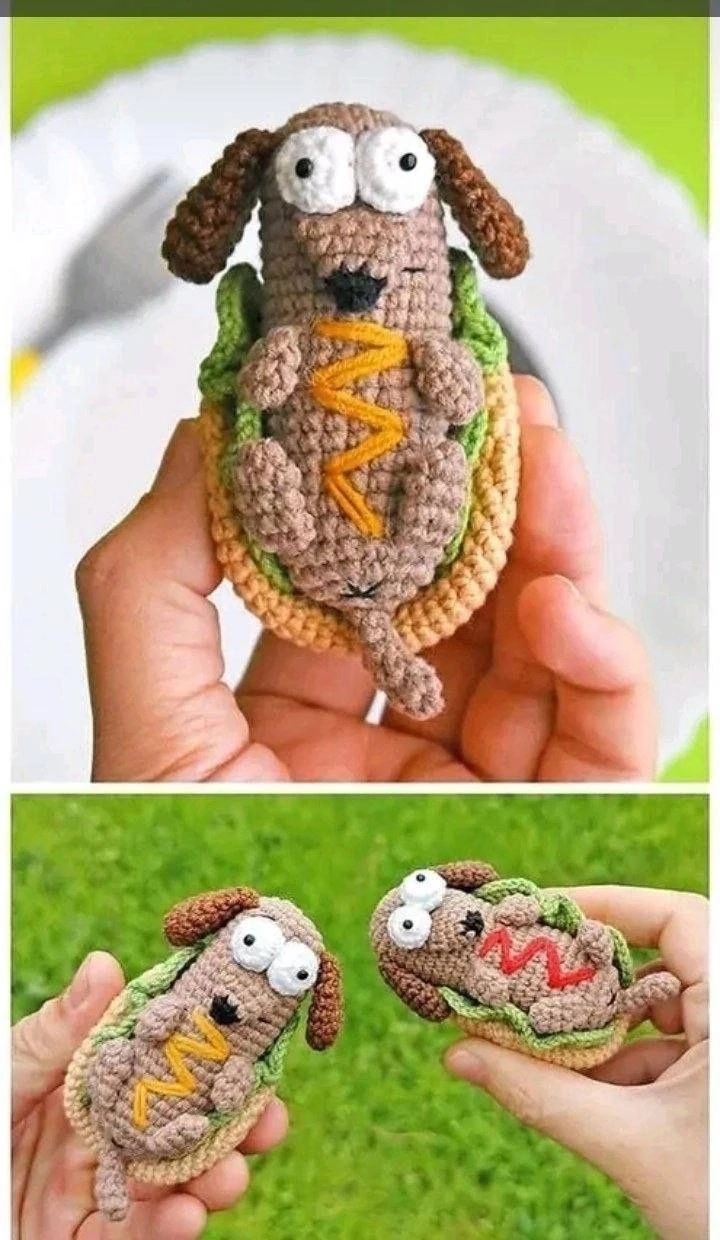
How to Crochet a Cute Amigurumi Hot Dog Dog: Free Crochet Pattern
Are you looking for a fun, quirky, and absolutely adorable crochet project to brighten up your day? Look no further! This amigurumi hot dog dog combines the cuteness of a goofy dachshund with the fun of a classic backyard barbecue favorite. Nestled inside a cozy crochet bun with frilly lettuce and a squeeze of ketchup or mustard, this little pup is guaranteed to bring a smile to anyone’s face.
This beginner-friendly pattern is quick to make and is perfect for using up scrap yarn from your stash. It makes a fantastic keychain, a funny desk buddy, or a unique gift for dog lovers and foodies alike. Let’s grab our hooks and get cooking!
Materials & Abbreviations
Materials Needed
- Yarn: Sport weight yarn (55% cotton, 45% acrylic blend, approx. 175 yards / 1.75 oz) in the following colors:
- Brown (for the dog’s body and legs)
- Beige (for the bun)
- Green (for the lettuce)
- Dark Brown (for the ears)
- Black (for the muzzle)
- White (for the eyes)
- Red or Yellow (for the ketchup or mustard embroidery)
- Crochet Hook: Size 2.00 mm (US B-1) to ensure tight, neat stitches so the stuffing doesn’t peek through.
- Fiberfill: Polyester stuffing for shaping the body and eyes.
- Safety Eyes or Beads: Two 3 mm black safety eyes or small black beads.
- Sewing Accessories: Black sewing thread, a tapestry needle, scissors, and straight pins for assembly.
Abbreviations (US Crochet Terms)
- MR: Magic ring
- ch: Chain
- sc: Single crochet
- dc: Double crochet
- inc: Increase (crochet 2 single crochets into the same stitch)
- dec: Invisible decrease (single crochet next 2 stitches together)
- sl st: Slip stitch
- st(s): Stitch(es)
- R: Round or Row
- () x…: Repeat instructions inside the parentheses the indicated number of times
Step-by-Step Instructions
The Sausage Dog Body
We will start by crocheting the main sausage body using your brown yarn. Work in continuous rounds without joining.
- R1: 6 sc in MR (6)
- R2: inc x 6 (12)
- R3: (1 sc, inc) x 6 (18)
- R4: (2 sc, inc) x 6 (24)
- R5-25: 24 sc (24) – 21 rounds total
- R26: (2 sc, dec) x 6 (18)
Stop here and stuff the body firmly with fiberfill.
- R27: (1 sc, dec) x 6 (12)
- R28: dec x 6 (6)
Cut the yarn, leaving a tail. Using your tapestry needle, thread the yarn tail through the front loops only of the remaining 6 stitches and pull tightly to close the hole. Secure and weave in your end inside the body.
The Hot Dog Bun
Next, we will make the soft hot dog bun using your beige yarn. Work in continuous rounds.
- R1: 6 sc in MR (6)
- R2: inc x 6 (12)
- R3: (1 sc, inc) x 6 (18)
- R4: (2 sc, inc) x 6 (24)
- R5: (3 sc, inc) x 6 (30)
- R6: (4 sc, inc) x 6 (36)
- R7: (5 sc, inc) x 6 (42)
- R8: (6 sc, inc) x 6 (48)
- R9-22: 48 sc (48) – 14 rounds total
- R23: (6 sc, dec) x 6 (42)
- R24: (5 sc, dec) x 6 (36)
- R25: (4 sc, dec) x 6 (30)
Do not stuff the bun with fiberfill (or only add a tiny pinch if you want a slightly puffier shape). The bun needs to remain flexible so it can fold around the dog.
- R26: (3 sc, dec) x 6 (24)
- R27: (2 sc, dec) x 6 (18)
- R28: (1 sc, dec) x 6 (12)
- R29: dec x 6 (6)
Cut the yarn, leaving a long tail for sewing. Close the remaining hole using the front loops only. Keep the yarn tail handy—you will use this later to sew the dog inside the bun.
The Goofy Eyes (Make 2)
Use your white yarn to create the large, expressive eyes.
- R1: 6 sc in MR (6)
- R2: inc x 6 (12)
- R3: 12 sc (12)
- R4: dec x 6 (6)
Cut the yarn, leaving a tail. Insert your 3 mm safety eye or sew a small black bead into the center of each eye. Stuff the eye lightly with fiberfill, then sew the bottom closed using the yarn tail.
The Dog Muzzle
Start with black yarn to create the nose, then transition into brown yarn for the muzzle.
- R1: With black yarn, 6 sc in MR (6)
- Switch to brown yarn.
- R2: (2 sc, inc) x 2 (8)
- R3: (3 sc, inc) x 2 (10)
- R4: (4 sc, inc) x 2 (12)
- R5: 12 sc (12)
Do not stuff the muzzle. Fold the open edges flat against each other and single crochet across both layers to seal it shut (6 sc). Cut the yarn, leaving a tail for sewing.
The Floppy Ears (Make 2)
Use your dark brown yarn to make two floppy ears.
- R1: 6 sc in MR (6)
- R2: inc x 6 (12)
- R3: (3 sc, inc) x 3 (15)
- R4: 15 sc (15)
- R5: (3 sc, dec) x 3 (12)
- R6: 12 sc (12)
- R7: (2 sc, dec) x 3 (9)
- R8: 9 sc (9)
Do not stuff the ears. Fold the open edges together and single crochet across both layers to seal it shut (4 sc). Cut the yarn, leaving a long tail.
The Tiny Legs
Use your brown yarn to make the legs. These do not require stuffing.
Front Legs (Make 2)
- R1: 6 sc in MR (6)
- R2-3: 6 sc (6) – 2 rounds total
- Fold the edges together and single crochet across to seal (2 sc). Cut yarn, leaving a sewing tail.
Back Legs (Make 2)
- R1: 6 sc in MR (6)
- R2-4: 6 sc (6) – 3 rounds total
- Fold the edges together and single crochet across to seal (2 sc). Cut yarn, leaving a sewing tail.
The Tail
Use brown yarn to crochet a cute little tail.
- R1: 4 sc in MR (4)
- R2: (1 sc, inc) x 2 (6)
- R3: 6 sc (6)
- R4: 2 sc, dec, 2 sc (5)
- R5: 5 sc (5)
- R6: 2 sc, dec, 1 sc (4)
Cut yarn, leaving a long tail for assembly.
The Frilly Lettuce Leaves (Make 2)
Using your green yarn, we will crochet the lettuce leaves in flat, turning rows.
- R1: Ch 11. Starting in the 2nd chain from hook, sc in the next 10 stitches. Ch 2, turn. (10)
- R2: Dc in each of the 10 stitches across. Ch 2, turn. (10)
- R3: Work 3 dc into each stitch across (this creates the ruffled edge). (30)
- Make a ch 2 and slip stitch into the last stitch of the row to finish the edge nicely.
Cut the yarn, leaving a tail for assembly. Hide the starting tail inside the leaf piece.
Finishing & Assembly
Now that all of your components are crocheted, it is time to assemble our hot dog puppy! Use straight pins to position all the parts before sewing to ensure everything is symmetrical.
1. Face & Head Details
- The Muzzle: Pin the muzzle onto the front of the body, approximately between Rounds 8 and 9. Sew it securely using your tapestry needle.
- The Eyes: Pin the two white eyes directly above the muzzle so they touch. Sew them flat to the face.
- The Ears: Pin the floppy ears symmetrically on either side of the head, between Rounds 5 and 6. Sew them down securely.
- The Face Embroidery: Use black sewing thread to embroider a tiny, simple mouth right below the muzzle (about 2 stitches wide). Squeeze in two tiny, quirky eyebrows just above the white eyes for extra personality.
2. Legs & Tail
- The Legs: Pin the shorter front legs onto the upper body and the longer back legs onto the lower body. Sew them securely in place.
- The Tail: Pin the tail onto the lower backside of the dog’s body and sew it on.
- The Back Details: Using a bit of black sewing thread, embroider a tiny “x” mark on the lower back of the dog, just above the tail.
3. Condiment Toppings
Take some red yarn (for ketchup) or yellow yarn (for mustard) and embroider a wavy zigzag pattern directly down the center of the dog’s stomach. Double up on your embroidery stitches to make the sauce look thick, bold, and delicious!
4. Lettuce & Bun Assembly
- The Lettuce: Symmetrically pin the green lettuce ruffles along both sides of the dog’s body, tucked behind the arms and legs. Sew them to the body with green yarn.
- Fitting the Bun: Gently press your dog inside the curve of the beige bun. The bun should curl up around the sides of the dog like a real hot dog.
- Sewing the Bun: Pin the bun in place. Using the long beige yarn tail from the bun, sew it directly to the dog’s back and sides, hiding your stitches as you go. Fasten off and hide all loose ends inside your work.
Tips for Amigurumi Success
- Tight Stitches: Amigurumi looks best when stitched tightly so that fiberfill does not escape. If you see gaps, try sizing down your crochet hook by 0.25 mm or 0.5 mm.
- Embroidery Precision: Use a sharp embroidery or sewing needle rather than a blunt tapestry needle when working with fine sewing thread for the facial details. This allows for cleaner placement through the yarn fibers.
- Make It Your Own: Love toppings? Try embroidering tiny green dots for relish, or make both ketchup and mustard lines running down the belly!
Your adorable and crazy amigurumi hot dog dog is finished and ready to be shown off! Happy crocheting!