How to Crochet a Cute Mini Backpack: A Step-by-Step Tutorial
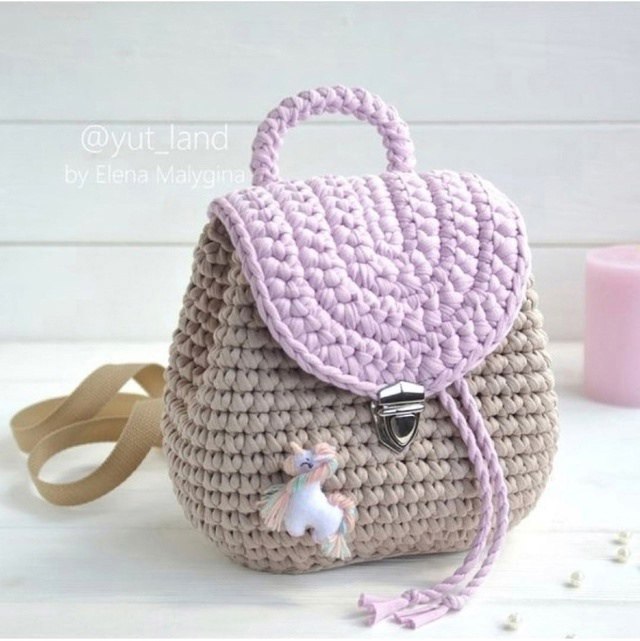
Are you looking for your next adorable crochet project? Whether you want to make a tiny accessory for a child, a quirky festival bag, or a stylish way to carry your essentials, this crochet mini backpack is the perfect project! This design combines a trendy, textured body with a charming decorative flap, creating a look that is both functional and whimsical.
This tutorial is designed with beginners in mind. We will walk you through creating the oval base, the sturdy walls, and that iconic rounded flap. By the end of this guide, you’ll have a handmade masterpiece that looks like it came straight from a boutique! Grab your hook and some cozy yarn, and let’s get started.
Materials & Abbreviations
To ensure your backpack has enough structure to hold its shape, I recommend using a slightly thicker yarn and a hook size that creates a tight, dense fabric. This prevents small items from slipping through the stitches.
What You Will Need
- Yarn: Approximately 150–200 yards of bulky weight cotton or acrylic yarn. You will need two colors: a neutral shade (like beige or tan) for the body, and a soft pastel shade (like lavender or lilac) for the flap and handle.
- Crochet Hook: A 5.0mm (H) or 5.5mm (I) crochet hook, depending on your tension.
- Notions: A tapestry needle for weaving in ends, scissors, and stitch markers.
- Hardware: One metal magnetic clasp or a decorative button, and a piece of beige webbing or a matching crochet strap for the shoulder strap.
- Decorations: A small charm (like the unicorn shown in the inspiration photo) to add personality.
Abbreviations (US Terms)
Please note that these instructions use standard US crochet terminology:
- ch: chain
- st(s): stitch(es)
- sc: single crochet
- sl st: slip stitch
- inc: increase (two stitches in one)
- dec: decrease (two stitches worked together)
- rnd(s): round(s)
Step-by-Step Instructions
Part 1: The Oval Base (The Bottom)
Every great bag starts with a solid foundation. We will begin by crocheting an oval base using your neutral color. This shape provides the width needed for the bag to sit upright.
Start by making a foundation chain of approximately 12–15 chains. Do not make it too tight, as you need flexibility for the oval shape.
Round 1: Single crochet in the second chain from the hook. Work 1 sc in each remaining chain. When you reach the end, work 3 sc into the very last chain to turn the corner. Now, working along the bottom side of your foundation chain, work 1 sc in each stitch. As you approach the beginning of the chain, work 2 sc in the final stitch. Join with a sl st to the first sc.
Round 2: Work in continuous rounds. Place your stitch marker in the first stitch. Work 1 sc in each stitch around. When you reach the “curves” (the ends of the oval), work an increase (2 sc in one stitch) to keep the base flat. Continue until your oval reaches your desired width, typically about 5–6 inches across.
Part 2: The Main Body (The Walls)
Once your base is complete, it is time to build the walls. This is where the bag gains its height and structure.
Round 3 and beyond: Continue working in continuous rounds with your neutral color. To ensure the walls rise vertically rather than curling inward, work one sc in every stitch around. If you notice the edges starting to flare out, you can work one sc in each stitch. If the edges start to pull inward, add an increase at the turning points of the oval once every few rounds.
Continue working in rounds until the walls reach approximately 6–7 inches in height. For a more professional look, keep your tension even. The goal is a dense, “stiff” fabric that won’t stretch out too much when you put items inside.
Part 3: The Decorative Flap
The flap is the star of the show! We will switch to your pastel color (lavender) to create a rounded, textured flap that covers the top of the bag.
The Foundation: Create a foundation chain that is slightly wider than the top opening of your bag. Join to the edge of the bag with a sl st to create a starting row.
Row 1: Work sc in each chain across. Turn your work.
Row 2 (The Texture Row): To achieve the ribbed effect seen in the design, work a row of sc, but every few stitches, incorporate a decorative slip stitch or a small chain loop to create ridges. Alternatively, you can work in rows of half double crochet to create a thicker, more cushioned flap.
Shaping the Curve: As you work upward, decrease at the edges (work two stitches together) on every other row. This will create the semi-circle shape. Continue until the flap is long enough to reach past the front of the bag, allowing it to tuck under the clasp.
Part 4: The Top Handle
The handle is worked separately and then attached to the top of the bag.
Using your pastel color, chain a loop that is approximately 4–5 inches long. To make it sturdy, work a round of sc all the way around that chain, essentially creating a thick crochet cord. This prevents the handle from stretching over time.
Finishing
Now that all your pieces are ready, it is time for assembly!
Attaching the Flap: Lay your bag flat. Position the flap on top. Using your tapestry needle and a bit of pastel yarn, sew the edges of the flap to the top of the bag’s walls. Ensure it is centered so it hangs symmetrically.
Attaching the Handle: Sew the ends of your crochet handle to the top edge of the bag, near the sides. Make sure it is secure, as this will be handled frequently.
Adding the Strap and Charm: Attach your beige webbing strap to the sides of the bag using heavy-duty stitches or small safety pins for a temporary fix. Finally, sew your favorite charm (like the unicorn!) to the front of the bag to complete the look.
Don’t forget to weave in all your loose ends thoroughly so they don’t pop out later!
Tips for Success
- Use Stitch Markers: When working in rounds, it is very easy to lose track of where your row starts. Always use a marker in the first stitch of every round.
- Tight Tension is Key: For bags, a tighter tension is usually better. It makes the bag more durable and prevents your phone or keys from poking through the stitches.
- Try Different Colors: While the beige and lavender combo is classic, this pattern looks amazing in neon colors for a retro vibe or earthy tones for a boho look.
- Blocking: Once you are finished, you can lightly steam or wet-block your flap to make sure the shape is perfectly even and the texture pops.