Cozy Pocket Bear: Free Amigurumi Crochet Pattern
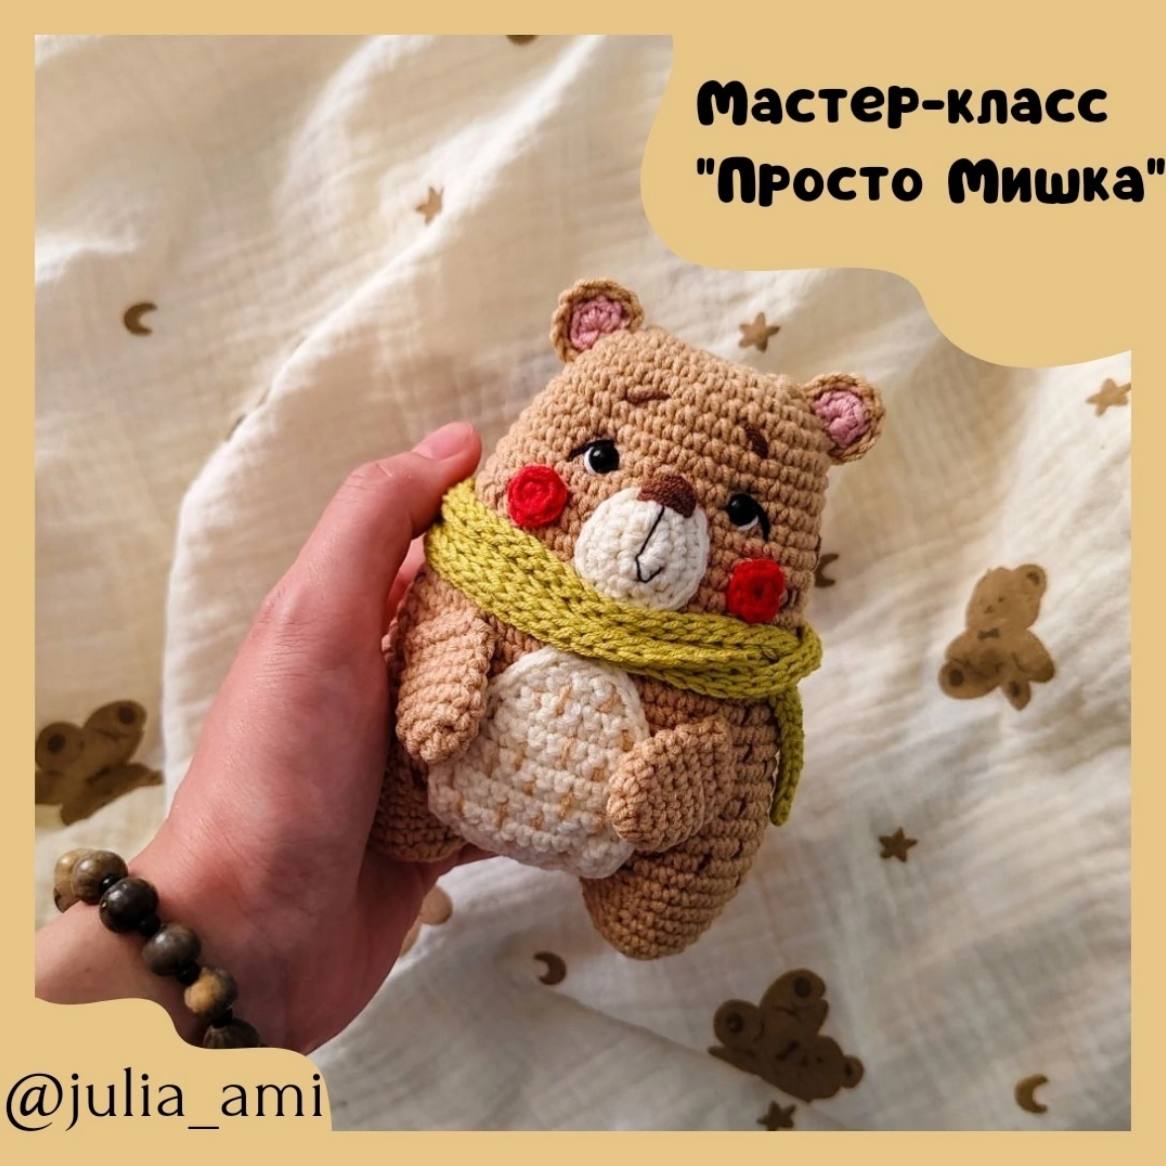
Are you looking for your next cozy crochet project? This adorable pocket-sized amigurumi bear is the perfect companion! With his chubby cheeks, custom pistachio-green scarf, and sweet embroidered details, he is guaranteed to bring a smile to anyone’s face. Whether you are crafting a handmade gift for a loved one or adding to your own plushie collection, this beginner-friendly tutorial will guide you step-by-step through the process.
We use standard US crochet terms and imperial measurements to make this pattern easy to follow. Grab your favorite yarn, find a comfy spot, and let’s start stitching!
Materials & Abbreviations
Materials Needed
- Yarn: Sport weight (Fine #2) or DK weight yarn in the following colors:
- Beige (approx. 45-50 yards) for the main body, head, and outer ears
- Cream/Milk (approx. 15 yards) for the muzzle and tummy patch
- Powder Pink (scrap amount) for the inner ears
- Pistachio Green (approx. 15-20 yards) for the scarf
- Red (scrap amount) for the cheeks
- Crochet Hooks:
- Size 1.5 mm (or US Steel Hook Size 8) for the bear body and details
- Size US G/6 (4.0 mm) for the scarf
- Safety Eyes: Two 6 mm black safety eyes
- Embroidery Floss or Thin Yarn: Black, white, and medium brown for facial detailing
- Other Tools: Fiberfill stuffing, tapestry needle, sharp scissors, and a stitch marker
Crochet Abbreviations (US Terms)
- ch: chain
- sc: single crochet
- inc: increase (work 2 single crochets in the same stitch)
- dec: decrease (crochet 2 stitches together using the invisible decrease method)
- sl st: slip stitch
- BLO: back loops only
- st(s): stitch(es)
- MR: Magic Ring
- […]: repeat instructions within brackets the specified number of times
- (…): total stitch count at the end of the round or row
Step-by-Step Instructions
Head & Body
The head and body are worked as one continuous piece from the top down. Use beige yarn and the 1.5 mm hook. Work in a continuous spiral without joining or chaining at the end of each round unless otherwise noted. Use your stitch marker to keep track of the first stitch of each round.
Round 1: Ch 8. Starting in the second chain from the hook, work 1 inc. Work 5 sc along the chain. In the last chain stitch, work 4 sc (this turns your work so you can crochet along the opposite side of the chain). Working along the opposite side, work 5 sc, then 1 inc in the final loop. (18 sts)
Round 2: [1 sc, inc], repeat [2 sc, inc] 5 times, then work 1 sc. (24 sts)
Round 3: [3 sc, inc] 6 times. (30 sts)
Round 4: [2 sc, inc], repeat [4 sc, inc] 5 times, then work 2 sc. (36 sts)
Round 5–6: Work 36 sc around. (36 sts for 2 rounds)
Round 7: [5 sc, inc] 6 times. (42 sts)
Round 8–10: Work 42 sc around. (42 sts for 3 rounds)
Round 11: [3 sc, inc], repeat [6 sc, inc] 5 times, then work 3 sc. (48 sts)
Round 12–16: Work 48 sc around. (48 sts for 5 rounds)
Round 17: [7 sc, inc] 6 times. (54 sts)
Round 18–23: Work 54 sc around. (54 sts for 6 rounds)
Round 24: [8 sc, inc] 6 times. (60 sts)
Round 25–28: Work 60 sc around. (60 sts for 4 rounds)
Eye Placement: Stop and insert your 6 mm safety eyes between Rounds 8 and 9, leaving a space of 8 stitches between them. Secure the backings tightly.
Round 29: [8 sc, dec] 6 times. (54 sts)
Round 30: Work 54 sc around. (54 sts)
Round 31: [7 sc, dec] 6 times. (48 sts)
Dividing and Crocheting the Legs
Before splitting the piece into two legs, work an additional 6 sc (or adjust as needed) so your working yarn and stitch marker are positioned precisely on the side fold of the body. We will now split the 48 stitches into two legs of 18 stitches each, leaving a small gap in the middle to sew shut later.
Leg 1
Round 1: From your marker on the side edge, work 8 sc. To split the body, skip the next 10 stitches across the body opening. Join the sides by working 1 sc into the opposite side’s stitch (the 9th stitch from the marker). Work another 9 sc around the newly formed leg loop. (18 sts total for the leg loop)
Round 2: Work 18 sc around. (18 sts)
Round 3: Work [dec] 9 times in BLO. (9 sts)
Fasten off, weave the tail through the front loops of the remaining 9 stitches, pull tightly to close the opening, and secure the thread.
Now, firmly stuff the upper head and body, as well as the first completed leg, using fiberfill stuffing.
Leg 2
Join beige yarn at the marker position on the back of the bear’s body to start the second leg.
Round 1: Count 19 stitches on the open body side. Work 17 sc around, then join the 19th stitch to the first stitch near the marker with 1 sc to close the leg circle. (18 sts)
Round 2: Work 18 sc around. (18 sts)
Round 3: Work [dec] 9 times in BLO. (9 sts)
Fill the second leg firmly with stuffing. Fasten off, pull the hole closed, and weave in your ends. Sew the small remaining gap between the two legs closed using a needle and a short strand of beige yarn.
Ears (Make 2 Outer & 2 Inner pieces)
The ears are created by making two pink inner pieces and two beige outer pieces, then crocheting them together for a clean, thick finish.
Pink Inner Ear (Make 2)
Using pink yarn, work 6 sc into a Magic Ring. Do not join into a circle. Pull the ring into a neat semi-circle, fasten off, and weave in the starting tail.
Beige Outer Ear (Make 2)
Using beige yarn, work 6 sc into a Magic Ring. Do not join. Ch 1, turn your work. Place one pink inner ear piece directly on top of the beige piece. Working through both pieces at once (through the BLO of the pink ear and both loops of the beige ear), crochet: [1 sc, inc] 3 times. (9 sts)
Fasten off, leaving a long tail for sewing the ears onto the head.
Muzzle
Using cream/milk yarn and the 1.5 mm hook, work in a spiral around a starting chain.
Round 1: Ch 4. Starting in the second chain from the hook, work 2 sc. In the last chain, work 4 sc to turn the corner. Working along the opposite side of the chain, work 2 sc. (8 sts)
Round 2: Work 1 inc, 1 sc, [1 inc, 2 sc, 1 inc], 1 sc, 1 inc. (12 sts)
Round 3: Work 1 sc, 1 inc, 1 sc, [1 sc, 1 inc] 3 times, 1 sc, 1 inc, 1 sc. (17 sts)
Fasten off, leaving a long tail for sewing.
Tummy Patch
Using cream/milk yarn and the 1.5 mm hook, worked in flat, turning rows.
Row 1: Ch 5. Starting in the second chain from the hook, work 4 sc. Ch 1, turn. (4 sts)
Row 2: Work 1 inc, 2 sc, 1 inc. Ch 1, turn. (6 sts)
Row 3: Work 6 sc. Ch 1, turn. (6 sts)
Row 4: Work 1 inc, 4 sc, 1 inc. Ch 1, turn. (8 sts)
Row 5: Work 8 sc. Ch 1, turn. (8 sts)
Row 6: Work 1 inc, 6 sc, 1 inc. Ch 1, turn. (10 sts)
Row 7: Work 10 sc. Ch 1, turn. (10 sts)
Row 8–12: Work 10 sc. Ch 1, turn. (10 sts for 5 rows)
Row 13: Work 1 dec, 6 sc, 1 dec. Ch 1, turn. (8 sts)
Row 14: Work 1 dec, 4 sc, 1 dec. (6 sts)
Do not turn. Work a clean border of slip stitches (sl st) all the way around the outer raw edge of the tummy patch. Fasten off, leaving a long tail for sewing.
Arms (Make 2)
Using beige yarn and the 1.5 mm hook.
Round 1: Work 6 sc in a MR. (6 sts)
Round 2: Work [inc] 6 times. (12 sts)
Round 3–6: Work 12 sc around. (12 sts for 4 rounds)
Press the opening of the arm flat and work 6 sc through both layers to close the edge. Ch 1, turn. Work 1 dec, 2 sc, 1 dec. (4 sts) Fasten off, leaving a long tail.
Cheeks (Make 2)
Using red yarn and the 1.5 mm hook, work 7 sc into a Magic Ring. Join with a sl st to the first stitch. Fasten off, leaving a tail for sewing.
Pistachio Scarf
Using pistachio green yarn and the larger 4.0 mm hook (US G/6).
Row 1: Ch 141. Starting in the second chain from the hook, work 140 sl st. Ch 1, turn. (140 sts)
Row 2: Work 140 sl st in BLO across.
If you prefer a wider scarf, simply repeat Row 2 until it reaches your desired thickness. Fasten off and weave in your ends.
Finishing & Assembly
1. Eye Sculpting (Deepening)
Before sewing on the details, perform a slight needle sculpting for the eye sockets to give your bear a sweet expression. Thread a long piece of beige yarn on your needle. Insert the needle from the bottom of the head (near the neck/leg split gap) and bring it out right next to the outer corner of the left eye. Re-insert it one stitch over and bring it back down to the neck. Repeat this process for the right eye. Pull both thread tails gently to sink the eyes slightly into the head, tie a secure knot at the base of the head, and hide the yarn tails inside the body.
2. Facial Details
- Eye Details: Using white embroidery thread, stitch a small crescent shape along the lower outer edge of each safety eye to create the whites of the eyes. Using black thread, stitch a delicate eyelid or eyelash line just above each eye.
- Muzzle: Sew the muzzle to the center of the face, positioning it slightly over the lower edge of the eyes. Add a tiny bit of fiberfill stuffing inside before closing. With brown embroidery thread, stitch a triangular nose on top and add vertical brow lines above the eyes. Using a single strand of black thread, stitch a simple, sweet smile.
- Ears & Cheeks: Sew the ears securely to the top corners of the head. Position the red cheeks just below and slightly to the outside of the eyes, sewing them flat.
3. Body Assembly
- Tummy Patch: Before sewing the tummy patch onto the body, use a contrast thread (such as the pistachio green or brown) to stitch a decorative cross-stitch or plaid pattern on it. Center the patch on the lower half of the body and sew it down neatly around the slip stitch border.
- Arms: Position the arms on the sides of the body, level with the top of the tummy patch, and sew them firmly in place.
- Fur Details (Optional): Take some medium brown thread and add tiny vertical stitches randomly across the body to simulate soft, textured fur.
- The Scarf: Wrap the pistachio green scarf cozy-style twice around your bear’s neck and tie it loosely on the side.
Crochet Tips for Success
- Keep Your Tension Consistent: Amigurumi requires tight, even stitches so that the fiberfill stuffing does not peek through. If you notice gaps, try using a slightly smaller hook.
- Use the Invisible Decrease: When working your decreases (dec), insert your hook into the front loops only of the next two stitches. This creates a much smoother finish than a standard decrease.
- Stuff Firmly: Take your time stuffing the body and legs. Use small clumps of fiberfill and push them into the corners (especially the legs) to help your bear maintain its chubby, huggable shape over time.
Your adorable Cozy Pocket Bear is now complete and ready for adventures! Enjoy your new little friend!