Cute Crochet Pigeon Keychain Pattern: A Step-by-Step Tutorial
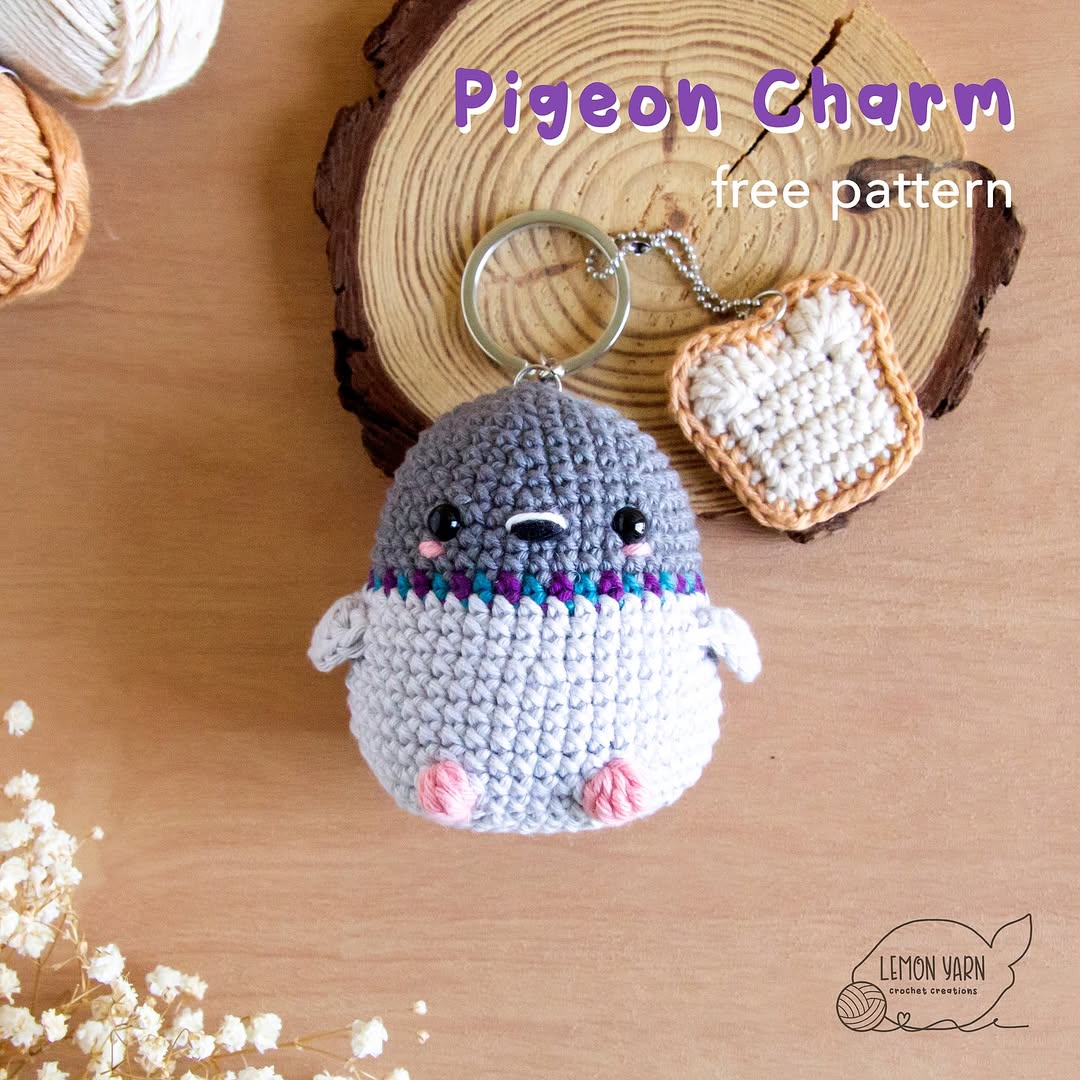
Who doesn’t love the quirky charm of city pigeons? While they might be known as “rats with wings” to some, we see them as adorable, bread-loving little birds! In this tutorial, we are going to create a tiny, plump pigeon charm that comes complete with its favorite snack: a little slice of crochet toast. This project is perfect for beginners looking to practice amigurumi basics or for experienced crocheters who want a quick and satisfying “one-afternoon” project.
This little bird measures approximately 2.8 inches, making it the ideal size for a keychain, bag charm, or a desk companion. We will be using a few different colors to capture that iridescent “pigeon” look, including a pop of teal and purple for the neck feathers. Let’s grab our hooks and get started!
Materials & Abbreviations
To make this pigeon, you will need a few different colors of yarn. Because this is a small project, you only need small amounts of each color. A cotton DK weight yarn works best for a clean, defined look.
Materials Needed
- Yarn: 100% Cotton DK weight in the following colors:
- Slate Grey (for the head)
- Silver Grey (for the body)
- Purple and Teal (for the neck detail)
- Coral (for the feet and cheeks)
- Ecru (for the bread slice)
- Caramel (for the bread crust)
- Small amounts of Black and Cream (for embroidery)
- Crochet Hook: 2.5mm (or a size that prevents stuffing from showing through)
- Safety Eyes: 6mm black safety eyes
- Stuffing: Polyester fiberfill or toy stuffing
- Tools: Yarn needle, scissors, and pliers
- Hardware: Keychain ring, jump rings, and a small chain
Abbreviations (US Terms)
- Rnd: Round
- MR: Magic Ring
- ch: Chain
- st/s: Stitch/Stitches
- slst: Slip stitch
- sc: Single crochet
- hdc: Half double crochet
- dc: Double crochet
- inc: Increase (two stitches in one stitch)
- dec: Invisible decrease
- FLO: Front Loop Only
- X-dc-bobble: Bobble stitch created with double crochets
- [*] Sequence of stitches to be repeated
- (*) The final stitch count for the round
Step-by-Step Instructions
This pigeon is worked in continuous rounds, meaning you do not join the end of each round with a slip stitch. It is highly recommended to use a stitch marker to keep track of the beginning of your rounds.
The Body and Head
Start with the Slate yarn for the top of the head.
Rnd 1: Create a magic ring and work 6 sc into it. (6)
Rnd 2: Increase in each stitch around. (12)
Rnd 3: [sc 1, inc] 6 times. (18)
Rnd 4: [sc 2, inc] 6 times. (24)
Rnd 5: [sc 3, inc] 6 times. (30)
Rnd 6: sc in each stitch around. (30)
Rnd 7: [sc 4, inc] 6 times. (36)
Rnd 8: sc in each stitch around. (36)
Rnd 9: [sc 5, inc] 6 times. (42)
Rnd 10-12: sc in each stitch around for 3 rounds. (42)
Creating the Neck Pattern
Now we will add that signature pigeon iridescent shimmer. Cut the slate yarn and switch to Teal and Purple.
Rnd 13: [sc 1 in teal, sc 1 in purple] 21 times. (42)
Cut the teal and purple yarns. Change to Silver Grey for the lower body.
Rnd 14: [sc 13, inc] 3 times. (45)
Adding the Face
Before we move further down the body, let’s add the facial features while the piece is still easy to handle.
- Eyes: Place the 6mm safety eyes between rounds 10 and 11, leaving 8 stitches between them.
- Cheeks: Using Coral yarn, embroider two small horizontal lines between rounds 11 and 12, directly below the eyes. Each cheek should be 1 stitch wide.
- Beak: Using Black yarn, center the beak between the eyes. Embroider 3 horizontal lines between rounds 10 and 11, each 2 stitches wide.
- Detail: Using Cream yarn, add one small line of embroidery just above the black beak for a realistic touch.
The Wings
The wings are worked directly into the body using the Front Loop Only (FLO) technique to make them pop out from the sides.
Rnd 15: sc 7, skip 3 sts, work 9 dc into the FLO of the next stitch, skip 3 sts, sc 15, skip 3 sts, work 9 dc into the FLO of the next stitch, skip 3 sts, sc 9. (45)
Rnd 16: sc 7, sc 3 in each of the skipped stitches, sc 1 in the leftover loop from the dc, sc 3 in each of the skipped stitches, sc 15, sc 3 in each of the skipped stitches, sc 1 in the leftover loop, sc 3 in each of the skipped stitches, sc 9. (45)
Rnd 17: [sc 7, inc, sc 7] 3 times. (48)
Rnd 18-21: sc in each stitch around for 4 rounds. (48)
Feet and Tail
Now we add the final details to the bottom of the pigeon. Use Coral yarn for the feet.
Rnd 22: sc 20, work one 5-dc-bobble in coral, sc 6, work one 5-dc-bobble in coral, sc 19. Now, for the tail, work the following sequence into the FLO of the next stitch: [slst 1, ch 5, slst 1, ch 7, slst 1, ch 5, slst 1]. (45 sts + 2 feet + tail)
Rnd 23: sc 47, sc 1 in the leftover loop of the tail. (48)
Rnd 24: [sc 4, dec] 8 times. (40)
Stuffing: Now is the time to stuff the body firmly with polyester fiberfill. Ensure the neck and bottom are plump!
Rnd 25: [sc 3, dec] 8 times. (32)
Rnd 26: [sc 2, dec] 8 times. (24)
Rnd 27: [sc 1, dec] 8 times. (16)
Rnd 28: dec 8 times. (8)
Fasten off and use your yarn needle to sew the remaining hole closed.
The Bread Accessory
No pigeon is complete without a piece of toast!
Bread Slices
Using Ecru yarn, make 2 identical slices.
Row 1: ch 7, starting in the second chain from hook, sc 6, turn. (6)
Row 2-5: ch 1, sc 6, turn. (6)
Now, we will work in one continuous round around the rectangle to shape the top of the bread:
Rnd 6: ch 1, work along the side of the rows: sc 4. On the foundation chain: dc 5 in next st, hdc 1, sc 2, hdc 1, dc 5 in next st. Work back along the other side: sc 4, ch 1. Finish by working across the top row (Row 5): sc 6. (28)
Fasten off and weave in the ends.
Bread Crust
Using Caramel yarn, place your two ecru slices together with the wrong sides facing each other.
Rnd 1: Join with a slipknot. sc 1 in the bottom right corner chain, sc 6, inc in the corner chain, sc 22, sc 1 in the starting corner chain. (30)
Fasten off and weave in the ends.
Finishing
Now that all your pieces are complete, it’s time for assembly!
- Attach a jump ring to the very top of the pigeon’s head.
- Attach the bread slice to a small chain and connect it to the main keychain ring along with the pigeon.
- Use your pliers to ensure all jump rings are closed tightly so your pigeon and his toast don’t get lost on your adventures.
Tips for Success
- Invisible Decreases: To keep your amigurumi looking smooth and professional, always use the invisible decrease method (inserting your hook into the front loops only of the next two stitches) rather than a standard decrease.
- Tension: Keep your tension tight, especially when working the wings and feet, to ensure the shape holds and the stuffing doesn’t leak out.
- Customization: Feel free to experiment with the colors! You could make a white pigeon or even a fancy fancy pigeon with different metallic yarns for the neck.