DIY Sage Green Circle Crochet Jacket: Step-by-Step Pattern
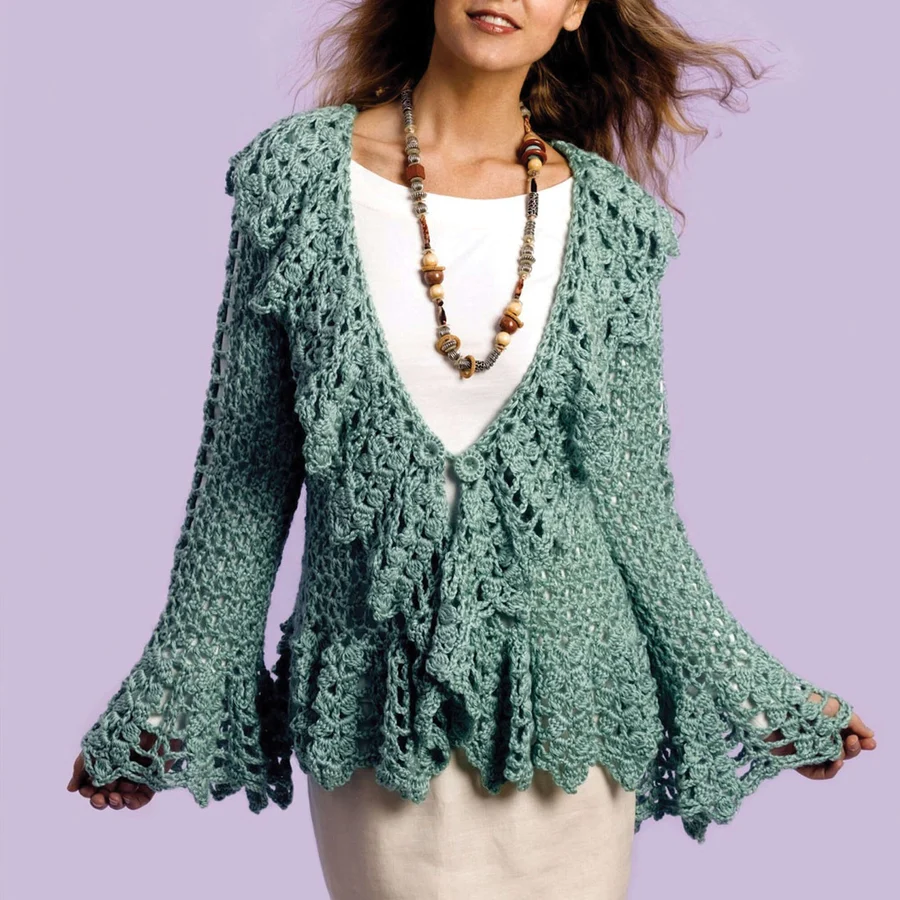
Looking for a stunning, bohemian-inspired project to add to your wardrobe? This Sage Green Circle Crochet Jacket is the perfect blend of elegance and comfort. With its unique leaf motifs and a flowing, oversized silhouette, this jacket works beautifully as a light layer for spring or a cozy addition to a fall outfit.
This pattern is worked from the neck down, utilizing raglan-style increases at the corners to create a comfortable fit that drapes perfectly. While it is marked as an intermediate project, this detailed guide will walk you through every special stitch, making it accessible for any crocheter ready to level up their skills.
Materials & Abbreviations
To get started, gather the following supplies. We recommend using a soft, medium-weight yarn to ensure the jacket has a lovely drape.
Materials Needed
- Yarn: Medium weight (4) yarn in Sage Green.
- XS/S: 4 balls (approx. 1,260 yards)
- M: 4 balls (approx. 1,260 yards)
- L: 5 balls (approx. 1,575 yards)
- Crochet Hooks:
- US I/9 (5.5 mm) for the main body
- US H/8 (5 mm) for the buttons
- Notions: Stitch markers, 2 plastic bone rings (7/8″ diameter) for buttons, and a yarn needle.
Abbreviations (US Terms)
- Ch: Chain
- Sc: Single crochet
- Dc: Double crochet
- Dtr: Double treble crochet
- Sl st: Slip stitch
- V-st: V-stitch (1 dc, ch 2, 1 dc) worked into the same stitch
- CL: Cluster stitch (dc4tog). Yarn over and draw up a loop 4 times in one stitch, then yarn over and draw through all 5 loops on the hook.
- Leaf: A decorative motif worked as (Ch 3, CL, Ch 2, 1 dc, Ch 2, CL, Ch 3) all in the same indicated stitch.
- Dc3tog: Double crochet 3 together.
- RS/WS: Right side / Wrong side
- Tch: Turning chain
Gauge
Using the larger hook in the established pattern: 4 V-sts and 6 rows = 4 inches. If your gauge differs, consider adjusting your hook size to ensure the jacket fits as intended.
Step-by-Step Instructions
The Foundation: Base Chain and Sc
This jacket begins with a unique foundation stitch that provides more stability than a standard chain. Begin with a slip knot. Ch 2. Insert the hook into the 2nd ch from the hook, draw up a loop, yarn over and draw through one loop (creating a “chain”), then yarn over and draw through 2 loops to create a single crochet (sc).
For the following stitches, work under the forward two loops of the stem of the previous stitch. Insert your hook into the face of the chain and under the nub at the back. Draw up a loop, yarn over and draw through one loop, then yarn over and draw through two loops. Repeat this process for 33 stitches, measuring approximately 11 inches when stretched.
The Body: Creating the Shape
The body is worked from the neck down. We will use V-stitches and corner increases to create the raglan shaping.
Starting the Body
Row 1 (RS): Ch 5. Work 1 dc in the first sc. *Skip next sc, work a V-st in the next sc*. Repeat from * to * 16 times. Turn. (17 V-sts total).
Row 2 (Increases): Ch 5. In the first ch-sp, work (1 dc, ch 2, V-st) to create the first corner. Work a V-st in each of the next 3 V-sts. In the next V-st, work (V-st, ch 2, V-st) for the second corner. Work a V-st in each of the next 7 V-sts. In the next V-st, work (V-st, ch 2, V-st) for the third corner. Work a V-st in each of the next 3 V-sts. Finally, in the turning chain space, work (V-st, ch 2, V-st) for the fourth corner. Turn. Use stitch markers to mark the ch-2 spaces at each corner.
Sizing Adjustments for Row 2:
- Size M & L: Add an extra increase row (Row 2a) by working (V-st, ch 2, V-st) into each corner ch-2 space and a V-st in every other V-st across.
- Size L only: Add another increase row (Row 2b) following the same logic to further expand the neckline and shoulders.
Building the Pattern and Leaf Motifs
Row 3: Ch 5. Work 1 dc in the first ch-sp. Work a V-st in every V-st and every corner ch-2 space across. End with 1 dc in the tch sp. Ch 2, 1 dc in 3rd ch of tch. Turn. (Count: 25, 33, or 41 V-sts depending on size).
Row 4: Repeat the increase logic from Row 2, working (V-st, ch 2, V-st) into the corner V-sts to continue expanding the jacket.
Row 5: Repeat Row 3.
Row 6 (Introducing Leaves): This is where the jacket gets its signature look. Work V-sts across, but at the center of the back and the center of each arm, work a Leaf stitch into the designated V-st. Follow the size-specific counts for V-sts between leaves: 3 (4-5) V-sts for XS/S (M, L).
Rows 7-10: Continue the pattern. In rows 7 and 8, work the Leaf stitch directly over the previous row’s leaf to create a stacked effect. In Row 9, continue the corner increases to shape the underarms.
Armholes and Final Body Rows
Row 11: Ch 5. Work V-sts across the front. When you reach the underarm, work a base ch/sc of 5 stitches to create the armhole opening, skip the necessary stitches, and then continue with V-sts across the back and other arm.
Rows 12-23: Continue working the leaf and V-st pattern, following the instructions for your specific size. As you approach the bottom, transition to the “Work in pat” instructions, ending with a double treble crochet (dtr) in the final turning chain. Do not turn.
Edging and Collar
Rotate your work to the right side. Work single crochet (sc) around the entire front edge of the jacket. To create the collar, you will work “Short Rows.”
- Short Row 1: Work sc along the bottom corner and up the front edge, then across the neck base. Sl st in the final chain and turn.
- Short Rows 2-5: Work sc across the collar area, turning back before the end of the row to build height and shape for the neckline.
The Sleeves and Ruffle Trim
Crocheting the Sleeves
Join your yarn at the middle of the underarm. Work in rounds using V-sts and Leaf motifs.
- Rounds 1-3: Establish the sleeve width with V-sts and one centered Leaf motif.
- Rounds 4-17: Repeat the V-st and Leaf pattern to reach the desired sleeve length.
The Ruffle Trim
To add a feminine touch, work a ruffle around the sleeve cuffs and the bottom hem of the jacket.
Round 18: Work Cluster stitches (CL) and Leaf motifs around the edge.
Rounds 19-22: Continue with the Leaf and V-st pattern to expand the ruffle.
Round 23 (The Finish): Create a picot edge by working (Dc3tog, ch 3, sl st in top of cluster, ch 4, sc in next cluster). This creates a delicate, pointed lace edge.
Finishing
Making the Bone Ring Buttons
Using the smaller hook (US H/8) and a long tail for sewing:
- Round 1: Ch 2, 6 sc in the 2nd ch from hook. Sl st to join.
- Round 2: Hold the 7/8″ bone ring behind the work. Ch 1, work 3 sc into each stitch, crocheting over the bone ring each time. Sl st to join.
Connect two buttons by chaining 6 between them and slip stitching back across the chain to create a double-button link.
Final Assembly
Sew the buttons to the front of the jacket using a yarn needle. Use the existing ch-spaces in the front panels as buttonholes. Weave in all remaining ends securely on the wrong side of the fabric.
Tips for Success
- Keep it Loose: The V-stitch and Cluster stitches can sometimes become tight. Ensure you are relaxed while crocheting to maintain the jacket’s flow.
- Mark Your Corners: Because the jacket grows quickly, using stitch markers at the four raglan corners is essential to avoid miscounting your increases.
- Leaf Placement: When working the Leaf stitch, ensure you are centering it exactly over the previous leaf to keep the vertical columns symmetrical.
- Blocking: For a professional look, lightly steam-block the finished jacket to open up the V-stitches and let the ruffle trim lay flat.