Adorable Mini Amigurumi Bear Crochet Pattern: Step-by-Step Tutorial
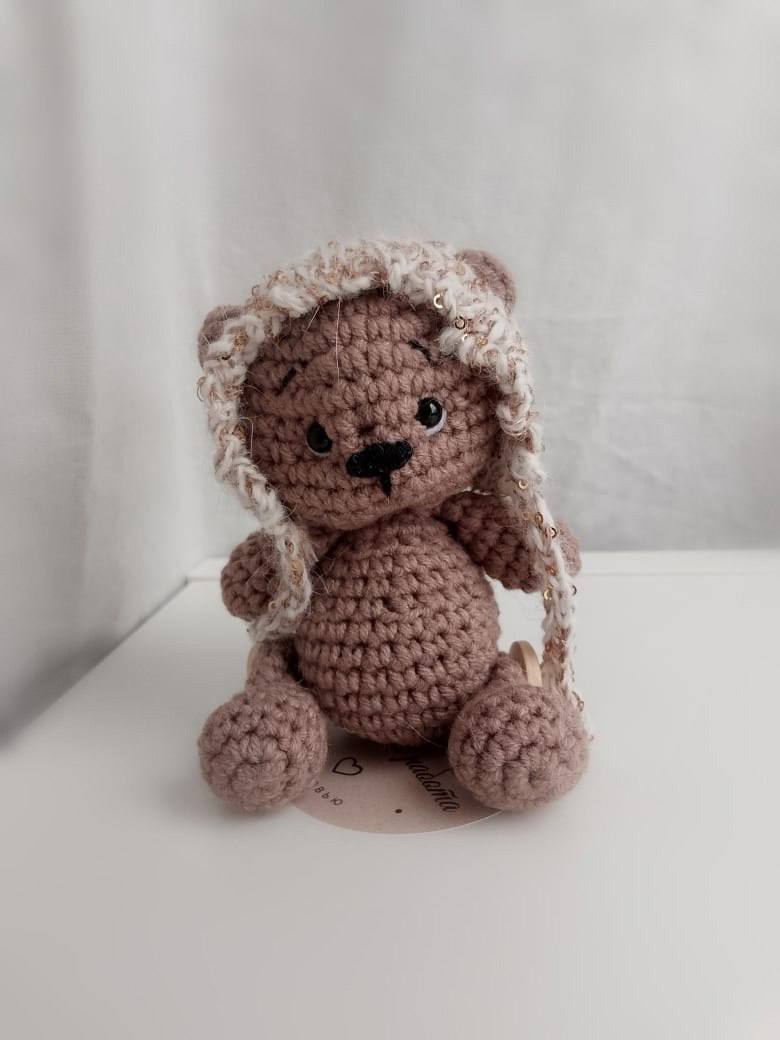
If you are looking for a quick, rewarding, and absolutely precious project, this mini amigurumi bear is the perfect choice. Standing at approximately 4 inches tall, this tiny companion is ideal for keychains, desk buddies, or a sweet handmade gift for a loved one. Whether you are an experienced crocheter or a beginner looking to practice your shaping skills, this pattern is designed to be accessible and fun.
In this tutorial, we will walk through the process of creating a miniature bear with a round belly and a sweet expression. We will use standard US crochet terms and imperial measurements to ensure a smooth crafting experience. Let’s grab our hooks and get started!
Materials & Abbreviations
To achieve the tight, sturdy stitches required for amigurumi (so the stuffing doesn’t peek through), it is important to use a hook that is slightly smaller than what the yarn label recommends.
Materials Needed
- Yarn: Sport weight cotton blend yarn (such as YarnArt Jeans) in brown or your choice of color.
- Crochet Hook: 1.75mm hook.
- Safety Eyes: 6mm black plastic safety eyes.
- Stuffing: Polyester fiberfill or scrap yarn.
- Embroidery Floss: Black and white stranded cotton for facial details.
- Tools: Yarn needle, scissors, and stitch markers.
- Optional: Small buttons for the leg joints if you want your bear to be posable.
Abbreviations (US Terms)
- MR: Magic Ring
- Sc: Single Crochet
- Inc: Increase (two single crochet stitches in the same stitch)
- Dec: Decrease (invisible decrease preferred: sc two stitches together)
- Sl st: Slip Stitch
- Dc: Double Crochet
- St(s): Stitch(es)
Step-by-Step Instructions
The Lower Legs (Make 2)
The lower legs provide the base for our bear. We will create a tube and then flatten the top to create a foot shape.
- Round 1: Create a MR and work 6 sc into the ring. (6 sts)
- Round 2: Inc in every stitch around. (12 sts)
- Rounds 3-4: Sc in each stitch around. (12 sts)
- Round 5: Sc in the next 4 sts, dec 2 times, sc in the last 4 sts. (10 sts)
- Rounds 6-10: Sc in each stitch around. (10 sts)
Closing the Lower Leg: Fold the piece in half. Sc 5 stitches across the opening to close it. Fold the piece in half once more and sc through the remaining corners to flatten the top. Finish with a slip stitch and leave a long tail for sewing.
The Upper Legs (Make 2)
The upper legs are slightly slimmer than the lower legs to give the bear a natural proportion.
- Round 1: Create a MR and work 6 sc into the ring. (6 sts)
- Round 2: (1 sc, inc) repeat 3 times. (9 sts)
- Rounds 3-7: Sc in each stitch around. (9 sts)
Closing the Upper Leg: Fold the piece in half. Sc 4 stitches across the opening. Fold the piece in half once more and sc through the corners to create a flat top. Finish with a slip stitch and leave a long tail for sewing.
The Head
The head is a sphere that we will later sculpt to create a cute muzzle.
- Round 1: Create a MR and work 6 sc into the ring. (6 sts)
- Round 2: Inc in every stitch around. (12 sts)
- Round 3: (1 sc, inc) repeat 6 times. (18 sts)
- Round 4: (2 sc, inc) repeat 6 times. (24 sts)
- Round 5: (3 sc, inc) repeat 6 times. (30 sts)
- Rounds 6-11: Sc in each stitch around. (30 sts)
- Round 12: (3 sc, dec) repeat 6 times. (24 sts)
- Round 13: (2 sc, dec) repeat 6 times. (18 sts)
- Round 14: (1 sc, dec) repeat 6 times. (12 sts)
Eye Placement: Before closing the head, insert the 6mm safety eyes between rounds 8 and 9. Space them 4 sc apart for a cute, wide-eyed look. Stuff the head firmly with fiberfill. Finish with a slip stitch and leave a long tail for sewing the head to the body.
The Body
The body is a rounded pear shape that allows the bear to sit comfortably.
- Round 1: Create a MR and work 6 sc into the ring. (6 sts)
- Round 2: Inc in every stitch around. (12 sts)
- Round 3: (1 sc, inc) repeat 6 times. (18 sts)
- Round 4: (2 sc, inc) repeat 6 times. (24 sts)
- Rounds 5-9: Sc in each stitch around. (24 sts)
- Round 10: (2 sc, dec) repeat 6 times. (18 sts)
- Rounds 11-12: Sc in each stitch around. (18 sts)
- Round 13: (1 sc, dec) repeat 6 times. (12 sts)
- Round 14: Sc in each stitch around. (12 sts)
Fasten off with a slip stitch and weave in your ends. Stuff the body firmly.
The Ears (Make 2)
The ears are quick and simple additions created directly onto the head.
Join your yarn to the top of the head where you want the ear to be. Work 5 dc into a single stitch, then finish with a slip stitch into the next stitch. Fasten off and hide the yarn tail inside the head.
Finishing & Assembly
Assembly is where your bear truly comes to life! Follow these steps to put everything together.
Sewing the Parts
Start by sewing the head to the body using the long tail left from the head. Ensure the head is centered and secure. Next, sew the upper legs to the sides of the body and the lower legs to the bottom of the body. If you want your bear to be able to sit up or have movable legs, you can sew a small button to the body and loop the leg around it before securing it.
Sculpting the Face
To give the bear a realistic muzzle, perform a “muzzle pull.” Thread your needle with a piece of brown yarn and insert it from the back of the head, coming out through the center of the face. Pull the yarn firmly (but not too tight) back into the head. This creates a small indentation that pushes the muzzle forward.
Embroidery Details
Use your embroidery floss to add the final touches:
- Nose: Embroider a small black triangle or oval just below the center of the eyes.
- Eyebrows: Add two small curved lines above the eyes for expression.
- Eyelashes: Add 2-3 tiny stitches to the outer corners of the eyes.
- Eye Highlights: Use a single stitch of white floss in the upper corner of each black eye to give them a “sparkle.”
Tips for Success
Want your mini bear to look professional? Here are a few expert tips:
- Maintain Tension: In amigurumi, consistent tension is key. If your stitches are too loose, the stuffing will show. If they are too tight, you may struggle to insert your hook.
- The Invisible Decrease: To avoid bumps in your work, use the invisible decrease. Instead of a standard decrease, insert your hook into the front loop only of the first stitch, and then into the front loop only of the next stitch before completing the sc.
- Stuffing Technique: Use small clumps of stuffing. Overstuffing can stretch the stitches and make the bear look distorted, while understuffing can make it look saggy.
- Customization: Feel free to change the yarn color! This pattern works beautifully in cream, grey, or even a fantasy color like mint green. You can also add a tiny crocheted scarf or a ribbon bow around the neck for extra charm.