Adorable Crochet Mini Tiger Pattern: Step-by-Step Amigurumi Tutorial
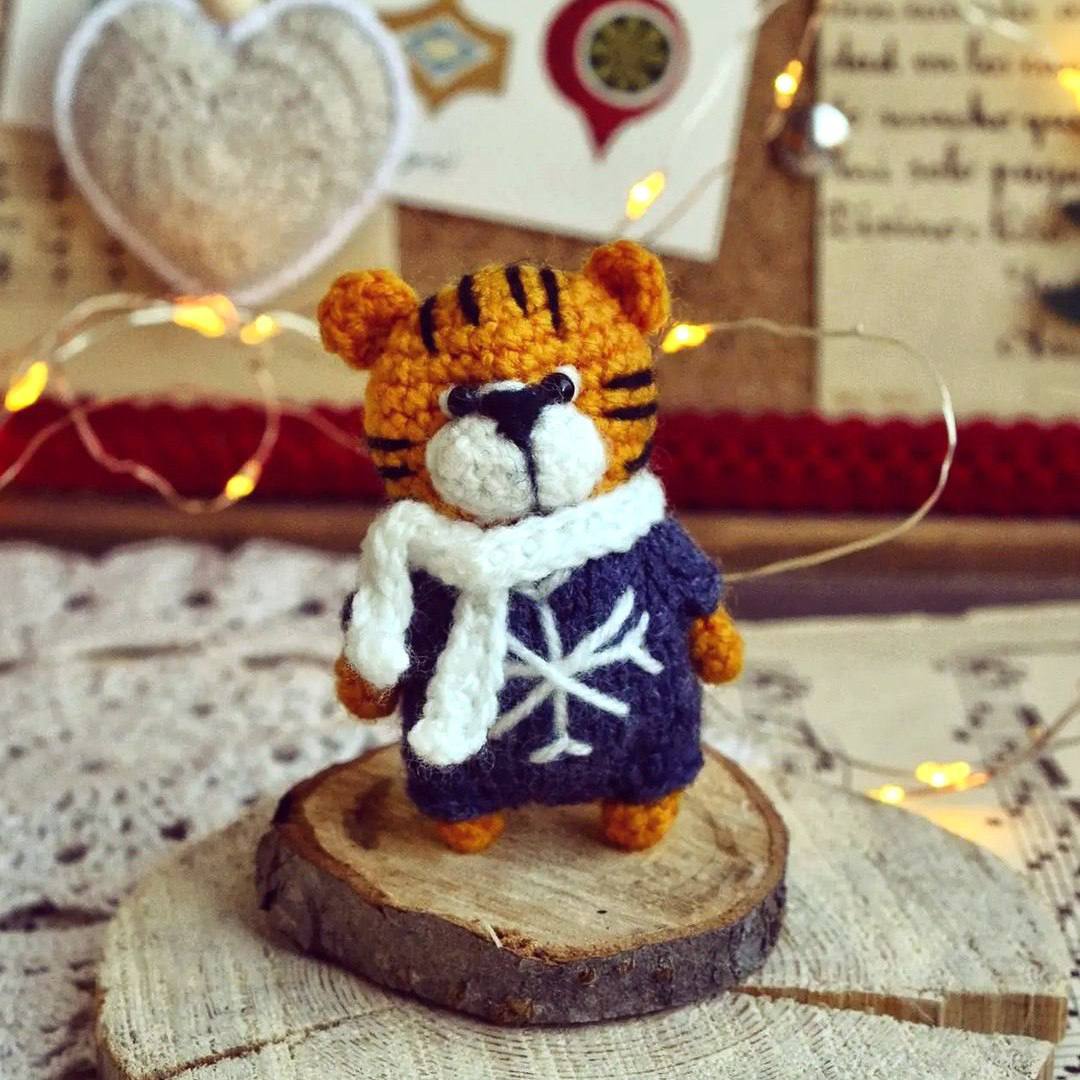
Looking for a quick and cute project to brighten up your day? This mini crochet tiger is the perfect pocket-sized companion. Measuring approximately 2.75 inches tall, this little guy is a fantastic project for beginners or a great way for experienced makers to whip up a fast gift. With his cozy knitted outfit and sweet expression, he’s sure to be a favorite in any collection.
In this tutorial, we will walk you through every stitch needed to create your own tiny tiger, from the amigurumi body to the charming little outfit. Let’s grab our hooks and yarn and get started!
Materials & Abbreviations
To keep your tiger small and sturdy, it is important to use a tight tension and a hook size that matches your yarn. For this project, we recommend a sport or baby-weight yarn.
Materials Needed
- Yarn: Baby yarn or DK weight yarn in Orange, White, Black, and Denim Blue.
- Crochet Hook: 2.0mm (or 2.25mm) hook.
- Knitting Needles: 2.0mm needles (for the outfit).
- Stuffing: Polyester fiberfill.
- Other Tools: Yarn needle, scissors, and safety eyes (or black embroidery thread).
Abbreviations (US Terms)
- MR: Magic Ring
- sc: Single crochet
- inc: Increase (two single crochet in one stitch)
- dec: Decrease (single crochet two together)
- ch: Chain
- st(s): Stitch(es)
- yo: Yarn over (used in the knitting section)
- k: Knit
- p: Purl
Step-by-Step Instructions
The Head
The head is worked in continuous rounds. Do not join at the end of each round.
- Round 1: 6 sc in MR (6)
- Round 2: inc in every st around (12)
- Round 3: (1 sc, inc) repeat 6 times (18)
- Round 4: (2 sc, inc) repeat 6 times (24)
- Round 5: (3 sc, inc) repeat 6 times (30)
- Rounds 6-9: sc in every st around (30)
- Round 10: (3 sc, dec) repeat 6 times (24)
- Round 11: (2 sc, dec) repeat 6 times (18)
- Round 12: (1 sc, dec) repeat 6 times (12)
- Round 13: dec 6 times (6)
Fasten off and leave a long tail for sewing. Stuff the head firmly with fiberfill.
The Legs
You will make two legs. Use the orange yarn.
- Round 1: 6 sc in MR (6)
- Rounds 2-3: sc in every st around (6)
For the first leg, fasten off and weave in the ends. For the second leg, do not fasten off; we will use this leg to begin the body.
The Body
The body is joined from the legs to create a seamless base.
- Round 1: Ch 6 to connect the first leg to the second leg. Work 6 sc around the first leg, 6 sc across the chain, 6 sc around the second leg, and 6 sc back across the chain (24).
- Rounds 2-4: sc in every st around (24).
Pro Tip: Before starting Round 5, you may need to work 1 to 3 “shift” sc (single crochets without increasing or decreasing) to ensure your decreases are positioned exactly on the sides of the body for a better shape.
- Round 5: dec, 10 sc, dec, 10 sc (22)
- Round 6: sc in every st around (22)
- Round 7: dec, 9 sc, dec, 9 sc (20)
- Round 8: sc in every st around (20)
- Round 9: dec, 8 sc, dec, 8 sc (18)
- Round 10: (4 sc, dec) repeat 3 times (15)
- Round 11: (3 sc, dec) repeat 3 times (12)
- Round 12: (2 sc, dec) repeat 3 times (9)
Fasten off and stuff the body firmly.
Arms, Muzzle, Ears, and Tail
Arms (Make 2)
- Round 1: 6 sc in MR (6)
- Rounds 2-7: sc in every st around (6)
Muzzle
Use white yarn.
- Round 1: Ch 6. Starting in the 2nd ch from hook, work 4 sc, 3 sc in the last ch. Working on the other side of the chain, work 3 sc, inc (12).
- Round 2: sc in every st around (12).
Ears (Make 2)
- Round 1: 6 sc in MR (6). Fasten off, leaving a tail.
Tail
- Row 1: Ch 16.
- Row 2: 15 sc starting in the 2nd ch from hook.
The Knitted Outfit
The tiger’s little overalls are knitted using 2.0mm needles with denim blue yarn. This adds a lovely texture contrast to the crochet body.
- Cast on: 18 stitches.
- Row 1: Knit all stitches.
- Row 2: Purl all stitches.
- Row 3: 3k, yo, 1k, yo, 1k, yo, 1k, yo, 6k, yo, 1k, yo, 1k, yo, 1k, yo, 3k.
- Row 4: Purl all stitches (26 sts).
- Row 5: 4k, yo, 1k, yo, 3k, yo, 1k, yo, 8k, yo, 1k, yo, 3k, yo, 1k, yo, 4k.
- Row 6: Purl all stitches (39 sts).
- Row 7: 5k, yo, 1k, yo, 5k, yo, 1k, yo, 10k, yo, 1k, yo, 5k, yo, 1k, yo, 5k.
- Row 8: Purl all stitches (42 sts).
- Row 9: 7k, bind off 7 sts, 19k, bind off 7 sts, 7k (28 sts).
- Row 10: Purl all stitches (28 sts).
- Rows 11-20: Knit 7 to 10 more rows depending on your tension.
You can knit this flat and sew a seam down the back and at the crotch, or you can distribute the stitches onto three double-pointed needles to knit in the round, sewing only the crotch area at the end.
Finishing & Assembly
Now it’s time to bring your little tiger to life!
The Face
Start by decorating the muzzle. Sew the muzzle onto the head. Use black embroidery thread to sew a small triangular nose and the whites of the eyes. Attach safety eyes or embroider small black beads for the pupils. Finally, embroider a few black stripes onto the forehead and cheeks of the head.
Final Assembly
- Sew the ears to the top of the head.
- Attach the head to the body.
- Sew the arms to the sides of the body.
- Attach the tail to the back.
- Slide the knitted outfit onto the tiger and sew it in place.
Tips for a Perfect Mini Tiger
- Tension is Key: Because this is a small amigurumi, keep your stitches tight so the stuffing doesn’t peek through.
- Adding Details: To make your tiger extra special, use white yarn to embroider a snowflake or a star on the front of the blue outfit, as seen in the example.
- The Scarf: Want a cozy accessory? Chain a length of white yarn and work one row of single crochet across the chain to create a tiny scarf for your tiger.
- Yarn Choice: If you don’t have baby yarn, a fine cotton or acrylic blend in DK weight works perfectly.