Adorable Miniature Crochet Puppy Pattern: Step-by-Step Tutorial
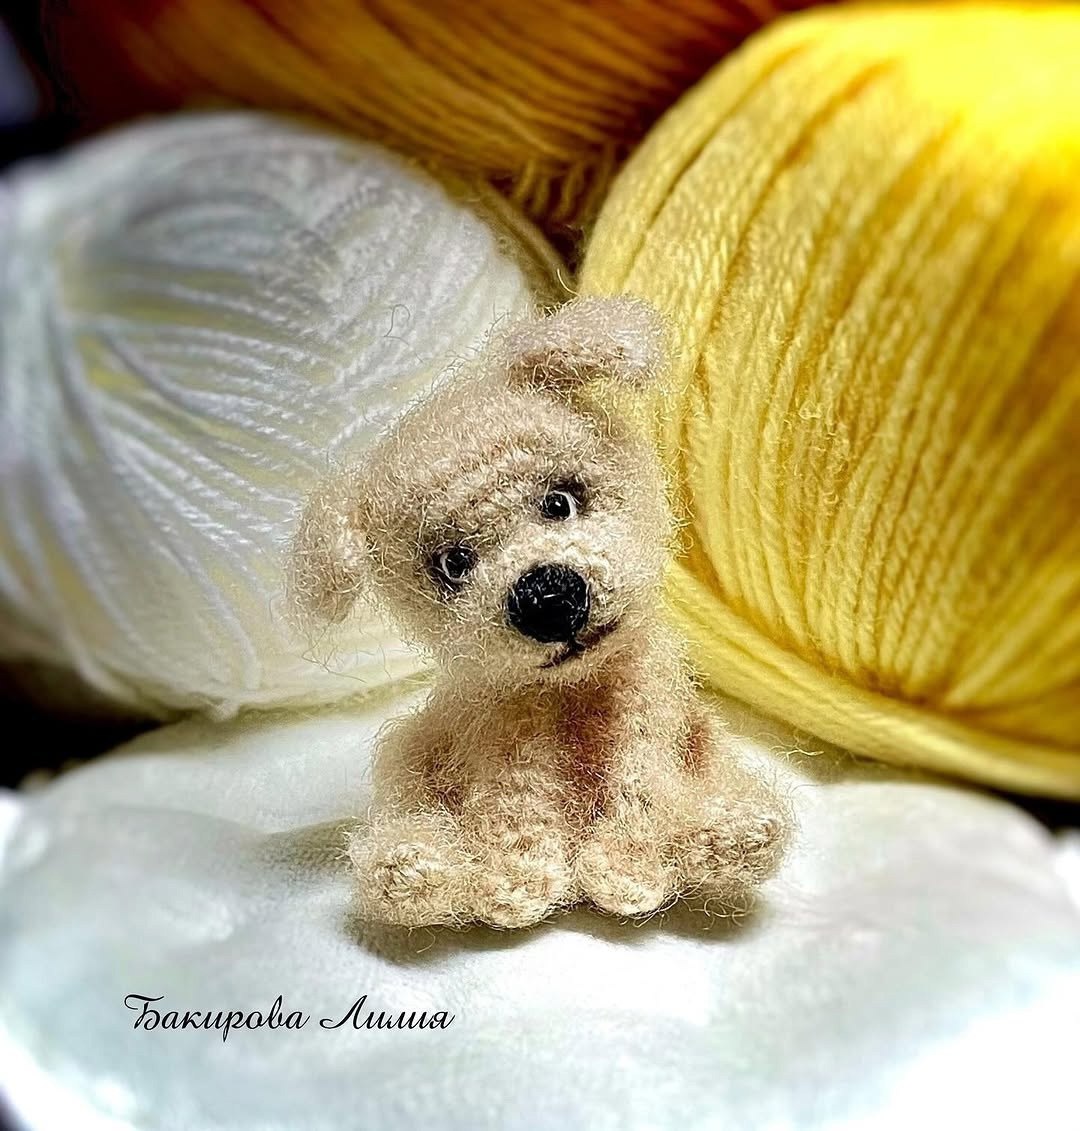
There is something absolutely magical about miniature crochet. Whether you are looking for a tiny companion to sit on your desk or a precious gift for a loved one, a tiny amigurumi puppy is the perfect project. This little pup is designed to be incredibly cute, with a soft, fluffy texture that makes it look like a realistic little toy.
If you are new to amigurumi, don’t be intimidated! This tutorial is written to be beginner-friendly. The key to this puppy’s charm is not just in the stitches, but in the finishing touches—like brushing the yarn and sculpting the face—which we will cover in detail. Grab your hook and some fluffy yarn, and let’s get started!
Materials & Abbreviations
To achieve the look of the puppy in the photos, I recommend using a yarn with a bit of “halo” or fuzz, such as a mohair blend or a brushed acrylic. This makes the brushing process much more effective.
Materials Needed
- Yarn: Approximately 50-100 yards of sport-weight or DK-weight fuzzy/mohair yarn in your choice of color (cream, tan, or brown work best).
- Crochet Hook: 2.0mm or 2.5mm (use a size smaller than the yarn label suggests to ensure the stuffing doesn’t peek through).
- Safety Eyes: 4mm or 6mm black safety eyes (or black beads/embroidery thread).
- Stuffing: High-quality polyester fiberfill.
- Tools: Yarn needle, scissors, stitch markers, and a small wire brush or a clean toothbrush for fluffing.
Abbreviations (US Terms)
- MR: Magic Ring
- sc: Single Crochet
- inc: Increase (two single crochets in the same stitch)
- dec: Decrease (single crochet two stitches together)
- ch: Chain
- st: Stitch
Step-by-Step Instructions
The Head
The head is worked in continuous rounds. Do not join at the end of each round; instead, use a stitch marker to keep track of your progress.
- Round 1: Create a MR and work 6 sc into the ring (6)
- Round 2: inc in each st around (12)
- Round 3: 4 sc, inc, 2 sc, inc, 4 sc (14)
- Round 4: sc in each st around (14)
- Round 5: 5 sc, 4 inc, 5 sc (18)
- Round 6: (2 sc, inc) * 6 (24)
- Round 7: (3 sc, inc) * 6 (30)
- Round 8: sc in each st around (30)
- Round 9: sc in each st around (30)
- Round 10: (3 sc, dec) * 6 (24)
- Round 11: (2 sc, dec) * 6 (18)
- Round 12: (1 sc, dec) * 6 (12)
- Round 13: dec 6 times (6)
Fasten off, leaving a tail. Weave the tail through the remaining 6 stitches to pull the hole closed and secure it.
The Body
The body is a small, rounded shape that provides a sturdy base for the puppy to sit on.
- Round 1: Create a MR and work 6 sc into the ring (6)
- Round 2: inc in each st around (12)
- Round 3: (1 sc, inc) * 6 (18)
- Round 4: (2 sc, inc) * 6 (24)
- Round 5: sc in each st around (24)
- Round 6: sc in each st around (24)
- Round 7: (2 sc, dec) * 6 (18)
- Round 8: sc in each st around (18)
- Round 9: sc in each st around (18)
- Round 10: (1 sc, dec) * 6 (12)
- Round 11: sc in each st around (12)
- Round 12: sc in each st around (12)
Fasten off, but leave a long yarn tail. This will be essential for sewing the head to the body later.
Front Paws (Make 2)
The front paws are simple cylinders that we will flatten at the end.
- Round 1: 8 sc in MR (8)
- Round 2: sc in each st around (8)
- Round 3: 2 dec, 4 sc (6)
- Rounds 4-6: sc in each st around (6)
Fasten off. Fold the paw in half and use your yarn needle to sew the opening closed with a slip-stitch or whip-stitch along the edge.
Back Paws (Make 2)
The back paws are shaped to allow the puppy to look like it is sitting naturally.
- Round 1: 8 sc in MR (8)
- Round 2: sc in each st around (8)
- Round 3: sc in each st around (8). Tip: Add a tiny bit of stuffing to the toe area here.
- Round 4: 2 dec, 4 sc (6)
- Round 5: sc in each st around (6)
- Round 6: inc in each st around (12)
- Round 7: sc in each st around (12)
- Round 8: Work one decrease in the center front of the paw to create a “knee” indentation. This round will have 11 sts.
- Round 9: Work two decreases: one in the front and one in the back (9). Add a small amount of stuffing.
- Round 10: dec 4 times.
Fasten off and sew the hole closed.
The Ears (Make 2)
- Row 1: Ch 5. Leave a long tail (about 4-6 inches) for sewing.
- Row 2: Starting in the 2nd ch from hook, 4 sc, turn.
- Row 3: Ch 1, 4 sc, turn.
- Row 4: Ch 1, 4 sc.
Fasten off, leaving a tail of the same length as the starting tail. Tie these two tails together in a knot; you will use this knot to anchor the ear to the head.
The Tail
- Ch 6, turn.
- Starting in the 2nd ch from hook, 5 sc.
Fasten off, leaving a tail for sewing.
Finishing & Assembly
This is where the puppy really comes to life! Follow these steps carefully to get that professional, handcrafted look.
Sculpting the Face
Before sewing the head to the body, we need to create the muzzle. Using a yarn needle and a matching piece of thread, insert the needle through the center of the head from the back, come out at the bridge of the nose, and pull tight to “pinch” the muzzle into a protruding shape. This is called needle sculpting.
Details and Sewing
- Eyes: Place safety eyes in Row 5 of the head, spaced apart to give the pup a sweet expression.
- Nose: Embroider a small black triangular nose at the very tip of the muzzle.
- Head to Body: Sew the head securely to the body.
- Back Paws: Sew the back paws to the sides of the lower body.
- Front Paws: Sew the front paws to the front of the chest, leaving a gap of about 2 stitches between them.
- Ears & Tail: Sew the ears to the top of the head and the tail to the back of the body.
The “Fluff” Factor
To get the signature fuzzy look, use a wire brush or a clean toothbrush to gently brush the surface of the crochet. Focus specifically on the chest area where the front paws are attached; brushing this area helps hide the sewing seams and makes the puppy look like a real fluffy pup!
Tips for Success
Choosing the Right Yarn
If you don’t have mohair, you can use a standard acrylic yarn and brush it vigorously with a pet slicker brush. This “breaks” the fibers and creates a faux-fur effect. Just be careful not to brush too hard, or you might create holes in your work.
Perfecting the Shape
When stuffing your puppy, do it firmly but evenly. If the head is too soft, the needle sculpting won’t hold its shape. If the body is too soft, the puppy might slump over. Use a chopstick or a crochet hook to push stuffing into the smaller areas like the paws.
Customizing Your Puppy
Want a different look? Try using a darker brown for the nose and eyes to create a Chocolate Lab look, or use a white yarn for a tiny Maltese. You can even add a small ribbon around the neck for an extra touch of cuteness!