Rainbow Dachshund Crochet Pattern: A Step-by-Step Amigurumi Tutorial
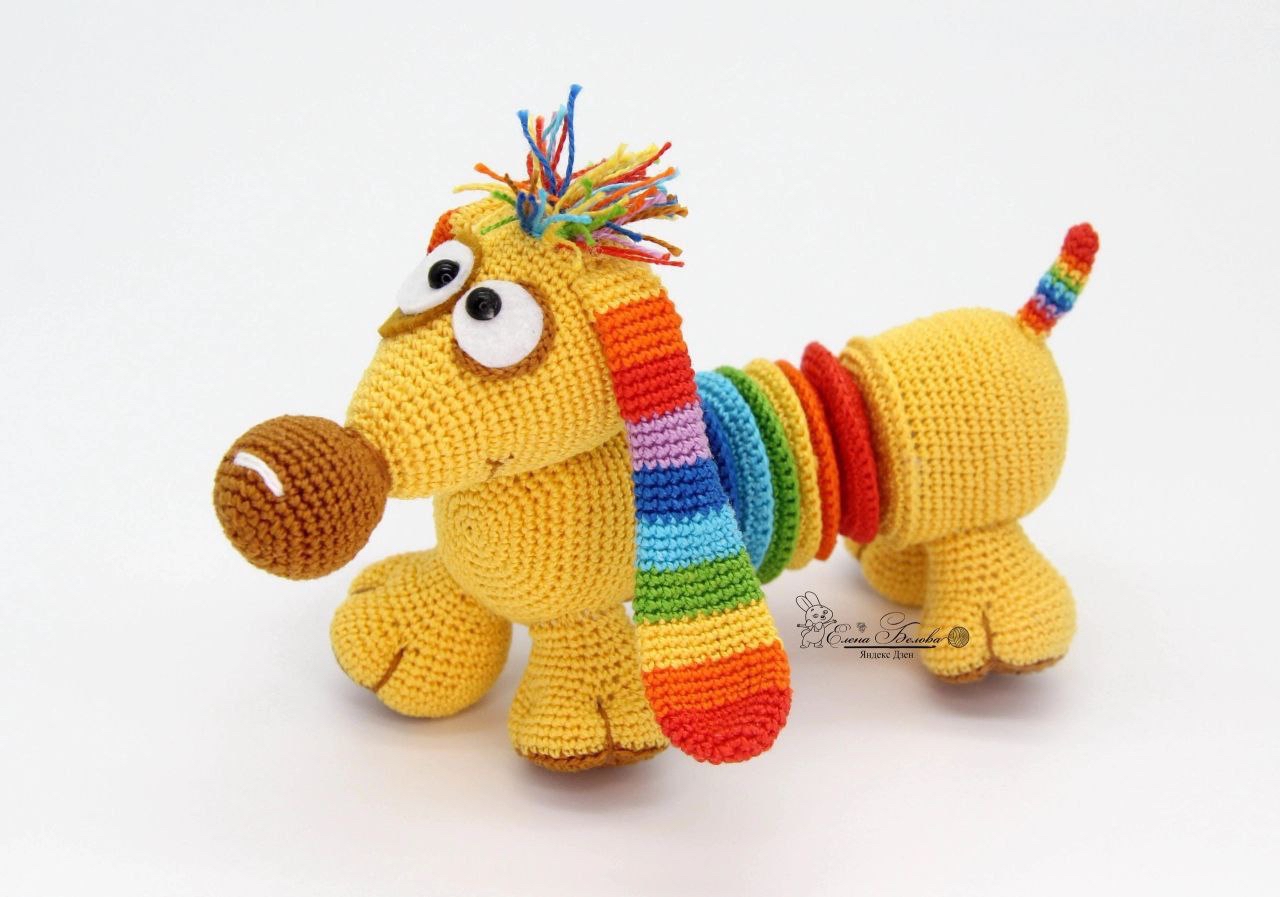
Who doesn’t love a dachshund? These “wiener dogs” are famous for their long bodies and adorable personalities. In this tutorial, we are putting a colorful twist on the classic pup by creating a Rainbow Dachshund! This unique amigurumi project features a vibrant, slinky-style body that makes it as much a piece of art as it is a cuddly toy.
Whether you are a seasoned crocheter or a beginner looking for a fun challenge, this pattern is designed to be accessible. We will guide you through creating each part of the dog—from the expressive eyes and long rainbow ears to the colorful segments of the body. By the end, you’ll have a cheerful, multi-colored companion that is sure to brighten any room.
The finished dog stands approximately 6.7 inches tall. When folded, it measures about 12.6 inches in length, but it can be stretched out to nearly 17.7 inches!
Materials & Abbreviations
Before you pick up your hook, gather all your supplies. Because this project uses a very small hook to ensure the stuffing doesn’t show through, make sure you have a well-lit workspace.
Materials Needed
- Yarn: Acrylic yarn in the following colors: Yellow, Brown, White, Black, Orange, Red, Green, Light Blue, Blue, and Purple. (A standard acrylic yarn with approximately 328 yards per 100g is recommended).
- Crochet Hook: 1.25mm hook.
- Stuffing: High-quality polyester fiberfill.
- Tools: Yarn needle, scissors, and stitch markers.
- Additional: Two small circles of cardboard (cut to the size of your body discs).
Abbreviations (US Terms)
- ch: chain
- sc: single crochet
- hdc: half double crochet
- sl st: slip stitch
- inc: increase (2 sc in the same stitch)
- dec: decrease (sc 2 together)
- st(s): stitch(es)
- MR: magic ring
Step-by-Step Instructions
The Head
Using yellow yarn, we will create a rounded head. Work in continuous spirals.
- Round 1: MR, 6 sc (6)
- Round 2: inc * 6 (12)
- Round 3: (sc, inc) * 6 (18)
- Round 4: (2 sc, inc) * 6 (24)
- Round 5: (3 sc, inc) * 6 (30)
- Round 6: (4 sc, inc) * 6 (36)
- Round 7: (5 sc, inc) * 6 (42)
- Round 8: (6 sc, inc) * 6 (48)
- Round 9: sc around (48)
- Round 10: (7 sc, inc) * 6 (54)
- Rounds 11-16: sc around (54)
- Round 17: (7 sc, dec) * 6 (48)
- Rounds 18-20: sc around (48)
- Round 21: (6 sc, dec) * 6 (42)
- Rounds 22-23: sc around (42)
- Round 24: (5 sc, dec) * 6 (36)
- Rounds 25-26: sc around (36)
- Round 27: (4 sc, dec) * 6 (30)
- Rounds 28-29: sc around (30)
- Round 30: (3 sc, dec) * 6 (24)
- Rounds 31-32: sc around (24)
- Round 33: (2 sc, dec) * 6 (18)
- Rounds 34-35: sc around (18). Begin stuffing the head firmly.
- Round 36: (sc, dec) * 6 (12)
- Round 37: dec * 6 (6)
- Round 38: dec until closed. Fasten off.
The Nose
Using brown yarn:
- Round 1: MR, 6 sc (6)
- Round 2: inc * 6 (12)
- Round 3: (sc, inc) * 6 (18)
- Round 4: (2 sc, inc) * 6 (24)
- Round 5: (3 sc, inc) * 6 (30)
- Rounds 6-11: sc around (30)
- Round 12: (3 sc, dec) * 6 (24)
- Rounds 13-14: sc around (24)
- Round 15: (2 sc, dec) * 6 (18), sl st.
Fasten off, leaving a long tail for sewing. Stuff the nose and sew it to the head. Use white yarn to embroider a small “highlight” dot on the nose for a realistic look.
The Eyes and Face Details
Eye Whites (Make 2): Using white yarn, MR 6 sc, inc to 12, (sc, inc) to 18. Work 2 rounds of sc around (18). sl st and fasten off.
Pupils (Make 2): Using black yarn, MR 7 sc. sl st and fasten off.
Assembly: Sew the black pupils onto the white circles. Add a tiny stitch of white yarn for a highlight. Stuff them slightly and sew them to the head.
Eye Spot: Using orange yarn, MR 6 sc, inc to 12, (sc, inc) to 18, (2 sc, inc) to 24, (3 sc, inc) to 30, (4 sc, inc) to 36. sl st and fasten off. Sew this under the right eye.
Eyelids: Using brown yarn, ch 15. Sc in the second ch from hook and each remaining ch (14 sc). Fasten off. Make two of these and sew them above the eyes.
Final Touch: Use brown yarn to embroider a small, happy smile.
The Rainbow Body
The body is made of two parts: the colorful middle “slinky” section and the yellow front/back ends.
The Middle Discs
You will create several flat discs. Crochet the following pattern for each disc: MR 6, inc to 12, (sc, inc) to 18, (2 sc, inc) to 24, (3 sc, inc) to 30, (4 sc, inc) to 36, (5 sc, inc) to 42, (6 sc, inc) to 48. sl st and fasten off.
Create these quantities: 2 Red, 2 Orange, 2 Green, 2 Light Blue, 2 Blue, 2 Purple, and 4 Yellow.
Connecting the Discs: Place two discs of different colors right sides together and sew them together along the 3rd round. Pair them as follows: Red to Orange, Orange to Yellow, Yellow to Green, Green to Light Blue, Light Blue to Blue, Blue to Purple, Yellow to Red, and Yellow to Purple. Once you have these pairs, connect the pairs by crocheting sc through both layers (wrong sides together) of the same color. This creates the ribbed “slinky” effect.
The Front and Back Ends (Make 2)
Using yellow yarn:
- Round 1: MR, 6 sc (6)
- Round 2: inc * 6 (12)
- Round 3: (sc, inc) * 6 (18)
- Round 4: (2 sc, inc) * 6 (24)
- Round 5: (3 sc, inc) * 6 (30)
- Round 6: (4 sc, inc) * 6 (36)
- Round 7: (5 sc, inc) * 6 (42)
- Round 8: (6 sc, inc) * 6 (48)
- Round 9: (7 sc, inc) * 6 (54)
- Rounds 10-14: sc around (54)
- Round 15: (7 sc, dec) * 6 (48)
- Rounds 16-20: sc around (48).
Fasten off without cutting the yarn. Stuff firmly. Join the front end to the middle rainbow section by working sc through the back loops of both pieces. Insert your cardboard circle inside the body before closing to help it keep its shape.
The Paws (Make 4)
Using brown yarn:
- Round 1: MR, 6 sc (6)
- Round 2: inc * 6 (12)
- Round 3: (sc, inc) * 6 (18)
- Round 4: (2 sc, inc) * 6 (24)
- Round 5: (3 sc, inc) * 6 (30)
- Round 6: (4 sc, inc) * 6 (36)
- Round 7: Switch to yellow yarn. Work 36 sc in the back loops only.
- Rounds 8-10: sc around (36)
- Round 11: 10 sc, dec, 12 sc, dec, 10 sc (34)
- Round 12: 9 sc, dec, 12 sc, dec, 9 sc (32)
- Round 13: 8 sc, dec, 12 sc, dec, 8 sc (30)
- Round 14: 7 sc, dec, 12 sc, dec, 7 sc (28)
- Round 15: 6 sc, dec, 12 sc, dec, 6 sc (26)
- Round 16: 6 sc, dec, 10 sc, dec, 6 sc (24)
- Round 17: (2 sc, dec) * 6 (18)
- Rounds 18-20: sc around (18). Stuff firmly.
- Round 21: In back loops only, (sc, dec) * 6 (12)
- Round 22: dec * 6 (6), sl st.
Fasten off and sew two small brown stitches on the bottom for toes.
The Rainbow Ears (Make 2)
We will change colors every few rounds to create the rainbow effect.
- Red: MR 6, inc to 12, (sc, inc) to 18. Round 4: 18 sc. Round 5: (2 sc, inc) to 24. Round 6: 24 sc.
- Orange: Rounds 7-10: 24 sc.
- Yellow: Round 11: (10 sc, dec) * 2 (22). Rounds 12-14: 22 sc.
- Green: Round 15: (9 sc, dec) * 2 (20). Rounds 16-18: 20 sc.
- Light Blue: Round 19: (8 sc, dec) * 2 (18). Rounds 20-22: 18 sc.
- Blue: Round 23: (7 sc, dec) * 2 (16). Rounds 24-26: 16 sc.
- Purple: Round 27: (6 sc, dec) * 2 (14). Rounds 28-30: 14 sc.
- Red: Rounds 31-34: 14 sc.
- Orange: Rounds 35-38: 14 sc.
- Yellow: Rounds 39-42: 14 sc.
Fold the ear in half and sc across the top (7 sc) to close. Fasten off and sew to the head.
The Tail
Using red yarn, MR 6 sc. Round 2: (2 sc, inc) * 2 (8). Round 3: 8 sc. Now, work one round of 8 sc in each of the following colors: Orange, Yellow, Green, Light Blue, Blue, Purple, Red, Orange, and finally Yellow. sl st and fasten off.
Finishing
Now it is time to put your puppy together! Sew the four paws to the bottom of the body, ensuring they are spaced evenly so the dog can “stand.” Attach the head to the front end of the body. Finally, sew the rainbow tail to the back end. If you have leftover yarn, you can add a few colorful strands of “hair” on top of the head for extra personality!
Tips for Success
- Tension is Key: Because we are using a 1.25mm hook, keep your tension consistent. If the stitches are too loose, the stuffing will peek through; if they are too tight, the piece will be stiff.
- Color Changes: When switching colors in the ears and tail, change the yarn on the last stitch of the previous color for a clean transition.
- Stuffing: Stuff the head and paws firmly, but be gentle with the rainbow body segments so they maintain their “slinky” flexibility.
- The Cardboard Trick: Don’t forget to insert the cardboard circles! They provide the structural integrity needed to keep the dog’s body from collapsing.