How to Crochet a Tiny Puffin Amigurumi: A Cute Pocket-Sized Pattern
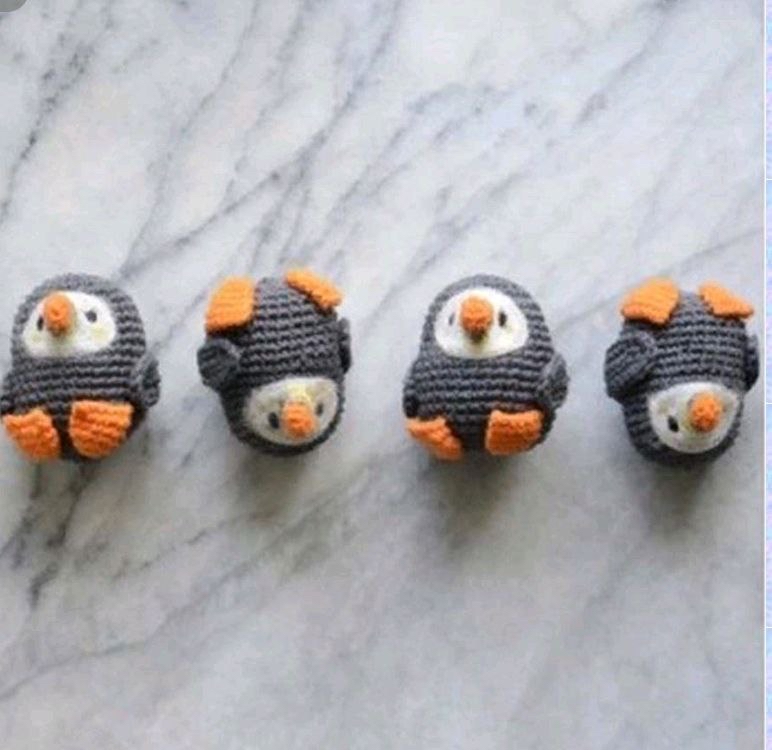
Are you looking for a quick, adorable crochet project that you can take anywhere? This Amigurumi Puffin is the perfect solution! Whether you want to create a cute keychain, a tiny desk companion, or a unique gift for a nature lover, these little puffins are incredibly versatile. Because of their small size, they are also fantastic “scrap busters”—perfect for using up those leftover bits of DK yarn in your stash.
This pattern is designed to be beginner-friendly, though it is classified as intermediate due to the small scale and the assembly required. By the end of this tutorial, you will have a charming, round puffin that measures approximately 2 inches by 3.5 inches.
Materials & Abbreviations
Before you begin, gather your supplies. Since this is a small project, you can easily use leftover yarn from previous projects.
Materials Needed
- DK Weight Cotton Yarn: You will need less than 100 yards of gray yarn for the body. You will also need scraps of orange (for the beak and feet), white (for the face), and yellow (for the blush/beak detail).
- Crochet Hook: 2.75 mm (Size B).
- Stuffing: White polyester fiberfill or sheepskin stuffing.
- Felt: A small amount of white felt for the face.
- Tapestry Needle: For sewing pieces together and embroidery.
- Black Thread: To create the eyes.
Abbreviations (US Terms)
- MR: Magic Ring
- ch: Chain
- sc: Single crochet
- inc: Increase (2 sc in one stitch)
- dec: Decrease (sc 2 together)
- sl st: Slip stitch
- st(s): Stitch(es)
Note: Numbers in parentheses indicate the total number of stitches at the end of the round.
Step-by-Step Instructions
The Body (Gray Yarn)
The body is worked in continuous rounds to create a smooth, seamless sphere.
- Round 1: 6 sc in a magic ring (6)
- Round 2: 6 inc (12)
- Round 3: (1 sc, 1 inc) repeat 6 times (18)
- Round 4: (2 sc, 1 inc) repeat 6 times (24)
- Round 5: (3 sc, 1 inc) repeat 6 times (30)
- Rounds 6–19: sc in each stitch around (30)
- Round 20: (3 sc, 1 dec) repeat 6 times (24)
- Round 21: (2 sc, 1 dec) repeat 6 times (18)
- Round 22: (1 sc, 1 dec) repeat 6 times (12)
- Round 23: 6 dec (6)
Fasten off, leaving a long tail for sewing. Begin stuffing the body firmly with your fiberfill before closing the hole completely.
The Wings (Gray Yarn)
For the wings, use two strands of gray yarn held together to give them a bit more stability and color depth.
- Round 1: Chain 9. In the 2nd chain from the hook, work 7 sc, then an inc. Working on the opposite side of the chain, work 7 sc, then an inc. (16)
- Round 2: (inc, 7 sc, inc, inc, inc, inc, 7 sc, inc, inc) (22)
Fasten off, leaving a long tail for sewing.
The Beak (Orange, Blue, and Yellow Yarn)
The beak features a color change to give it that iconic puffin look.
- Round 1 (Orange): 3 ch, sl st in the 1st ch, 4 sc, then 1 inc (6)
- Round 2 (Orange): 1 sc, 1 inc (8)
- Round 3 (Blue): 1 sc, 1 inc, 3 sc, 1 inc, 2 sc (10)
- Round 4 (Yellow): 10 sc (10)
Fasten off, leaving a long tail for sewing.
The Feet (Orange Yarn)
Make two feet following this pattern:
- Round 1: 6 sc in a magic ring (6)
- Round 2: 1 sc, 1 inc (8)
- Round 3: 8 sc (8)
- Round 4: (3 sc, 1 inc) repeat twice (10)
- Round 5: 4 sc, 1 inc (12)
Fasten off, leaving a long tail for sewing. Flatten the feet slightly.
Finishing & Assembly
This is where your puffin really comes to life! Precision during assembly makes a huge difference in how “professional” your amigurumi looks.
Adding the Face
- Felt Face: Cut an oval shape out of white felt. Pin this to the body, positioned between Rounds 6 and 11.
- Eyes: Using black thread, embroider two small eyes onto the felt face. For a more secure look, pass the needle through the felt and the body stitches at least four times.
- Blush: Using yellow thread, add a tiny bit of “blush” to the cheeks by passing the needle through the felt once per side.
Final Sewing
- The Beak: Sew the beak onto the face, starting between Rounds 6 and 7.
- The Wings: Sew the wings to the sides of the body.
- The Feet: Sew the feet to the bottom of the body as shown in your reference images.
Tips for Success
To make your puffin look its absolute best, keep these professional tips in mind:
- Tension is Key: Since you are working with small stitches and a small hook, try to keep your tension consistent. This prevents stuffing from peeking through the holes.
- Use Stitch Markers: Amigurumi is worked in continuous rounds. Always use a stitch marker to keep track of the first stitch of every round so you don’t lose your place.
- Stuffing Technique: When stuffing, push the fiberfill into the corners of the body. This ensures the puffin is round and doesn’t have any “lumps.”
- Symmetry: When sewing the wings and feet, take a moment to step back and ensure they are even. Symmetry is what makes amigurumi look polished!