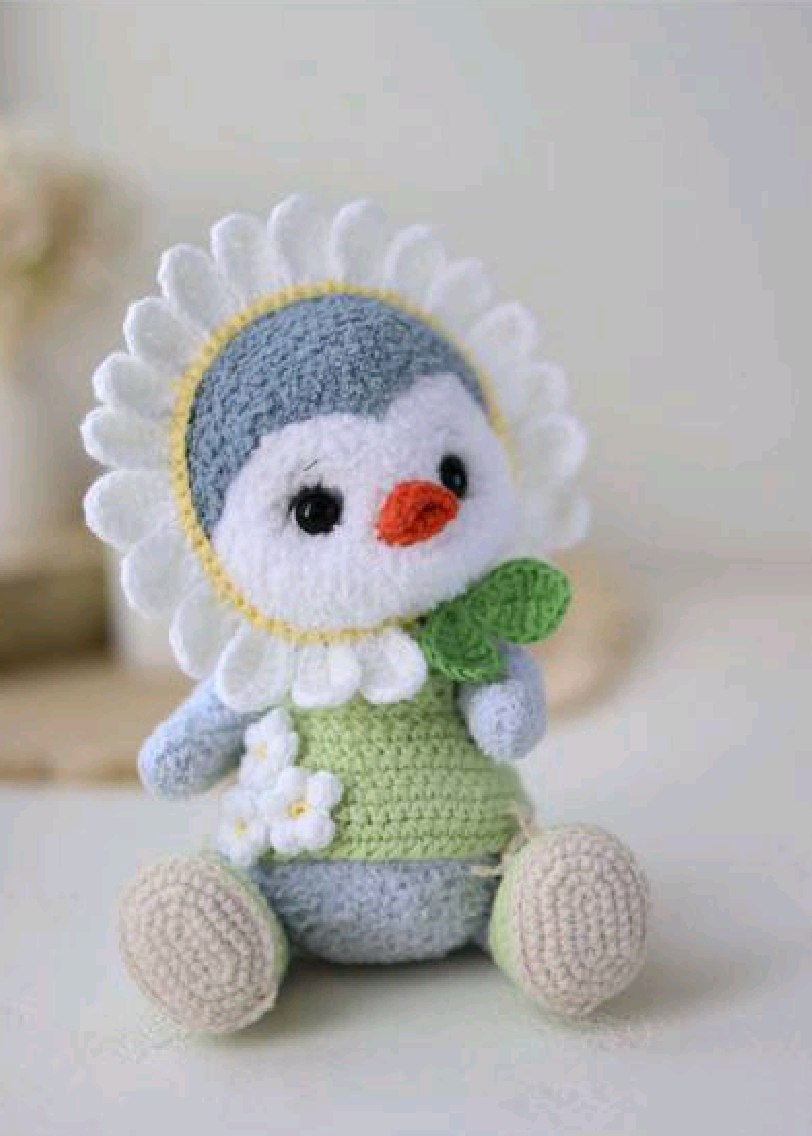
Adorable Crochet Baby Penguin Amigurumi Pattern
There is something incredibly heartwarming about a chubby, wide-eyed baby penguin. Whether you are looking for a cuddly nursery decoration or a unique handmade gift, this crochet baby penguin is the perfect project. This pattern is designed to create a soft, huggable amigurumi character that features a charming daisy headband and a tiny, cozy sweater.
This tutorial is written for makers who want to create a high-quality, professional-looking toy. The combination of velvety chenille yarn for the body and classic cotton for the clothing creates a wonderful contrast in textures that makes the finished piece feel truly special. Grab your hook and let’s dive into this adorable winter project!
Materials & Abbreviations
Materials Needed
To achieve the look in the photos, you will need the following materials. You can substitute these with similar weights, but for the best results, follow these suggestions:
- Main Body Yarn: A soft chenille or velvet yarn (approx. 120 yards/50g). You will need three colors: a main color (blue/grey), a secondary color for the head overlay (light blue), and a third color for the head base (white).
- Clothing & Details Yarn: A fine cotton/acrylic blend yarn (approx. 170 yards/50g). Colors needed: light green for the sweater and boots, white for the flowers/beak, and orange for the beak.
- Safety Eyes: 0.4-inch (10mm) safety eyes.
- Safety Disks/Pin Joints: 9 pieces of 0.85-inch (22mm) disks for the limbs and body, and 1 piece of 1-inch (25mm) disk for the head. These are essential for making the limbs poseable.
- Crochet Hooks:
- 1.5mm (B-1/0) for the body.
- 2mm (D/3) for the clothing.
- Stuffing: High-quality polyester fiberfill.
- Embroidery Tools: A long needle for tightening and a blunt tapestry needle for sewing. White embroidery thread and dark grey thread for facial details.
- Finishing Touches: Waxed thread for tightening joints, dry pastels and a synthetic brush for adding a soft blush to the cheeks, and a small snap button for the headband.
Abbreviations (US Terms)
- MR: Magic Ring
- CH: Chain
- SC: Single Crochet
- HDC: Half Double Crochet
- DC: Double Crochet
- TR: Treble Crochet
- SL ST: Slip Stitch
- INC: Increase (2 SC in one stitch)
- DEC: Decrease (SC 2 together)
- BLO: Back Loops Only
- FLO: Front Loops Only
- Continuous Spiral: Work in a continuous spiral without joining rows unless otherwise noted.
Step-by-Step Instructions
The Head
Start with the main color of the head.
R1: 6 SC in MR (6)
R2: 6 INC (12)
R3: (1 SC, INC) * 6 (18)
R4: (2 SC, INC) * 6 (24)
R5: (3 SC, INC) * 6 (30)
R6: (4 SC, INC) * 6 (36)
R7: (5 SC, INC) * 6 (42)
R8-9: 42 SC (42)
R10: (6 SC, INC) * 6 (48)
R11-15: 48 SC (48)
R16: 12 SC, (1 SC, INC) * 6, place a marker, (INC, 1 SC) * 6, 12 SC (60)
R17-20: 60 SC (60)
R21: 12 SC, (4 SC, DEC) * 6, 12 SC (54)
R22: (7 SC, DEC) * 6 (48)
R23: (6 SC, DEC) * 6 (42)
Note: If using safety eyes, install them in Row 16, approximately 0.75 inches (2cm) away from the additional marker.
Stuff the head firmly, paying extra attention to the cheek area to ensure it is rounded and cute. Continue stuffing as you work the decreases.
R24: (5 SC, DEC) * 6 (36)
R25: (4 SC, DEC) * 6 (30)
R26: (3 SC, DEC) * 6 (24)
R27: (2 SC, DEC) * 6 (18)
R28: (1 SC, DEC) * 6 (12)
Stuff completely. After tightening the opening, insert the safety disk for the head.
R32: 6 DEC (6). Fasten off and weave in ends.
The Head Overlay (Daisy Style)
Using the darker color for the overlay/headband portion.
R1: 6 SC in MR (6)
R2: 6 INC (12)
R3: (1 SC, INC) * 6 (18)
R4: (2 SC, INC) * 6 (24)
R5: (3 SC, INC) * 6 (30)
R6: (4 SC, INC) * 6 (36)
R7: (5 SC, INC) * 6 (42)
R8: (6 SC, INC) * 6 (48)
R9: (7 SC, INC) * 6 (54)
R10: (8 SC, INC) * 6 (60)
R11: (9 SC, INC) * 6 (66)
R12-21: 66 SC (66)
R22: 30 SC, 1 HDC, 1 DC, 2 TR, 1 DC, 1 HDC, 30 SC (66)
R23: 66 SC (66). Fasten off, leaving a long tail for sewing to the head.
The Beak
Upper Part:
R1: CH 8. Starting in the 2nd chain from hook: 3 SC, 3 SC in the last chain, 2 SC, 2 SC in the last chain. Working down the other side of the chain: 2 SC, 1 SL ST, 3 SC (16).
R2: 16 SC (16). Fold the piece in half and SC 8 stitches through both sides. Leave a tail for sewing.
Lower Part:
R1: CH 5. Starting in the 2nd chain from hook: 3 SC, 2 SC in the last chain. Working down the other side: 3 SC (8).
R2: 8 SC (8). Fold in half and SL ST 4 stitches through both sides. Leave a tail for sewing.
The Wings
R1: 6 SC in MR (6)
R2: (2 SC, INC) * 2 (8)
R3: (3 SC, INC) * 2 (10)
R4: (4 SC, INC) * 2 (12)
R5-7: 12 SC (12)
R8: 5 SC, 2 INC, 5 SC (14)
R9: 6 SC, 2 INC, 6 SC (16)
R10: 7 SC, 2 INC, 7 SC (18)
R11-15: 18 SC (18)
R16: 4 SC, place an additional marker, 14 SC (18). For the second wing, work 14 SC, place marker, 4 SC (18).
R17: (4 SC, DEC) * 3 (15)
Insert the pin joint at the additional marker from Row 16.
R18: (3 SC, DEC) * 3 (12)
R19: 6 DEC (6). Fasten off and leave a tail.
The Body
R1: 6 SC in MR (6)
R2: 6 INC (12)
R3: (1 SC, INC) * 6 (18)
R4: (2 SC, INC) * 6 (24)
R5-6: 24 SC (24)
R7: (3 SC, INC) * 6 (30)
R8: 7 SC, place marker, 16 SC, place marker, 7 SC (30)
R9-10: 30 SC (30)
Insert the head into the center of the body piece before continuing.
R11: 6 SC, (2 SC, INC) * 6, 6 SC (36)
R12-13: 36 SC (36)
R14: 7 SC, INC, (4 SC, INC) * 2, (INC, 4 SC) * 2, INC, 7 SC (42)
R15-16: 42 SC (42)
Attach wings at the markers from Row 8.
R17: 5 SC, (3 SC, INC) * 8, 5 SC (50)
R18-22: 50 SC (50)
R23: 1 SC, (7 SC, INC) * 6, 1 SC (56)
R24-28: 56 SC (56)
R29: 14 SC, place marker, 28 SC, place marker, 14 SC (56)
R30-31: 56 SC (56)
Attach legs at the markers from Row 29.
R32: (5 SC, DEC) * 8 (48)
R33: (4 SC, DEC) * 8 (40)
R34: (3 SC, DEC) * 8 (32)
R35: (2 SC, DEC) * 8 (24)
R36: (1 SC, DEC) * 8 (16)
R37: 8 DEC (0). Fasten off.
The Tail
R1: 6 SC in MR (6)
R2: (2 SC, INC) * 2 (8)
R3: (3 SC, INC) * 2 (10)
R4: (4 SC, INC) * 2 (12)
Fold in half and SC 6 stitches through both sides. Fasten off.
The Legs and Boots
Sole:
R1: CH 6. Starting in 2nd ch from hook: INC, 3 SC, 4 SC in last st. Working other side: 3 SC, INC (14).
R2: 2 INC, 3 SC, 4 INC, 3 SC, 2 INC (22)
R3: (1 SC, INC) * 2, 3 SC, (INC, 1 SC) * 2, (1 SC, INC) * 2, 3 SC, (INC, 1 SC) * 2 (30)
R4: 30 SC (30). Do not cut yarn. Change to boot color.
R5: 30 SC in BLO (30)
R6-8: 30 SC (30)
Return to the original yarn color and work 30 SC in the spaces between the stitches of Row 4. Fasten off.
Boot Upper:
R11: 20 SC in BLO (20)
R12: 5 SC, 5 DEC, 5 SC (15)
R13: (3 SC, DEC) * 3 (12)
R14-15: 12 SC (12)
R16: 5 SC, 2 INC, 5 SC (14)
R17: 6 SC, 2 INC, 6 SC (16)
R18-21: 16 SC (16)
R22: 4 SC, place marker, 12 SC (16). For the second leg, work 12 SC, place marker, 4 SC (16).
R23: (2 SC, DEC) * 4 (12)
Insert pin joint at the marker from Row 22.
R24: 6 DEC (0). Fasten off.
For the boot laces: CH 60 and thread through the sides of the boot.
The Cozy Sweater
R1: CH 7. Starting in 2nd ch: 6 SC (6). Work in rows using BLO and a turning chain.
R2-34: 6 SC (6)
R1 (Side): 34 SC (34)
R2: 4 SC, CH 9 (skip 7 SC from previous row), 12 SC, CH 9 (skip 7 SC from previous row), 4 SC (38)
R3: 38 SC (38)
R4: SC, (5 SC, INC) * 6, SC (44)
R5: 44 SC (44)
R6: (10 SC, INC) * 4 (48)
R7: 48 SC (48)
R8: (5 SC, INC) * 8 (56)
R9-10: 56 SC (56)
Finish the bottom edge with a slip stitch border or your preferred method. Add button loops to one side of the back.
The Daisy Headband
Petals: CH 7. R1: (2 HDC, 3 DC, 3 DC in last st, 3 DC, 2 HDC). Make 20 petals in total.
Base: CH equal to head circumference + 10. R1: 7 SC, 60 SC (working 3 SC into each petal), 7 SC. Fasten off and attach a snap button or tie with a long chain.
Leaves: CH 9. R1: SC, HDC, DC, 2 TR, DC, HDC, 2 SC in last st, working other side: HDC, DC, 2 TR, DC, HDC, SC, SC.
Finishing
Assembly and Face Details
To bring your penguin to life, the assembly is key:
- The Head Overlay: Pin the daisy headband to the head and sew it securely.
- The Eyes: Place the eyes in the tension points. Use white thread to embroider small “eye whites” and dark grey thread for subtle eyelids above the eyes.
- The Beak: Find the perfect spot below the eyes. Sew the lower part first, followed by the upper part.
- The Body: Attach the head to the center of the body. Attach the wings at the designated markers on the body. Attach the legs at the markers on the lower body. Sew the tail to the center of the back (around Row 31).
- Embellishments: Sew the tiny white flowers onto the sweater and add eyebrows with dark grey thread. For an extra professional touch, use dry pastels and a brush to add a soft pink blush to the cheeks.
Tips
Tension is Everything: When working with chenille yarn, use a smaller hook than the yarn suggests. This ensures your stitches are tight enough so that the stuffing doesn’t peek through.
Creating Expression: When tightening the eye tension points, be careful not to over-tighten, or you might distort the shape of the head. Aim for a slightly “squished” look to give the penguin that chubby, cute expression.
Using Pin Joints: When using safety disks and pins, ensure the pins are twisted very tightly and are parallel to each other. This ensures the limbs move smoothly and stay in place.
Consistent Spirals: Always use a stitch marker when working in a spiral. If your rows look uneven, use “offset stitches” (working into the space between stitches) to keep the spiral perfectly round.