Easy Chunky Crochet Blanket Pattern: The Weekend Speedy Crochet Throw
There is nothing quite like the feeling of curling up under a heavy, cozy blanket on a chilly evening. However, many of us have started “the big blanket project” only to find that it takes months—or even years—to actually finish. If you are looking for a project that provides the luxury of a chunky, weighted throw without the endless commitment, you have come to the right place.
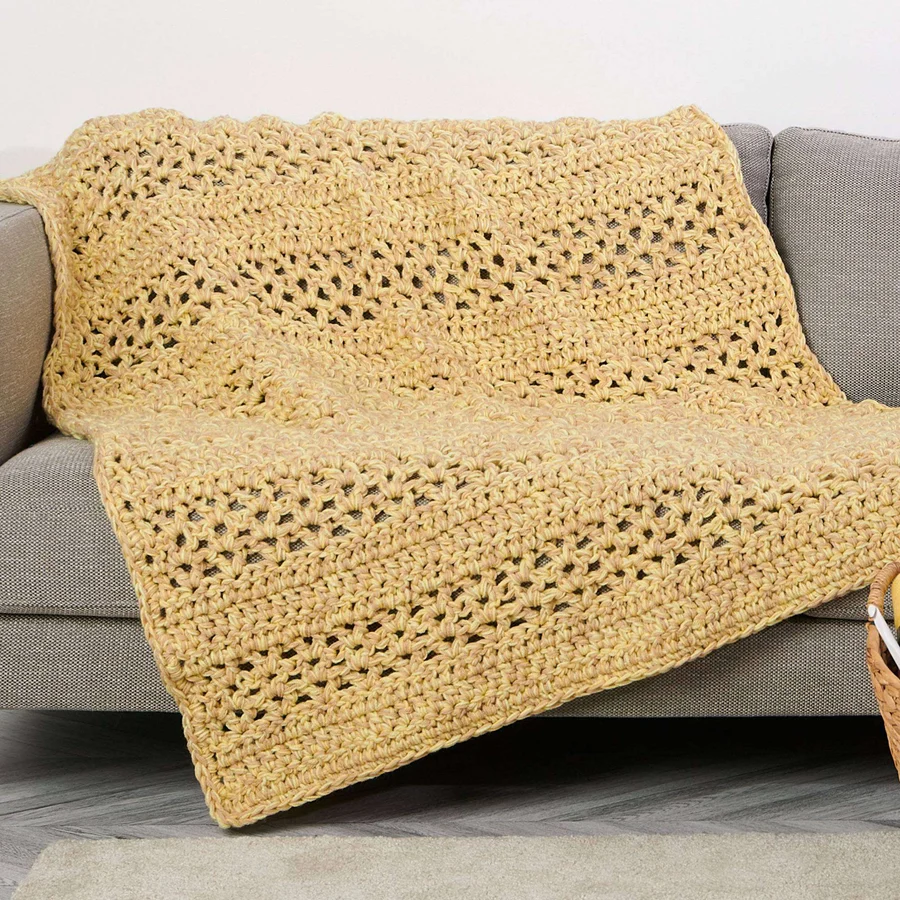
This Weekend Speedy Crochet Throw is designed specifically for the maker who wants instant gratification. The secret to its speed? We aren’t using one strand of bulky yarn; instead, we are holding four strands of medium-weight yarn together as one. Combined with a massive crochet hook, this creates a thick, plush fabric that grows incredibly fast. Whether you are a complete beginner or a seasoned pro looking for a quick weekend project, this pattern is for you.
Materials & Abbreviations
Before we dive into the stitches, let’s gather your supplies. To achieve the signature chunky look of this throw, you will need a significant amount of medium-weight yarn and a very large hook.
Supplies Needed
- Yarn: Medium weight (4) yarn. You will need a total of 12 to 15 balls of yarn (approximately 3,600 to 4,500 yards total), depending on your color choices.
Pro Tip: To get the look shown in the design, choose four coordinating colors (Contrast A, B, C, and D) and hold one strand of each together throughout the entire project.
- Crochet Hook: US P/Q (15 mm) crochet hook. If you find your stitches are too loose, you can go down a size, but the 15mm hook is what makes this project “speedy.”
- Other Tools: A large yarn needle for weaving in ends and a pair of scissors.
Measurements & Gauge
- Finished Size: Approximately 48″ x 61.5″.
- Gauge: 8 stitches and 5 rows = 6″ in the established pattern.
Abbreviations (US Terms)
- Ch: Chain
- Dc: Double crochet
- Sc: Single crochet
- Sl st: Slip stitch
- Sp: Space
- St(s): Stitch(es)
- RS: Right side
- WS: Wrong side
- Rep: Repeat
- Tog: Together
Step-by-Step Instructions
Crucial Note: Throughout this entire pattern, you will work with four strands of yarn held together as one. Treat these four strands as a single thick piece of yarn. This is what creates the chunky texture and the speed of the project.
The Foundation and Base Rows
We start by creating a sturdy foundation and a few solid rows of double crochet to set the stage for our texture.
Foundation Chain: Loosely chain 66. (This count is a multiple of 3 chains plus 9). Keep your chains loose so the blanket doesn’t pull inward.
Row 1 [Wrong Side]: Work 1 double crochet (dc) in the 4th chain from your hook. (The skipped chains and the first dc together count as 2 dc). Work 1 dc in each remaining chain across to the end. You should have a total of 64 dc. Turn your work.
Rows 2 and 3: Chain 3 (this counts as your first dc). Work 1 dc into the next stitch and continue working 1 dc in each stitch across the row. End by working 1 dc into the top of the starting chain-3. Turn your work.
Adding the Texture (The V-Stitch Section)
Now we begin the textured part of the blanket. We will be creating “V-stitches,” which are essentially two double crochets separated by a chain, worked into the same stitch. This creates a lovely open-work look that remains cozy.
Row 4 [Right Side]: Chain 3. Work 1 dc in the next dc. Skip the next dc. Now, work a V-stitch: (1 dc, ch 1, 1 dc) all into the next stitch. *Skip the next 2 dc, then work another V-stitch (1 dc, ch 1, 1 dc) in the next stitch. Repeat from * until you have 3 stitches remaining. Skip the next dc, work 1 dc in the next stitch, and 1 dc in the top of the starting chain-3. Turn.
Rows 5 and 6: Chain 3. Work 1 dc in the next dc. Skip the next dc. Now, work your V-stitch (1 dc, ch 1, 1 dc) directly into the chain-1 space created in the previous row. *Skip the next 2 dc, then work a V-stitch into the next chain-1 space. Repeat from * until 3 stitches remain. Skip the next dc, work 1 dc in the next stitch, and 1 dc in the top of the starting chain-3. Turn.
The Closing Row and Repeating
To stabilize the texture, we finish the sequence with a solid row of double crochet.
Row 7: Chain 3. Work 1 dc in each of the next 2 dc. *Work 1 dc into the next chain-1 space, then 1 dc in each of the next 2 dc. Repeat from * until you reach the last stitch. Work 1 dc in the top of the starting chain-3. Turn.
Completing the Blanket
To reach the full length of the throw, you will now repeat the sequence you just learned.
- Repeat Rows 2 through 7 seven more times.
- Finally, repeat Rows 2 and 3 one last time to ensure the top edge matches the bottom edge.
Do not fasten off yet! Turn your work to prepare for the border.
Finishing
A neat border helps the blanket hold its shape and gives it a professional, finished look.
The Edging: Working on the Right Side (RS), chain 1. Work single crochet (sc) evenly all the way around the entire perimeter of the blanket. When you reach the corners, work 3 sc into the corner stitch to allow the blanket to turn smoothly without curling. Once you have gone all the way around and reached the beginning, join with a slip stitch to the first sc.
Fasten off your yarn and use your yarn needle to weave in all the ends securely. Because you are using four strands of yarn, you will have more ends to weave than usual, so take your time to ensure they are well-hidden.
Tips for Success
Managing Four Strands of Yarn
Working with four balls of yarn at once can feel chaotic. To prevent tangling, try placing your yarn balls in separate bowls or using yarn holders. If you find the strands are twisting around each other, occasionally stop and gently pull the strands apart to “reset” the tension.
Maintaining Tension
Because we are using such a large hook, it is easy to accidentally make stitches too tight or too loose. Remember that this blanket is meant to have a soft, draped feel. If you find your edges are curving, you may be crocheting too tightly—try to relax your grip on the hook.
Customizing Your Colors
While the pattern suggests four specific colors, you can get creative! For a monochromatic look, use four different shades of the same color (like light blue, medium blue, royal blue, and navy). For a festive look, mix in holiday colors. Since the strands are held together, the colors will blend into a beautiful, variegated “marled” effect.