How to Crochet a Cute Mini Bunny: Free Amigurumi Pattern
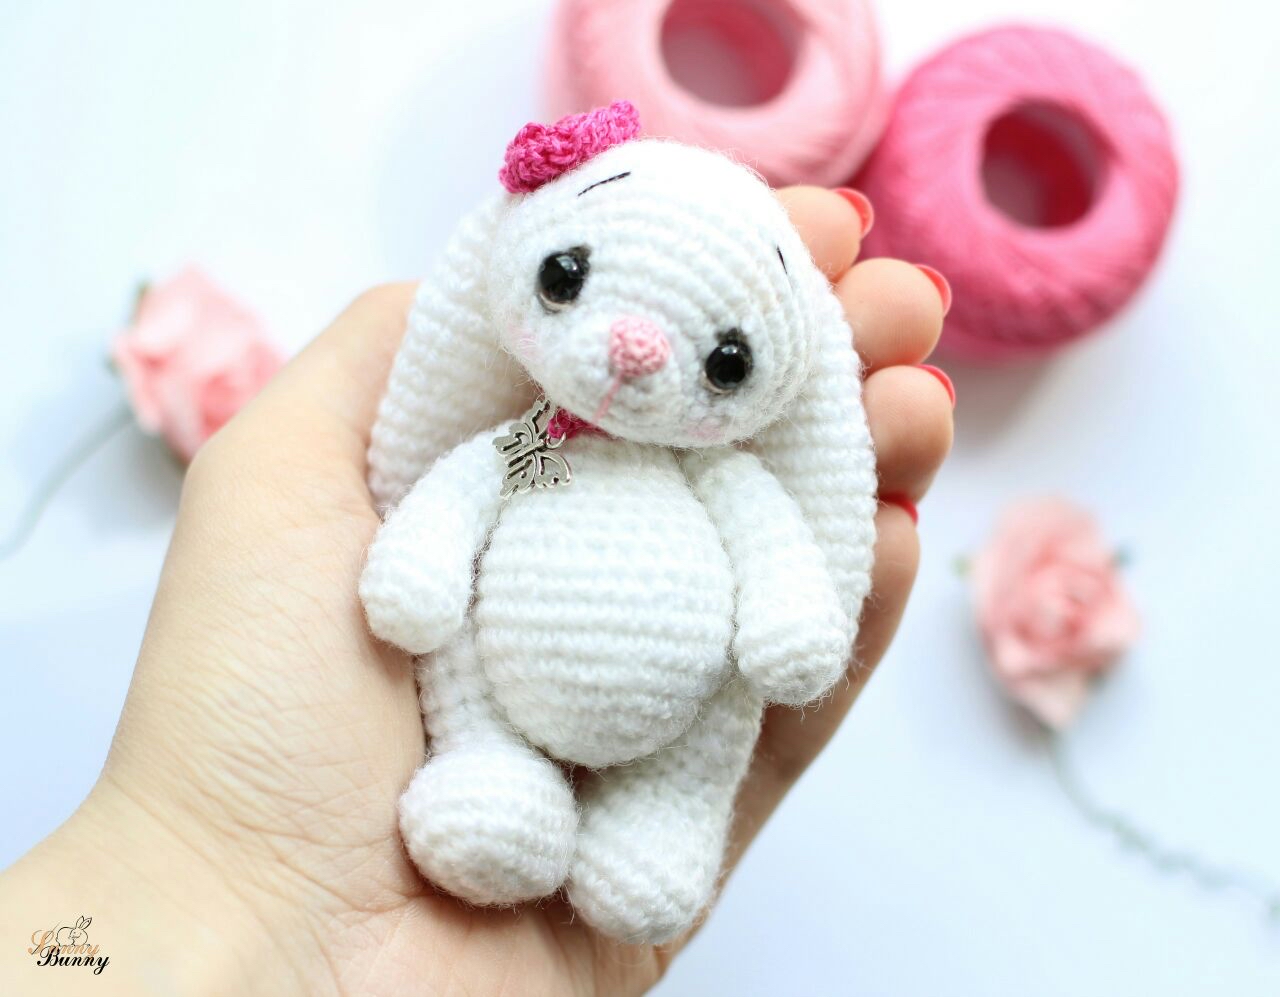
There is nothing quite as charming as a tiny, handmade companion. If you are looking for a quick and adorable project to brighten your day or create a thoughtful gift, this mini crochet bunny pattern is for you! We call this little sweetheart “Flo.” With her floppy ears and sweet expression, she is the perfect addition to any collection of amigurumi.
This project is designed to be beginner-friendly, though it uses some detailed shaping to give the bunny a professional, high-end look. Whether you are an experienced crocheter or just starting your journey into the world of yarn, this tutorial will guide you through every stitch to create your own tiny rabbit friend.
Materials & Abbreviations
To get started, gather the following supplies. Because this bunny is quite small, using a thin yarn and a small hook is essential to keep the stitches tight so the stuffing doesn’t peek through.
Supplies Needed
- Yarn: White mohair or a soft wool blend. (Approx. 50-100 yards depending on your tension).
- Crochet Hook: 1.5mm hook.
- Eyes: Small glass safety eyes or black beads.
- Nose: Small pink iris bead or pink embroidery thread.
- Stuffing: High-quality polyester fiberfill.
- Tools: Yarn needle, sharp scissors, and pliers (for securing safety eyes).
- Extras: Pink blush or fabric marker for the cheeks, and a small ribbon or charm for decoration.
US Crochet Terms & Abbreviations
- ch: chain
- sc: single crochet
- inc: increase (two single crochet stitches in one stitch)
- dec: decrease (single crochet two stitches together)
- sl st: slip stitch
- MR: magic ring
- st(s): stitch(es)
Step-by-Step Instructions
The Head
The head is worked in a continuous spiral. Do not join rounds with a slip stitch unless specified.
Round 1: Ch 5. Starting in the 2nd ch from the hook, work 2 sc, 1 sc in each of the next 2 sts, 3 sc in the last st. Now, working along the opposite side of the chain, work 1 sc in each of the remaining sts. (10 sts)
Round 2: 2 inc, 2 sc, 3 inc, 2 sc, 1 inc. (16 sts)
Round 3: 1 sc, 8 sl st, 7 sc. (16 sts)
Round 4: Repeat Round 3. (16 sts)
Round 5: 2 inc, 1 sc, 1 inc, 2 sc, 1 inc, 1 sc, 2 inc, 6 sc. (20 sts)
Round 6: 1 inc, 1 sc, 3 inc, 1 sc, 2 inc, 1 sc, 3 inc, 1 sc, 1 inc, 6 sc. (30 sts)
Round 7: (inc, 3 sc) repeat 6 times, then 6 sc. (36 sts)
Round 8: (5 sc, inc) repeat 6 times. (42 sts)
Rounds 9–13: sc in each st around. (42 sts)
Round 14: (5 sc, dec) repeat 6 times. (36 sts)
Round 15: (4 sc, dec) repeat 6 times. (30 sts)
Round 16: (3 sc, dec) repeat 6 times. (24 sts)
Round 17: (2 sc, dec) repeat 6 times. (18 sts)
Round 18: (1 sc, dec) repeat 6 times. (12 sts)
Round 19: 6 dec. Fasten off, leaving a long tail for sewing. Stuff the head firmly with fiberfill.
The Nose
This is a tiny detail that adds a lot of character!
Round 1: 6 sc in MR.
Round 2: 3 sc in the first st, 2 sc in each of the next 2 sts, 3 sc in the next st, 1 dec. This creates a small triangular shape. Fasten off.
The Ears (Make 2)
Round 1: 6 sc in MR.
Round 2: (1 sc, inc) repeat 3 times. (9 sts)
Round 3: (2 sc, inc) repeat 3 times. (12 sts)
Round 4: sc in each st around. (12 sts)
Round 5: (3 sc, inc) repeat 3 times. (15 sts)
Rounds 6–7: sc in each st around. (15 sts)
Round 8: (4 sc, inc) repeat 3 times. (18 sts)
Rounds 9–12: sc in each st around. (18 sts)
Round 13: (4 sc, dec) repeat 3 times. (15 sts)
Rounds 14–15: sc in each st around. (15 sts)
Round 16: (3 sc, dec) repeat 3 times. (12 sts)
Round 17: sc in each st around. (12 sts)
Round 18: (2 sc, dec) repeat 3 times. (9 sts). Fasten off.
The Body
Round 1: 6 sc in MR. (6 sts)
Round 2: 6 inc. (12 sts)
Round 3: (1 sc, inc) repeat 6 times. (18 sts)
Round 4: (2 sc, inc) repeat 6 times. (24 sts)
Round 5: (3 sc, inc) repeat 6 times. (30 sts)
Round 6: (4 sc, inc) repeat 6 times. (36 sts)
Rounds 7–8: sc in each st around. (36 sts)
Round 9: (4 sc, dec) repeat 6 times. (30 sts)
Round 10: sc in each st around. (30 sts)
Round 11: (3 sc, dec) repeat 6 times. (24 sts)
Rounds 12–13: sc in each st around. (24 sts)
Round 14: (2 sc, dec) repeat 6 times. (18 sts)
Rounds 15–16: sc in each st around. (18 sts)
Round 17: (1 sc, dec) repeat 6 times. (12 sts)
Round 18: 6 dec. Fasten off, stuff the body firmly, and close.
The Legs (Make 2)
Round 1: Ch 7. Working in the 2nd ch from hook: 2 sc, 1 sc in each of the next 4 sts, 3 sc in the last st. Now work on the other side of the chain: 5 sc in the remaining sts. (14 sts)
Round 2: 2 inc, 4 sc, 3 inc, 4 sc, 1 inc. (20 sts)
Round 3: inc, 1 sc, inc, 5 sc, inc, 1 sc, inc, 1 sc, inc, 5 sc, inc, 1 sc. (26 sts)
Rounds 4–5: sc in each st around. (26 sts)
Round 6: 9 sc, 6 dec, 5 sc. (20 sts)
Round 7: 7 sc, 5 dec, 3 sc. (15 sts)
Round 8: 6 sc, 3 dec, 3 sc. (12 sts)
Rounds 9–10: sc in each st around. (12 sts)
Round 11: (3 sc, inc) repeat 3 times. (15 sts)
Round 12: (4 sc, inc) repeat 3 times. (18 sts)
Round 13: (1 sc, dec) repeat 6 times. (12 sts). Stuff the leg.
Round 14: 6 dec. Fasten off.
The Arms (Make 2)
Round 1: 6 sc in MR.
Round 2: 6 inc. (12 sts)
Round 3: (3 sc, inc) repeat 3 times. (15 sts)
Round 4: sc in each st around. (15 sts)
Round 5: 9 sc, 3 dec. (12 sts)
Round 6: 8 sc, 2 dec. (10 sts)
Rounds 7–13: sc in each st around. (10 sts)
Round 14: 5 dec. Fasten off, stuff lightly, and close.
The Tail
Round 1: 6 sc in MR.
Round 2: 6 inc. (12 sts)
Round 3: (inc, 1 sc) repeat 6 times. (18 sts)
Round 4: sc in each st around. (18 sts)
Round 5: (dec, 1 sc) repeat 6 times. (12 sts)
Round 6: 6 dec. Fasten off.
Finishing & Assembly
Now comes the magic part where Flo comes to life! Use your yarn needle and matching white yarn to assemble the pieces.
- Face: Attach the safety eyes between rounds 10 and 11 of the head. Sew the small triangular nose centrally between the eyes.
- Details: Using a thin black embroidery thread, stitch small eyelids and eyebrows above the eyes to give her a sleepy, sweet look. For an extra touch, use a cream-colored thread to add a tiny stitch just under the eyes.
- Blush: Gently apply a small amount of pink blush or a pink marker to the cheeks just below the eyes.
- Assembly: Sew the head onto the body. Attach the ears to the top of the head, the arms to the sides of the body, and the legs to the bottom. Finally, sew the tail to the back.
- Accessories: Add a small ribbon around the neck or a tiny flower on the head for a personalized touch.
Tips for Your Crochet Bunny
To make sure your mini bunny looks as professional as possible, keep these tips in mind:
- Tension is Key: Since we are using a very small hook (1.5mm), keep your tension consistent. If the stitches are too loose, the stuffing will show. If they are too tight, the project will be difficult to work.
- The Invisible Decrease: To avoid bumps in your work, use the “invisible decrease” method. Insert your hook into the front loop of the first stitch and then the front loop of the second stitch, completing the sc.
- Stuffing Technique: Use small bits of fiberfill and push them into the corners with a chopstick or a pencil to ensure the head and body are perfectly round.
- Choosing Your Yarn: While mohair gives a fluffy, “toy-store” look, a smooth cotton or acrylic yarn will make the stitch definition more visible, which is great for beginners.