Adorable Crochet Baby Angel Amigurumi: A Step-by-Step Tutorial
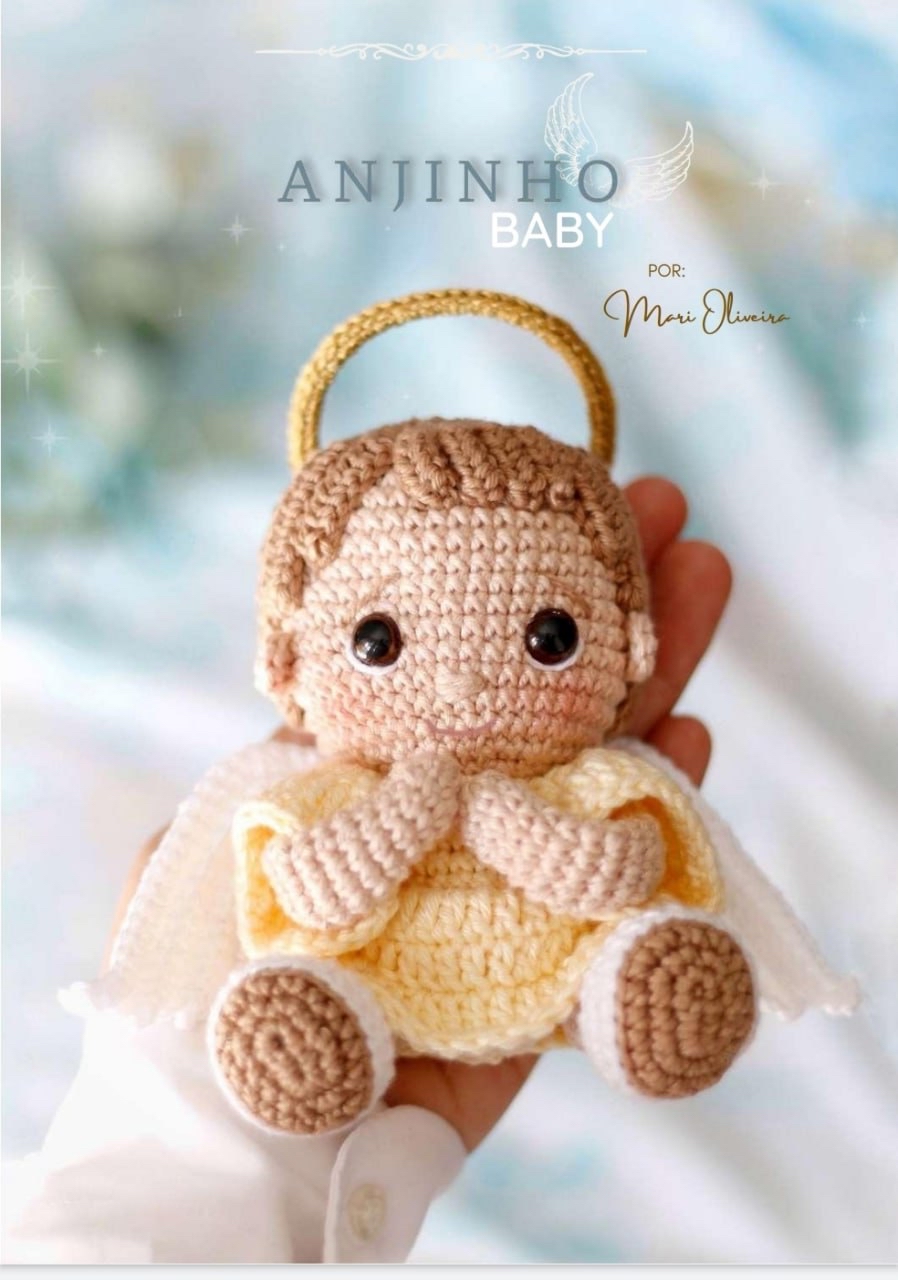
There is something incredibly sweet about a tiny crochet angel. Whether you are looking to create a special nursery decoration, a meaningful gift for a baptism, or a charming keepsake, this baby angel amigurumi is the perfect project. This little angel is designed to be compact, sitting at approximately 4.7 inches tall, making it an ideal size for shelf decor or a handheld toy.
In this tutorial, I will guide you through the process of creating this darling character, from the tiny facial features to the delicate wings and halo. This pattern is beginner-friendly, though you should be comfortable with basic amigurumi techniques like working in the magic ring and increasing/decreasing stitches.
Materials & Abbreviations
To ensure your angel turns out looking just like the pictures, I recommend using a smooth, 100% cotton yarn. Cotton provides great stitch definition, which is essential for the small details on the face and hair.
Required Materials
- Yarn (100% Cotton): Beige, Brown, White, Cream, and Gold.
- Crochet Hook: 2mm.
- Safety Eyes: 10mm.
- Stuffing: Fiberfill or similar polyester stuffing.
- Wire: Approximately 7.5 inches of thin craft wire (for the arms and halo).
- Notions: Sewing needle, stitch markers, pins, and scissors.
- Optional: Small buttons (if you want to make the legs removable).
Abbreviations (US Terms)
- MR: Magic Ring
- ch: Chain
- sc: Single crochet
- inc: Increase (2 sc in one stitch)
- dec: Decrease (sc 2 stitches together)
- hdc: Half double crochet
- dc: Double crochet
- sl st: Slip stitch
- BLO: Back loop only
- sc3tog: Single crochet 3 together
Step-by-Step Instructions
Head and Body
We will start with the head using beige yarn. Work in continuous spirals.
- 7 sc in MR (7)
- 7 inc (14)
- (1 sc, inc) x 7 (21)
- (2 sc, inc) x 7 (28)
- (3 sc, inc) x 7 (35)
- 2 sc, inc, (4 sc, inc) x 6, 2 sc (42)
- Rounds 7-18: 42 sc (12 rounds total)
Eye Placement: Insert your 10mm safety eyes between rounds 13 and 14. There should be 8 stitches between the bottom of the eyes, and 6 stitches between the eyes themselves. Use white thread to embroider the eye whites and black thread for the eyelashes between rounds 11 and 12. Use beige thread to embroider a small nose between rounds 15 and 16. In round 17, embroider a small mouth.
Continuing the Body:
- R19: 21 dec (21)
- Switch to cream yarn.
- R20: 20 sc, inc (22)
- R21-22: 22 sc (2 rounds)
- R23: 5 sc, inc, 10 sc, inc, 5 sc (24)
- R24: 24 sc (24)
- R25: 4 sc, inc, 14 sc, inc, 4 sc (26)
- R26: (6 sc, inc) x 3, 5 sc (29)
- R27-32: 29 sc (6 rounds)
- R33: (5 sc, dec) x 4, 1 sc (25)
- R34: (2 sc, dec) x 6, 1 sc (19)
- R35: dec until 6 stitches remain.
Fasten off and weave in your ends, pulling the opening tight.
Arms and Sleeves
You will make two arms using beige yarn.
- 6 sc in MR (6)
- (1 sc, inc) x 3 (9)
- R3-12: 9 sc (10 rounds)
- Switch to cream yarn.
- R13-18: 9 sc (6 rounds). Fasten off.
Assembly Tip: Take a 7.5-inch piece of wire. Insert it into the body between rounds 21 and 22. Ensure there are 11 stitches in the front between the wire ends. Bend the wire at the sides, slide the arms onto the wire, and sew the arms to the body between rounds 21 and 23. There should be 9 stitches between the arms at the front.
Sleeves: Make two using cream yarn.
- Ch 16, sl st in the first ch.
- R1: 2 ch, 15 hdc, sl st to first hdc (15)
- R2: 2 ch, (6 dc, inc from dc) x 2, hdc, sl st (17)
- R3: 2 ch, (2 dc, inc from dc) x 5, 2 hdc, sl st (22)
- R4: ch, 22 sc (22). Fasten off.
Slide the sleeves onto the arms and sew them in place. You should have 7 stitches between the arms at the front.
Legs
Make two legs starting with brown yarn.
- Ch 4. Starting from 2nd ch from hook: 2 sc, 4 sc in the last ch. On the other side of the chain: 1 sc, 3 sc in the last stitch (10)
- R2: inc, 2 sc, 3 inc, 2 sc, 2 inc (16)
- R3: inc, 4 sc, 4 inc, 4 sc, 3 inc (24)
Switch to white yarn.
- R4: 24 hdc in BLO (24)
- R5: 24 sc in BLO (24)
- R6-7: 24 sc (24)
- R8: 2 sc, 8 dec, 6 sc (16)
Fasten off and leave a long tail. Attach beige yarn to the back of the leg.
- R9: 16 hdc in BLO (16)
- R10: 6 sc, 1 dec, 8 sc (15)
- R11-13: 15 sc (3 rounds)
Switch to cream yarn.
- R14-15: 15 sc (2 rounds)
- R16: (3 sc, dec) x 3 (12)
- R17: (1 sc, dec) x 4 (8)
Fasten off and close the opening. Sew the legs to the body between rounds 29 and 32, ensuring the toes point upward. There should be 10 stitches between the legs at the front.
Ears, Skirt, and Wings
Ears: Using beige yarn, 6 sc in MR. Fasten off. Sew to the head between rounds 13 and 14, exactly 4 stitches away from the eyes.
Skirt: Using cream yarn.
- Ch 30, sl st to first ch.
- R1: 2 ch, 28 dc, inc from dc, sl st (30)
- R2: 2 ch, (4 dc, inc from dc) x 6, sl st (36)
- R3: 2 ch, (5 dc, inc from dc) x 6, sl st (42)
- R4: 42 sc (42). Fasten off.
Sew the skirt to the body between rounds 27 and 28.
Wings: Make two using white yarn. These are worked in rows (flat).
- R1: 5 ch, 4 sc, ch, turn (4)
- R2: 4 sc, ch, turn (4)
- R3: 4 sc, 6 ch, turn (4)
- R4: 5 sc along the chain, 4 sc, ch, turn (9)
- R5: 9 sc, 3 sc3tog, turn (9)
- R6: 2 sc along the chain, 9 sc, 5 sc along the side, 4 sc along the first row, ch, turn (20)
- R7: 20 sc, 3 sc3tog, turn (20)
- R8: 2 sc along the chain, 11 sc, inc, 8 sc, ch, turn (23)
- R9: 6 sc, inc, 1 sc, inc, 14 sc, 3 sc3tog, turn (25)
- R10: 2 sc along the chain, 15 sc, inc, 9 sc (28). Fasten off.
Sew or glue the wings to the back of the body.
Hair and Halo
Hair: Use brown yarn. First, create a hair cap.
- 6 sc in MR (6)
- 6 inc (12)
- (1 sc, inc) x 6 (18)
- (2 sc, inc) x 6 (24)
- (3 sc, inc) x 6 (30)
Next, crochet individual hair strands. You will make several strands of varying lengths (ranging from 7 to 15 chains) and use hdc to work them back. Once completed, pin the strands to the head (placing strands 6 and 17 above the ears) and sew them down to create a full, curly look.
Halo: Take a piece of wire and wrap it around a round object (like a thread spool) to create a circle about 1.5 inches in diameter. Secure the ends with tape. Using gold yarn, work a single round of sc around the wire circle. Sew the halo to the top of the head.
Finishing
The final step is assembly! Carefully sew the hair strands, wings, and skirt to the body. Ensure the facial features are centered and the eyes are secure. If you used the button method for the legs, ensure the buttons are sewn tightly to the body so the limbs can move freely without falling off.
Tips for Success
- Tension is Key: When working with small stitches like sc, try to keep your tension even so the stuffing doesn’t show through the gaps.
- Wire Safety: If this is intended for a child, ensure all wire ends are thoroughly covered by yarn and stuffing to prevent any sharp edges.
- Facial Expressions: Don’t rush the embroidery! Use a long needle and take small, controlled stitches for the mouth and eyes to give your angel its unique personality.
- Stitch Markers: Always use a stitch marker when working in amigurumi to avoid losing count of your rounds.