How to Crochet a Chunky Amigurumi Cat: Easy Step-by-Step Pattern
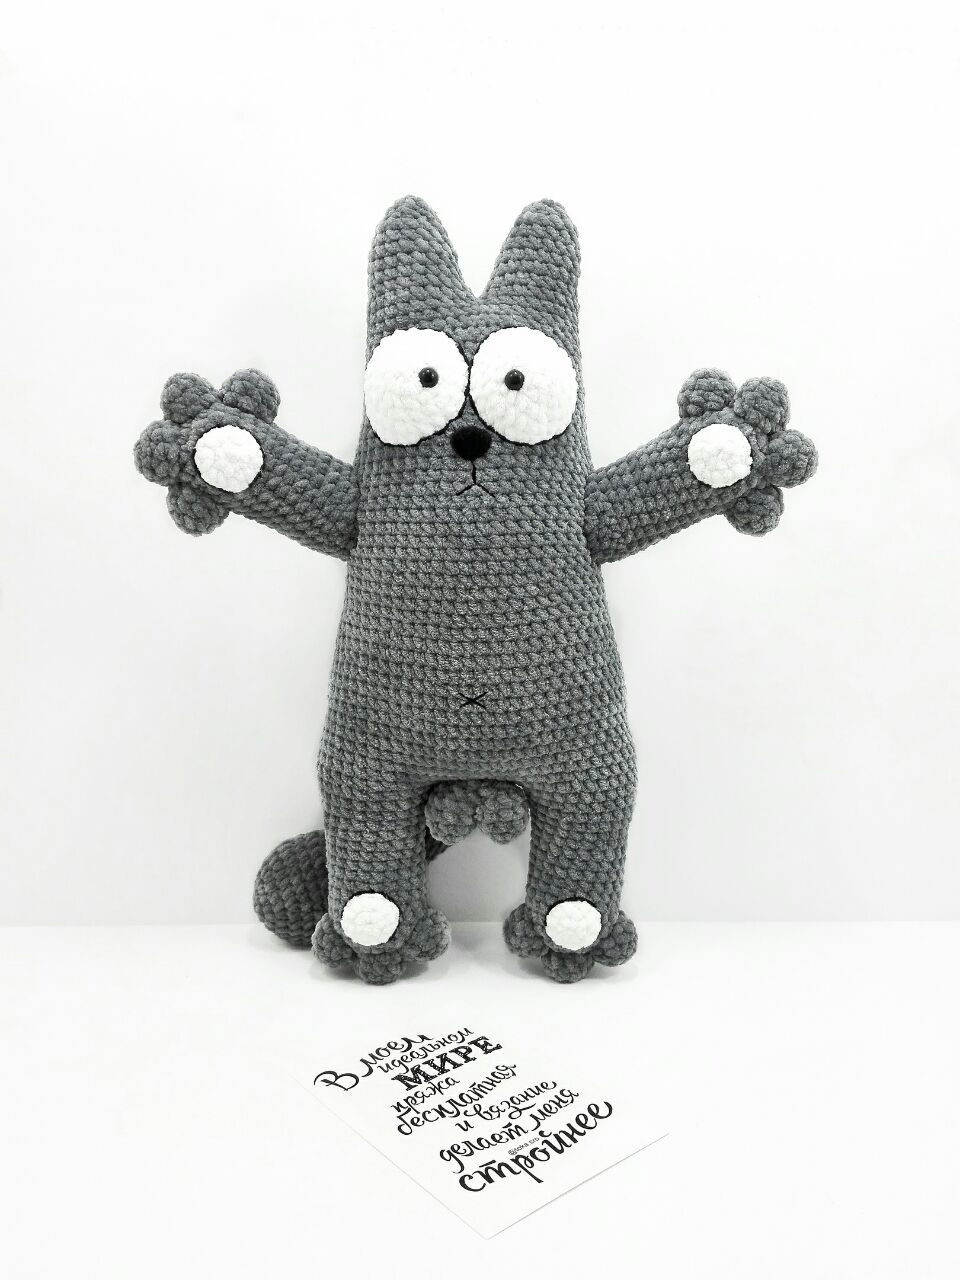
If you are looking for a cozy, huggable project that brings a touch of humor and cuteness to your crochet collection, this chunky amigurumi cat is the perfect choice. With its oversized proportions and adorably blank expression, this cat is designed to be a statement piece. Whether you are making it for a friend or as a treat for yourself, this project is a delight to work up, especially since it uses plush chenille yarn for that extra-soft feel.
This pattern is designed for beginners and intermediate crocheters. We will be working with a “chonky” style, which means the finished cat will stand about 17 inches tall. The most unique part of this project is that the legs, body, and head are all worked as one continuous piece, reducing the amount of sewing you have to do at the end!
Materials & Abbreviations
To get that signature velvety look, I recommend using a plush chenille or “blanket” style yarn. Here is everything you will need to gather before you start:
- Yarn: Super bulky plush yarn in Grey (approximately 2 skeins) and a small amount of White plush yarn.
- Crochet Hook: 4.0mm (G) hook (or whichever size works best with your yarn to keep stitches tight).
- Safety Eyes: 9-10mm safety eyes.
- Safety Nose: 20mm x 16mm safety nose.
- Stuffing: High-quality polyester fiberfill.
- Embroidery Thread: Black thread for the face and detail work.
- Tools: Stitch markers, yarn needle, and scissors.
US Crochet Terms Used
- MR: Magic Ring
- sc: Single crochet
- inc: Increase (two sc in one stitch)
- dec: Decrease (invisible decrease recommended)
- ch: Chain
- sl st: Slip stitch
- st(s): Stitch(es)
- ( ): Repeat instructions inside parentheses the indicated number of times
Step-by-Step Instructions
Rear Legs, Body, and Head
The rear legs, body, and head are all created in one piece. We start with the legs and then join them to build the torso.
The Rear Legs (Make 2)
Leg 1:
Row 1: 6 sc in MR (6)
Row 2: 6 inc (12)
Row 3: (1 sc, 1 inc) x 6 (18)
Row 4: (2 sc, 1 inc) x 6 (24)
Row 5: 24 sc (24)
Row 6: 1 dec, 10 sc, 1 dec, 10 sc (22)
Row 7: 1 dec, 9 sc, 1 dec, 9 sc (20)
Rows 8-14: 20 sc (20)
Row 15: 1 inc, 9 sc, 1 inc, 9 sc (22)
Row 16: 1 inc, 10 sc, 1 inc, 10 sc (24)
Row 17: 24 sc (24)
Fasten off the first leg, stuff it firmly, and weave in the end.
Leg 2: Follow the same instructions as Leg 1. However, do not fasten off after Row 17. Instead, crochet 2 more sc to shift the starting point, then ch 8. This chain will connect the two legs.
The Body and Head
Now we will work around both legs to create the belly and climb up to the head. Note: To keep the cat’s shape, ensure your increases and decreases stay on the sides of the body.
Row 18: 24 sc around the first leg, 9 sc across the connecting chain, 24 sc around the second leg, 9 sc across the other side of the chain (66)
Rows 19-21: 66 sc (66)
Row 22: 11 sc, 1 dec, 31 sc, 1 dec, 20 sc (64)
Row 23: 10 sc, 1 dec, 30 sc, 1 dec, 20 sc (62)
Row 24: 62 sc (62)
Row 25: 11 sc, 1 inc, 30 sc, 1 inc, 19 sc (64)
Row 26: 11 sc, 1 inc, 31 sc, 1 inc, 20 sc (66)
Row 27: 11 sc, 1 dec, 31 sc, 1 dec, 20 sc (64)
Row 28: 11 sc, 1 dec, 30 sc, 1 dec, 19 sc (62)
Row 29: 62 sc (62)
Row 30: 10 sc, 1 dec, 30 sc, 1 dec, 18 sc (60)
Row 31: 10 sc, 1 dec, 29 sc, 1 dec, 17 sc (58)
Row 32: 10 sc, 1 dec, 27 sc, 1 dec, 17 sc (56)
Row 33: 9 sc, 1 dec, 27 sc, 1 dec, 16 sc (54)
Rows 34-35: 54 sc (54)
Row 36: 10 sc, 1 dec, 25 sc, 1 dec, 15 sc (52)
Rows 37-43: 52 sc (52)
Row 44: 10 sc, 1 dec, 25 sc, 1 dec, 13 sc (50)
Row 45: 50 sc (50)
Row 46: 9 sc, 1 dec, 24 sc, 1 dec, 13 sc (48)
Row 47: 48 sc (48)
Row 48: 9 sc, 1 dec, 23 sc, 1 dec, 12 sc (46)
Row 49: 46 sc (46)
Row 50: 8 sc, 1 dec, 22 sc, 1 dec, 12 sc (44)
Rows 51-52: 44 sc (44)
Row 53: 9 sc, 1 dec, 21 sc, 1 dec, 10 sc (42)
Rows 54-58: 42 sc (42)
Important: Stuff the body firmly as you go. If you are using a safety nose, insert it now between rows 45 and 46.
The Ears (Make 2)
To create the ears, fold the top of the head in half and find the center. Insert your hook into the center stitch of the opposite side and sc them together. This closes the top of the head and leaves two holes for the ears.
Ear 1:
Row 59: Work 20 sc into one of the ear holes (20)
Row 60: 9 sc, 1 dec, 9 sc (19)
Row 61: 1 dec, 17 sc (18)
Row 62: 18 sc (18)
Row 63: 1 dec, 7 sc, 1 dec, 7 sc (16)
Row 64: 1 dec, 6 sc, 1 dec, 6 sc (14)
Row 65: 1 dec, 4 sc, 1 dec, 6 sc (12)
Row 66: 6 dec (6)
Row 67: 6 sc (6)
Fasten off, stuff the ear, and sew the hole closed. Repeat for the second ear.
Eyes and Front Paws
White Eye Bases (Make 2): Use white yarn.
Row 1: 6 sc in MR (6)
Row 2: 6 inc (12)
Row 3: (1 sc, 1 inc) x 6 (18)
Row 4: (2 sc, 1 inc) x 6 (24)
Row 5: 24 sc (24)
sl st to join. Fasten off. Place the safety eyes between rows 2 and 3.
Front Paws (Make 2): Use grey yarn.
Row 1: 6 sc in MR (6)
Row 2: 6 inc (12)
Row 3: (1 sc, 1 inc) x 6 (18)
Row 4: (2 sc, 1 inc) x 6 (24)
Row 5: 24 sc (24)
Row 6: 1 dec, 10 sc, 1 dec, 10 sc (22)
Row 7: 1 dec, 9 sc, 1 dec, 9 sc (20)
Row 8: 1 dec, 8 sc, 1 dec, 8 sc (18)
Rows 9-15: 18 sc (18)
Row 16: 7 sc, turn work and crochet 11 sc back along the same row. Turn again: 1 dec, 6 sc, 1 dec. (This shaping helps the paws point upward when sewn).
Row 17: 16 sc, sl st to join. Fasten off and stuff.
The Details
Fingers/Toes (Make 14):
Row 1: 5 sc in MR (5)
Row 2: 5 inc (10)
Rows 3-4: 10 sc (10), sl st to join. Fasten off and stuff.
Paw Pads (Make 4): Use white yarn.
Row 1: 6 sc in MR (6)
Row 2: 6 inc (12), sl st to join. Fasten off (do not stuff).
The Tail:
Row 1: 6 sc in MR (6)
Row 2: 6 inc (12)
Row 3: (1 sc, 1 inc) x 6 (18)
Row 4: (2 sc, 1 inc) x 6 (24)
Row 5: (3 sc, 1 inc) x 6 (30)
Row 6: 30 sc (30)
Row 7: 1 dec, 13 sc, 1 dec, 13 sc (28)
Row 8: 1 dec, 12 sc, 1 dec, 12 sc (26)
Row 9: 26 sc (26)
Row 10: 1 dec, 9 sc, 2 dec, 9 sc, 1 dec (22)
Row 11: 1 dec, 18 sc, 1 dec (20)
Row 12: 1 dec, 9 sc, 1 inc, 8 sc (20)
Row 13: 18 sc, 1 dec (19)
Row 14: 1 dec, 8 sc, 1 inc, 8 sc (19)
Row 15: 1 dec, 15 sc, 1 dec (17)
Row 16: 1 dec, 6 sc, 1 inc, 6 sc, 1 dec (16)
Row 17: 16 sc (16)
Row 18: 8 sc, 1 dec, 6 sc (15)
Row 19: 1 dec, 6 sc, 1 inc, 6 sc (15)
Row 20: 7 sc, 1 inc, 7 sc (16)
Row 21: 1 dec, 12 sc, 1 dec (14)
Row 22: 1 dec, 12 sc (13)
Row 23: 1 dec, 5 sc, 1 inc, 5 sc (13)
Row 24: 6 sc, 1 inc, 6 sc (14)
Row 25: 14 sc (14)
Row 26: 1 dec, 6 sc, 1 inc, 5 sc (14)
Rows 27-28: 14 sc (14)
Row 29: 1 dec, 6 sc, 1 inc, 5 sc (14)
Row 30: 1 dec, 5 sc, 1 inc, 6 sc (14)
Rows 31-35: 14 sc (14)
Work 2 sc to shift the stitch, fold the tail in half, and sc across both layers to close. Stuff the tail as you work.
Rear Details (Make 2):
Row 1: 5 sc in MR (5)
Row 2: 5 inc (10)
Row 3: 10 sc (10). Fasten off.
Join the two pieces together: Row 4: 10 sc around the first piece, 10 sc around the second (20). Row 5: 20 sc (20). Row 6: 4 sc, 1 dec, 3 sc, 1 dec, 4 sc, 1 dec, 1 sc, 1 dec (16). Row 7: 3 sc, 1 dec, 6 sc, 1 dec, 3 sc (14). Row 8: (2 sc, 1 dec) x 3, 2 sc (11). Fasten off and stuff.
Finishing & Assembly
Now it is time to bring your cat to life! Follow these assembly steps:
- Eyes: Sew the white eye bases onto the head between rows 46 and 56. Add a tiny bit of stuffing behind them to make them pop.
- Paws: Sew 4 fingers/toes to each front paw and 3 to each back paw. Then, sew the white paw pads onto the paws (do not stuff the pads).
- Arm Placement: Sew the front paws to the sides, a few rows below the eyes. Make sure they are pointed upward. Add a little extra stuffing at the attachment point so the arms stay firm.
- Tail and Rear: Sew the tail and the rear details to the back of the body.
- Embroidery: Use black thread to embroider the cat’s face (mouth/nose area) and a small belly button. For a professional look, use a chain stitch (tambour stitch) to create a black outline around the eyes and the white paw pads.
Tips for Success
- Invisible Decreases: Because you are using chunky yarn, standard decreases can leave visible gaps. Use the invisible decrease method (front loops only) to keep the surface smooth.
- Tension Control: Plush yarn can be tricky. Ensure your tension is consistent so that the stuffing doesn’t peek through the stitches.
- Stuffing: Stuff the body and head very firmly. Since this cat has a large, floppy shape, firm stuffing prevents it from sagging over time.
- Yarn Choice: If you can’t find the specific brand mentioned, any “Super Bulky” weight chenille yarn will work. Just be sure to adjust your hook size if the fabric looks too loose or too tight.