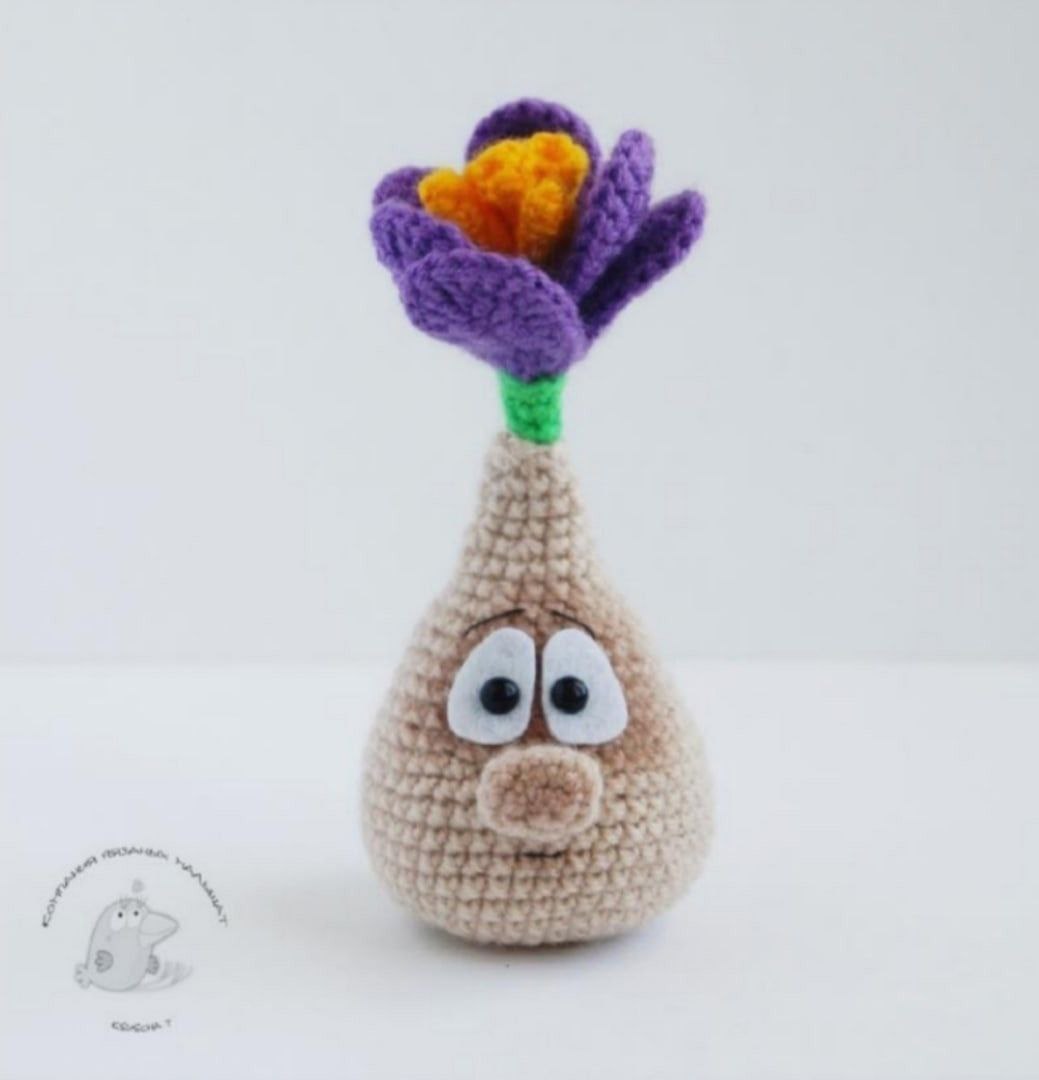
Adorable Crochet Baby Crocus Pattern: A Step-by-Step Amigurumi Tutorial
Bring a touch of eternal spring into your home with this charming Baby Crocus amigurumi! This little character is a delightful blend of a botanical bloom and a cute little personality. Whether you are looking for a unique gift or a fun weekend project, this pattern is designed to be accessible and rewarding. With his wide eyes and tiny nose, this little bulb is sure to bring a smile to anyone’s face.
This project combines several crochet techniques, including working in rounds and joining separate pieces, making it a fantastic way to level up your amigurumi skills. Let’s dive into the details and start crafting your very own little sprout!
Materials & Abbreviations
To get started, gather the following supplies. For the best results, we recommend using a cotton or acrylic blend yarn that holds its shape well.
Supplies Needed
- Yarn: Small amounts of beige, green, purple, and yellow.
- Pro Tip: Use a slightly thinner weight yarn for the yellow sections to keep the center of the flower delicate.
- Crochet Hook: A size appropriate for your chosen yarn (typically a 2.5mm to 3.25mm hook for amigurumi).
- Wire: About 5 inches of craft wire (ensure it is insulated or wrap it in floral tape).
- Weights: A few small coins, glass beads, or small metal nuts to give the bulb a stable base.
- Eyes: Two small white felt ovals (approx. 1/2″ x 2/3″) and two 6mm black half-beads.
- Embroidery: A small amount of black embroidery floss for the mouth and eyebrows.
- Stuffing: High-quality polyester fiberfill.
- Extras: Fabric glue or a glue stick, a yarn needle, scissors, and soft pastels or blush for toning the face.
US Crochet Terms & Abbreviations
- ch: chain
- sl st: slip stitch
- sc: single crochet
- hdc: half double crochet
- dc: double crochet
- inc: increase (2 sc in the same stitch)
- dec: decrease (sc 2 stitches together)
- MR: magic ring
- st(s): stitch(es)
Finished Size: The completed toy stands approximately 4.7 inches tall, with the bulb measuring about 2 inches in diameter.
Step-by-Step Instructions
Part 1: The Flower Bud
The bud consists of petals, stamens, and pistils that are assembled around a wire core.
The Petals (Make 6)
Using purple yarn:
- Row 1: ch 11.
- Row 2: Work along both sides of the foundation chain. Starting in the 3rd chain from the hook: sl st, 2 sc, 3 hdc, 2 dc, 3 dc in the last chain, 2 dc, 3 hdc, 2 sc, 2 sl st. (21 sts)
- Row 3: Work in a round: 2 sl st, 2 sc, 3 hdc, 2 dc, (inc dc) x 3, 2 dc, 3 hdc, 2 sc, 2 sl st. (24 sts)
Fasten off and leave a short tail for sewing.
The Stamens (Make 3)
Using yellow yarn:
- Row 1: 3 sc in MR.
- Row 2: 3 sc.
- Row 3: inc x 3 (6 sts).
- Row 4: 6 sc.
- Row 5: dec x 3 (3 sts).
Pull the yarn tight to close the hole. Fasten off, leaving a small tail.
The Pistils (Make 3)
Using yellow yarn:
- Row 1: ch 3.
- Row 2: In the first chain from the hook, work 5 dc and 1 sl st.
Pull tight. For two of the pistils, fasten off with a short tail. For the third pistil, leave a long tail of about 12-15 inches.
Assembling the Bud
- Take your 5-inch wire, fold it in half, and twist it together for strength. Wrap it in tape if needed.
- Apply glue to the top 3/4″ of the wire. Attach the pistils to the top and wrap the wire with yellow yarn for about 1/2″ to secure them.
- Attach the stamens to the wire and continue wrapping with yellow yarn.
- About 1/2″ below the stamens, apply glue to the wire. Position 3 petals around the wire and sew their bases together.
- Position the remaining 3 petals in a staggered pattern between the first three and sew them all together at the base.
- The Calyx (Green Base): Switch to green yarn. Join to the bottom three petals, working 3 sc into each petal (9 sc total).
- Rows 1-2: 9 sc.
- Row 3: (sc, dec) x 3 (6 sts).
- Rows 4-5: 6 sc.
- Fasten off and weave in ends.
Part 2: The Bulb
The bulb is worked in beige yarn and includes a separate nose piece that is integrated into the body.
The Nose
- Row 1: 6 sc in MR.
- Row 2: inc x 6 (12 sts).
- Row 3: 12 sc.
- Row 4: dec, 2 sc, 2 dec, 2 sc, dec (8 sts).
- Row 5: 8 sc.
Fasten off. This piece will be crocheted into the bulb body later.
The Bulb Body
- Row 1: 6 sc in MR.
- Row 2: inc x 6 (12 sts).
- Row 3: (sc, inc) x 6 (18 sts).
- Row 4: (2 sc, inc) x 6 (24 sts).
- Row 5: (3 sc, inc) x 6 (30 sts).
- Row 6: (4 sc, inc) x 6 (36 sts).
- Row 7: (5 sc, inc) x 6 (42 sts).
- Rows 8-12: 42 sc (5 rounds).
- Row 13 (Joining Nose): 19 sc, (sc 4 sts of nose together with 4 sts of bulb), 19 sc (42 sts).
- Row 14: 19 sc, 4 sc into the remaining 4 stitches of the nose, 19 sc (42 sts).
- Row 15: (5 sc, dec) x 6 (36 sts).
- Row 16: 36 sc.
- Row 17: (4 sc, dec) x 6 (30 sts).
- Row 18: 30 sc.
- Row 19: (3 sc, dec) x 6 (24 sts).
- Row 20: 24 sc.
- Row 21: (2 sc, dec) x 6 (18 sts).
- Rows 22-23: 18 sc.
Adding Weight: Before continuing, place your weights (coins or beads) in a tiny fabric pouch and place it at the bottom of the bulb. Fill the rest of the body firmly with fiberfill.
- Row 24: (sc, dec) x 6 (12 sts).
- Rows 25-26: 12 sc.
- Row 27: (2 sc, dec) x 3 (9 sts).
Insert the flower bud’s wire into the top of the bulb. Sew the green calyx (Row 27) to the body of the bulb to secure it.
- Row 28: (sc, dec) x 3 (6 sts).
Fasten off, weave in the end, and close the small hole tightly.
Finishing
Now it is time to give your Baby Crocus some personality!
- Blushing: Use soft pastels or a bit of blush to lightly shade the area above the nose where the eyes will go, as well as the tip of the nose and the area around the mouth.
- The Eyes: Glue the white felt ovals above the nose. Then, glue the black half-beads onto the center of the felt to create pupils.
- Facial Details: Using the black embroidery floss, stitch two small, slightly slanted eyebrows and a simple little smile. You can add a touch more shading around the mouth for a 3D effect.
Tips for Success
- Tension is Key: Keep your stitches tight, especially on the bulb, to ensure the stuffing doesn’t peak through.
- Wire Safety: Always ensure your wire ends are twisted or capped so they don’t poke through the crochet fabric.
- Custom Colors: While purple is classic for a crocus, feel free to use yellow or white yarn for the petals to create different varieties!
- Weighting the Base: Using a small fabric pouch for the coins prevents them from shifting or scratching the yarn from the inside.