Adorable Fantasy Cat Crochet Pattern: Free Amigurumi Tutorial
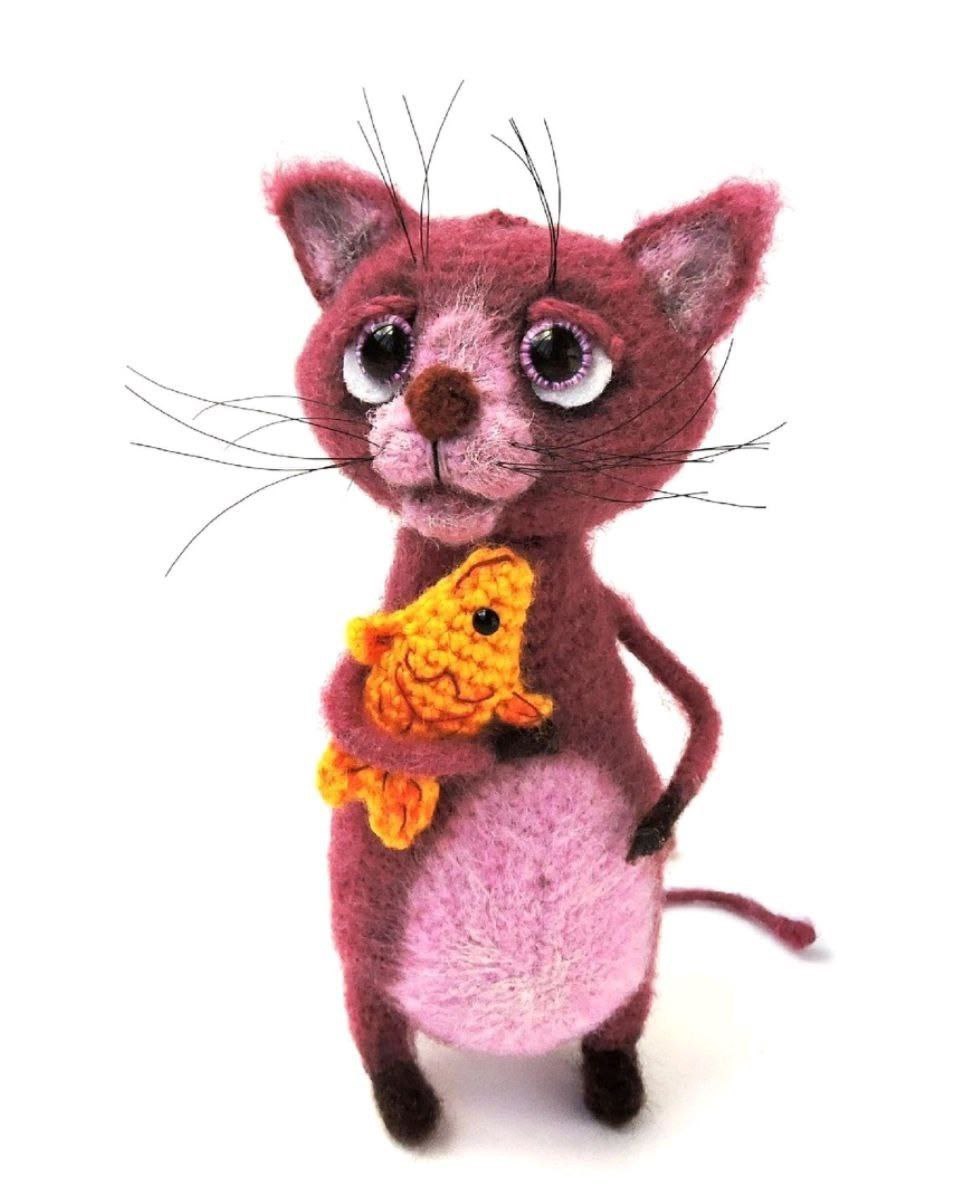
Welcome to this whimsical crochet journey! Today, we are creating a charming, slightly quirky Fantasy Cat. This little character is perfect for those who love amigurumi with a bit of personality. With its large, soulful eyes and slender frame, this cat is sure to become a favorite on your shelf or a cherished gift for a loved one.
This project combines traditional crochet with a bit of “mixed media” using wire and sculpting techniques to give the cat a professional, artist-doll look. While it may look complex, we will walk through it step-by-step to ensure your fantasy feline turns out perfectly.
Materials & Abbreviations
To get started, gather the following materials. We recommend using a fine acrylic, wool blend, or cotton yarn to keep the stitches tight and the shape firm.
Materials Needed
- Yarn: Three coordinating colors of the same weight (Lightweight/Sport weight).
- Color A: Main Body Color (approx. 15 grams)
- Color B: Accent Color 1 – Nose/Paws (approx. 3-5 grams)
- Color C: Accent Color 2 – Belly/Muzzle (approx. 3-5 grams)
- Crochet Hook: 1.25mm (or a size that fits your yarn for tight stitches)
- Filling: Polyester fiberfill
- Hardware:
- 1 pair of safety eyes or craft eyes
- 1 plastic toy joint (12mm) for the neck (optional, but recommended for poseability)
- 1mm diameter craft wire (approx. 20 inches total)
- Tools:
- Tapestry needle and matching thread for sewing
- Long sculpting needle and strong thread for facial shaping
- Clear super glue
- Medical tape or adhesive masking tape
- Fishing line (for whiskers)
Abbreviations (US Terms)
- ch: chain
- sc: single crochet
- sl st: slip stitch
- hdc: half double crochet
- dc: double crochet
- inc: increase (2 sc in one stitch)
- dec: decrease (sc 2 together)
- MR: magic ring
- (…) x N: repeat the instructions inside the parentheses N times
Step-by-Step Instructions
The Upper Paws (Make 2)
The paws are created by wrapping yarn around wire rather than crocheting.
- Cut a piece of wire approximately 3.5 inches long. Bend a small loop at one end.
- Apply a small amount of glue to the loop and wrap Color B around it for about 0.4 inches. Wrap multiple times to create a rounded “paw” shape. Secure the end with glue.
- Switch to Color A and continue wrapping toward the middle of the wire. Again, wrap several times to create volume. Secure with glue.
The Feet (Make 2)
Using Color B:
- Round 1: 6 sc in MR [6]
- Rounds 2–4: 6 sc [6]
- Round 5: Place a marker in the first stitch. Ch 2, skip 2 stitches, 4 sc [6]
- Round 6: 2 sc in the chain, 3 sc, sl st [6]. Fasten off. Pull the remaining stitches tight.
Using Color A:
- Round 1: Join yarn at the marked stitch from Round 5. Crochet 6 sc around the opening of the foot [6]
- Round 2: 6 sc [6]
- Round 3: 4 sc, inc, 1 sc [7]
- Round 4: 7 sc [7]
- Round 5: 2 sc, inc, 3 sc, sl st [8]
Cut a short piece of wire, bend a loop at the end, and insert it into the foot. Add a small amount of stuffing.
The Tail
Cut a piece of wire 5.5 inches long. Bend a loop at the end and glue it. Wrap Color A around the wire for about 3.5 inches, wrapping multiple times to create a plump tail. Secure with glue.
The Body
Using Color A:
Note: Keep a stitch marker at the center of the back.
- Round 1: 6 sc in MR [6]
- Round 2: 6 inc [12]
- Round 3: (1 sc, inc) x 6 [18]
- Round 4: (1 sc, inc, 1 sc) x 6 [24]
- Round 5: (3 sc, inc) x 6 [30]
Incorporating the Limbs
- Round 6: 6 sc. Place the first foot against the back (at the marker). Crochet 3 sc through both the body and the foot stitches. 12 sc. Place the second foot and crochet 3 sc through both. 6 sc [30].
- Round 7: 6 sc. In the remaining foot stitches: 2 sc, inc, 2 sc. 12 sc in body. In the second foot stitches: 2 sc, inc, 2 sc. 6 sc [36].
- Round 8: (2 sc, inc, 2 sc) x 6 [42]
- Round 9: 42 sc
Insert the tail. Twist the ends of the tail wire together with the foot wires. Secure the bundle tightly with medical tape.
Completing the Body
- Rounds 10–18: 42 sc
- Round 19: (6 sc, dec, 6 sc) x 3 [39]
- Round 20: 39 sc
- Round 21: (11 sc, dec) x 3 [36]
- Round 22: 36 sc
- Round 23: (5 sc, dec, 5 sc) x 3 [33]
- Round 24: 33 sc
- Round 25: (9 sc, dec) x 3 [30]
- Round 26: 30 sc
- Round 27: (4 sc, dec, 4 sc) x 3 [27]
- Round 28: 27 sc. Insert the upper paws here. Twist the paw wires together and secure with medical tape.
- Round 29: (7 sc, dec) x 3 [24]
- Rounds 30–32: 24 sc
- Round 31: (1 sc, dec, 1 sc) x 6 [18]
Stuff the body firmly. Insert the disk portion of the plastic joint.
- Round 32: (1 sc, dec) x 6 [12]
- Round 33: (2 sc, dec) x 3 [9]
Fasten off and pull the stitches tightly around the screw of the joint.
The Head
Using Color A:
- Round 1: Ch 8. Starting in 2nd ch: 6 sc, 3 sc in last ch. Working along other side of chain: 1 sc, ch 3, skip 3 (this is the joint hole), 1 sc, inc [16]
- Round 2: inc, 5 sc, (inc) x 3, 1 sc. On chain stitches: 3 sc, 1 sc, (inc) x 2 [22]
- Round 3: inc, 1 sc, 5 sc, (1 sc, inc) x 3, 5 sc, (1 sc, inc) x 2 [28]
- Round 4: (1 sc, inc, 1 sc), 5 sc, (1 sc, inc, 1 sc) x 3, 5 sc, (1 sc, inc, 1 sc) x 2 [34]
- Round 5: 15 sc, 3 sc in 1, 17 sc, 3 sc in 1 [38]
- Round 6: 16 sc, 3 sc in 1, 18 sc, 3 sc in 1, 2 sc [42]
- Round 7: 17 sc, 3 sc in 1, 20 sc, 3 sc in 1, 3 sc [46]
- Round 8: 18 sc, 3 sc in 1, 22 sc, 3 sc in 1, 4 sc [50]
Crochet 7 sc and move the marker here (this is the center of the back of the head).
- Rounds 9–11: 50 sc
- Round 12: 11 sc, dec, 24 sc, dec, 11 sc [48]
- Round 13: 10 sc, dec, 24 sc, dec, 10 sc [46]
- Round 14: 10 sc, dec, 22 sc, dec, 10 sc [44]
- Round 15: 9 sc, dec, 21 sc, dec, 10 sc [42]
- Round 16: 42 sc
- Round 17: (5 sc, dec) x 6 [36]
- Round 18: (2 sc, dec, 2 sc) x 6 [30]
- Round 19: (3 sc, dec) x 6 [24]
- Round 20: (1 sc, dec, 1 sc) x 6 [18]
- Round 21: (1 sc, dec) x 6 [12]
Stuff the head. Do not close the top yet—you will need the opening for sculpting.
- Round 22: dec x 6 [6]
Insert the head onto the neck joint and snap the cap into place. Tip: Warm the cap with a hairdryer or dip in hot water to make it snap on easier.
Facial Features & Belly
Belly Patch (Color C): Ch 8. From 2nd ch: 6 sc, 3 sc in last. Other side: 5 sc, inc [16]. R2: inc, 5 sc, (inc) x 3, 5 sc, (inc) x 2 [22]. R3: 1 sc, inc, 8 sc, 3 sc in 1, 7 sc, (1 sc, inc) x 2 [27]. R4: (1 sc, inc, 1 sc), 9 sc, 3 sc in 1, 8 sc, (1 sc, inc, 1 sc) x 2 [32]. R5: 3 sc, inc, 9 sc, 3 sc in 1, 10 sc, (3 sc, inc) x 2 [37]. R6: (2 sc, inc, 2 sc), 11 sc, 3 sc in 1, 10 sc, (2 sc, inc, 2 sc) x 2 [42]. R7: 5 sc, sl st. Fasten off.
Muzzle (Color C): Ch 5. From 2nd ch: 3 sc, 3 sc in last. Other side: 2 sc, inc [10]. R2: inc, 2 sc, (inc) x 3, 2 sc, (inc) x 2 [16]. R3-4: 16 sc. Stuff lightly and cinch the center with thread.
Lower Lip (Color C): MR 6. R2: (1 sc, inc) x 3 [9]. R3: 9 sc. Fasten off.
Bridge of Nose (Color C): Ch 7. From 3rd ch: 1 dc, 1 hdc, 1 sc. In last st: 1 sc, ch 2, 1 sc. Other side: 1 sc, 1 hdc, 2 dc in 1. Fasten off.
Ears (Make 4 – 2 in Color A, 2 in Color C): Ch 7. From 2nd ch: 6 sc, ch, turn [6]. R2: dec, 2 sc, dec, ch, turn [4]. R3: dec, 2 sc, ch, turn [3]. R4: dec, 1 sc, ch, turn [2]. R5: dec [1]. Join one Color A piece to one Color C piece and crochet around the top edge with Color A.
Nose (Color B): MR 6. R2: 6 sc. Fasten off and pull tight.
Finishing
Assembly
- Sew the belly patch, muzzle, bridge of nose, lower lip, and ears onto the head and body.
- Sew on the small nose.
- Glue the eyes into place.
- Insert fishing line into the cheeks to create whiskers.
Sculpting the Eyes (The Secret to the Look)
To give the cat those deep, expressive eyes, we use a sculpting thread. Identify these points: Point 0 (top head opening), Point 5 (back of neck), and Points 1 & 2 (edges of the bridge of the nose).
- Insert needle at Point 0, bury the knot in stuffing, and bring the needle out at Point 5.
- Secure with a small stitch. Bring needle from Point 5 back into the head to Point 1.
- Bring the needle from Point 1 over the surface of the crochet to Point 2, then back into the head to Point 5.
- Pull the thread tight to “sink” the eye socket. Secure with a knot. Repeat for the second eye.
Tips for Success
- Tension: Keep your stitches very tight, especially on the head, so the stuffing doesn’t peek through.
- Wire Safety: Always bend the ends of your wires into loops to prevent them from poking through the crochet fabric.
- Sculpting: Be careful not to pull the sculpting thread *too* hard, or you might warp the entire head. Pull gradually until you achieve the desired depth.
- Yarn Choice: If you want a “fuzzy” look, you can lightly brush the finished cat with a wire pet brush to create a felted effect.