Adorable Crochet Pig Amigurumi Pattern: A Step-by-Step Tutorial
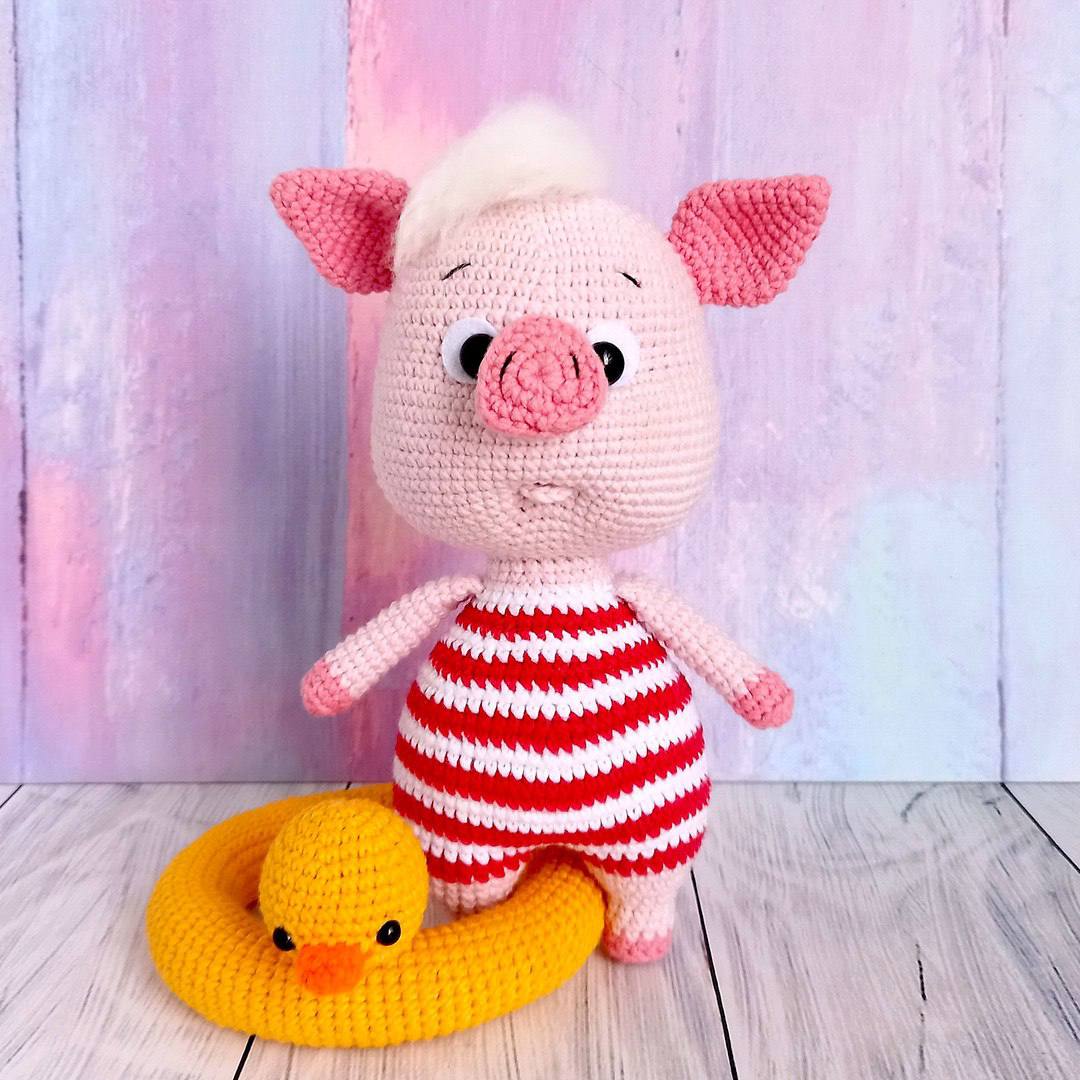
Looking for a project that is as sweet as sugar? This adorable crochet pig is the perfect addition to any plushie collection. With his tiny striped swimsuit and a little ducky swim ring, this little piggy is ready for a day at the beach This pattern is designed to be friendly for intermediate beginners, focusing on basic amigurumi techniques like working in a spiral and joining pieces together.
The finished pig stands approximately 8 inches tall. We will be working from the bottom up, using the “X” stitch (standard single crochet) unless otherwise noted. Remember to mark the beginning of each round with a contrasting piece of yarn to keep your place
Materials & Abbreviations
Materials Needed
- Yarn: Sport weight acrylic or cotton blend (similar to YarnArt Jeans). You will need:
- Light Pink (Main body)
- Dark Pink (Snout, ears, and hooves)
- Red and White (For the striped swimsuit)
- Yellow and Orange (For the ducky swim ring)
- A small scrap of white acrylic yarn for the hair tuft
- Crochet Hook: A size appropriate for your yarn (typically 2.0mm to 2.5mm)
- Eyes: 10mm safety eyes
- Felt: Small white felt circles (approximately 0.6 inches in diameter) for the eye whites
- Stuffing: Polyester fiberfill
- Tools: Tapestry needle, scissors, stitch markers, and a pet slicker brush or comb for the hair
- Extras: Strong thread for facial sculpting and a bit of clear glue
Abbreviations (US Terms)
- MR: Magic Ring
- sc: Single crochet
- inc: Increase (two sc in one stitch)
- dec: Decrease (sc two together)
- ch: Chain
- sl st: Slip stitch
- BLO: Back loop only
- (…) * X: Repeat the instructions inside the parentheses X times
- St(s): Stitch(es)
Step-by-Step Instructions
The Arms (Make 2)
Start with Dark Pink yarn.
- Round 1: 5 sc in MR (5)
- Round 2: 5 inc (10)
- Round 3: 10 sc in BLO (10)
- Round 4: 10 sc (10)
Switch to Light Pink yarn.
- Rounds 5-16: 10 sc (10)
Crochet an additional 1-2 stitches to ensure the color change is hidden inside the body when you join them later. Stuff the lower part of the arms lightly. Fold the arm in half and sc 5 across both layers to close. Fasten off, leaving a tail for sewing.
The Snout
Start with Dark Pink yarn. Leave a 12-inch tail for later.
- Round 1: 12 sc in MR (12)
- Round 2: (3 sc in next st, 3 sc) * 3 (18)
- Round 3: 2 sc, (3 sc in next st, 5 sc) * 2, 3 sc in next st, 3 sc (24)
Using the yarn tail from the start, sew through the first round from the back to tighten the magic ring completely.
- Round 4: 24 sc in BLO (or use a “hidden” decrease stitch for a cleaner look) (24)
- Round 5: 24 sc (24)
Switch to Light Pink yarn.
- Round 6: 24 sc (24)
- Round 7: 12 dec (12)
Fasten off and weave in ends.
The Head
Use Light Pink yarn.
- Round 1: 6 sc in MR (6)
- Round 2: 6 inc (12)
- Round 3: (1 sc, inc) * 6 (18)
- Round 4: (2 sc, inc) * 6 (24)
- Round 5: (3 sc, inc) * 6 (30)
- Round 6: (4 sc, inc) * 6 (36)
- Round 7: (5 sc, inc) * 6 (42)
- Round 8: (6 sc, inc) * 6 (48)
- Round 9: (7 sc, inc) * 6 (54)
- Round 10: (8 sc, inc) * 6 (60)
- Rounds 11-12: 60 sc (60)
- Round 13: (9 sc, inc) * 6 (66)
- Rounds 14-18: 66 sc (66)
Joining the Snout
In Round 19, we will create the cheeks and attach the snout. Find the top of the head opposite the snout’s placement. Mark the center two stitches. The snout should be turned so the top is facing away from you.
- Round 19: 18 sc, (1 sc, inc) * 6, 6 sc joined with the 6 stitches of the snout, (inc, 1 sc) * 6, 18 sc (78)
- Round 20: 36 sc, 6 sc in the remaining snout stitches, 36 sc (78)
Lightly stuff the snout. Continue with the head:
- Rounds 21-30: 78 sc (78)
Eye Placement: Between rounds 17 and 18, place safety eyes about 7-8 stitches apart, centered relative to the snout. Place your felt circles behind the eyes for a cute, wide-eyed look.
- Round 31: (11 sc, dec) * 6 (72)
- Round 32: (7 sc, dec) * 8 (64)
- Round 33: (6 sc, dec) * 8 (56)
- Round 34: (5 sc, dec) * 8 (48)
- Round 35: (4 sc, dec) * 8 (40)
- Round 36: (3 sc, dec) * 8 (32)
- Round 37: (2 sc, dec) * 8 (24)
Stuff the head firmly but leave room for sculpting. Fasten off.
The Ears (Make 2)
Use Light Pink yarn.
- Round 1: 6 sc in MR (6)
- Round 2: (1 sc, inc) * 3 (9)
- Round 3: 9 sc (9)
- Round 4: (2 sc, inc) * 3 (12)
- Round 5: (3 sc, inc) * 3 (15)
- Round 6: (4 sc, inc) * 3 (18)
- Round 7: (2 sc, inc) * 6 (24)
- Round 8: (3 sc, inc) * 6 (30)
- Round 9: 30 sc (30)
- Round 10: (3 sc, dec) * 6 (24)
- Round 11: (2 sc, dec) * 6 (18)
- Round 12: (1 sc, dec) * 6 (12)
- Round 13: 1 sc, fold in half, and sc 6 across the open edge to close.
Fasten off, leaving an 18-20 inch tail for sewing.
The Legs (Make 2)
Start with Dark Pink yarn.
- Round 1: 6 sc in MR (6)
- Round 2: 6 inc (12)
- Round 3: 12 sc in BLO (12)
- Round 4: 12 sc (12)
Switch to Light Pink yarn.
- Rounds 5-8: 12 sc (12) – Note: check the image for the stitch count, usually matches the start.
- Round 9: (1 sc, inc) * 6 (18)
- Round 10: 18 sc (18)
- Round 11: (2 sc, inc) * 6 (24)
- Round 12: 24 sc (24)
Fasten off the first leg. Leave the second leg attached to join to the body.
The Body
Join the legs using Red yarn. Ch 3 and connect the two legs.
- Round 1: 24 sc around first leg, 3 sc in the chain, 24 sc around second leg, 3 sc in the other chain (54)
- Round 2: (8 sc, inc) * 6 (60)
Now, we will alternate colors every 2 rounds (Red and White).
- Round 3: (White) 60 sc (60)
- Round 4: (White) (9 sc, inc) * 6 (66)
- Rounds 5-6: (Red) 66 sc (66)
- Rounds 7-8: (White) 66 sc (66)
- Rounds 9-10: (Red) 66 sc (66)
- Round 11: (White) 66 sc (66)
- Round 12: (White) (9 sc, dec) * 6 (60)
- Round 13: (Red) 60 sc (60)
- Round 14: (Red) (8 sc, dec) * 6 (54)
- Round 15: (White) 54 sc (54)
- Round 16: (White) (7 sc, dec) * 6 (48)
- Round 17: (Red) 48 sc (48)
- Round 18: (Red) (6 sc, dec) * 6 (42)
- Round 19: (White) 42 sc (42)
- Round 20: (White) (5 sc, dec) * 6 (36)
- Round 21: (Red) 36 sc (36)
- Round 22: (Red) (4 sc, dec) * 6 (30)
- Round 23: (White) 30 sc (30)
Joining the Arms: In Round 24, we attach the arms to the sides.
- Round 24: 8 sc, 5 sc joined with arm, 10 sc, 5 sc joined with arm, 2 sc (30)
Switch to Light Pink yarn.
- Round 25: 30 sc (30)
- Round 26: (3 sc, dec) * 6 (24)
- Round 27: 24 sc (24)
Fasten off and stuff the body firmly.
Finishing
Facial Sculpting
To give the pig expression, use a tapestry needle and strong thread to pull the face inward. Mark 6 points: two near the bottom of the snout (1 & 6) and four around the eyes (2, 3, 4, & 5).
Thread from point 1 to 2, then 3 to 6. Pull tight to create the mouth. Repeat the process from point 6 to 5, then 4 to 1 to create eye sockets. Tie off and hide the ends inside the head.
The Lower Lip
Using a small scrap of Light Pink yarn, make a MR and work 6 sc. Pull the ring tight to create a semi-circle. Sew this 2-3 rounds below the mouth sculpting.
The Tail, Ears, and Hair
- Ears: Sew ears between rounds 9 and 10 from the crown, about 14 stitches away from the center of the face.
- Tail: Attach yarn to the back of the body, ch 7-8. Working back down the chain, put 2 sc in each stitch. Tie off and hide the end.
- Hair Tuft: Use white acrylic yarn. Attach 10-12 small strands to the top of the head using a latch-hook method. Use a slicker brush to brush the yarn until it is fluffy, then trim it into a cute tuft.
The Ducky Swim Ring
The Ring: Use yellow yarn. Ch 17, join into a ring. Work in a spiral of sc around the ring until it reaches about 11 inches in length. Sew the ends together to form a donut shape and stuff lightly.
The Beak: Use orange yarn. Ch 5. Work 4 sc along one side and 4 sc along the other (8). Work 2 more rounds of 8 sc. Fasten off.
The Ducky Head: Use yellow yarn. Work a standard sphere: MR 6, inc to 12, 18, 24, 30. Work rounds of 30 sc. In Round 10, join the beak by working 5 sc together with the beak. Continue until you reach 12 stitches, then dec to 6. Sew the head to the ring and add tiny eyes.
Tips for Success
- Tension: Keep your tension consistent, especially on the body stripes, to ensure the swimsuit looks even.
- Stuffing: When stuffing the head, be careful not to overstuff before sculpting, or the face may become too round to pull the threads through.
- Yarn Choice: Acrylic blends work best for the hair tuft as they brush out much more easily than cotton.
- Safety: If making this for a small child, embroider the eyes with black yarn instead of using safety eyes.