Cozy Crochet Cat Pattern: Step-by-Step Amigurumi Tutorial
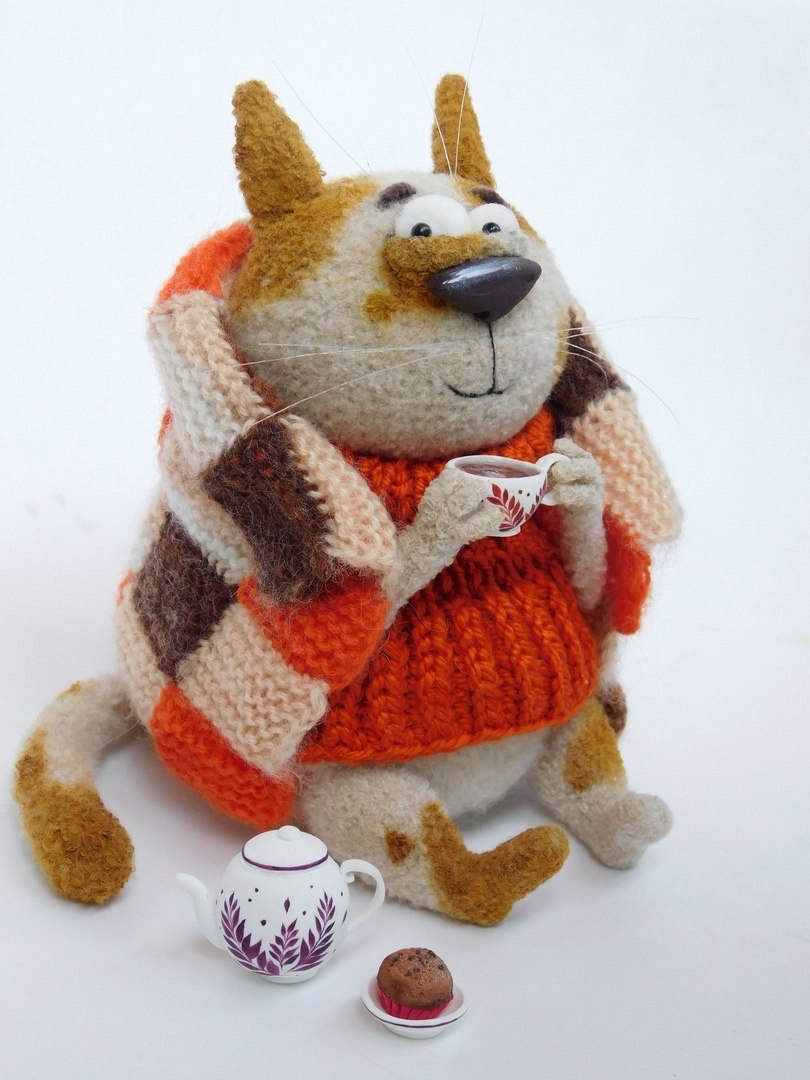
If you love cuddly, character-filled crochet projects, this cozy amigurumi cat is the perfect addition to your hook list! With his adorable chubby tummy, soulful eyes, and custom-fit knitted sweater and blanket, this little feline exudes warmth and comfort. Sitting at approximately 7 to 10 inches tall (depending on your yarn choice and tension), he makes a wonderful handmade gift or a delightful addition to your home decor.
This tutorial features an integrated wire frame, allowing your finished cat to sit, hold a tiny teacup, or wrap himself up snugly in his miniature blanket. Let’s gather our materials and get crocheting!
Materials & Abbreviations
Materials Needed
- Yarn: Sport weight or DK weight yarn in your choice of cat color (gray, beige, or orange work wonderfully) and black thread for the nose. You will also need scrap yarn in your favorite colors for the knitted sweater and blanket.
- Crochet Hook: US Size B-1 or C-2 (2.0 mm to 2.5 mm) depending on your tension. (For a miniature version, you can use a 1.0 mm hook with lace weight thread).
- Knitting Needles: US Size 2 or 3 (2.75 mm to 3.25 mm) for the sweater and blanket.
- Wire: Strong craft wire or floral wire (approx. 12-gauge). You will need about three pieces of 8-inch wire and one piece of 12-inch wire.
- Tape: Medical adhesive tape or electrical tape to wrap wire ends.
- Stuffing: Premium polyester fiberfill.
- Eyes & Nose: Polymer clay (to sculpt custom details) or plastic safety eyes and a crocheted nose (pattern included below).
- Tools: Tapestry needle, scissors, and stitch markers.
Abbreviations (US Terms)
- MR: Magic Ring
- ch: Chain
- sc: Single crochet
- dc: Double crochet
- inc: Increase (2 sc in the same stitch)
- 3-sc inc: 3 single crochet stitches in the same stitch
- dec: Decrease (sc 2 stitches together)
- sc3tog: Double decrease (sc 3 stitches together)
- sl st: Slip stitch
- Popcorn: 3-dc Popcorn stitch (work 3 dc into the same stitch, drop the loop from your hook, insert hook into the first dc, grab the dropped loop, and pull through)
- t-ch: Turning chain
- [ ]: Repeat instructions inside brackets the indicated number of times
- ( ): Total stitch count at the end of the round
Step-by-Step Instructions
Feet and Legs (Make 2)
We begin by crafting the paws and working our way up the legs. Stuff the pieces firmly as you progress.
Step 1: The Foot
Chain 5. Starting in the second chain from your hook:
- Round 1: Inc, 2 sc, 3-sc inc in the last chain. Working down the opposite side of the chain: 2 sc, inc (11)
- Round 2: Popcorn, sl st, Popcorn, sl st, Popcorn, sl st, 5 sc (11)
- Round 3–4: Sc in each stitch around (11)
- Round 5: Dec, 9 sc (10)
- Lightly stuff the toe area.
- Round 6: [Dec, 3 sc] x 2 (8)
- Round 7: 4 dec (4)
Pull the remaining opening closed, fasten off, and weave in your ends.
Step 2: The Leg
To begin the leg, join your yarn directly to the sole of the foot you just completed. Pick up 9 sc in a circle on the back of the foot (on the opposite side of your initial chain, starting near the heel area).
- Round 1: 9 sc (9)
- Round 2: 3 sc, 3 inc, 3 sc (12)
- Round 3: Sc in each stitch around (12)
- Round 4: 3 sc, [inc, sc] x 3, 3 sc (15)
- Round 5: 4 sc, [inc, 2 sc] x 3, 2 sc (18)
- Round 6: Sc in each stitch around (18)
- Round 7: 4 sc, [inc, 3 sc] x 3, 2 sc (21)
- Round 8: 5 sc, [inc, 4 sc] x 3, sc (24)
- Round 9: Sc in each stitch around (24)
- Round 10: 5 sc, [inc, 5 sc] x 3, sc (27)
- Round 11: 6 sc, [inc, 6 sc] x 3 (30)
- Round 12–17: Sc in each stitch around (30)
- Round 18: 6 sc, [dec, 6 sc] x 3 (27)
- Round 19: Sc in each stitch around (27)
- Round 20: 5 sc, [dec, 5 sc] x 3, sc (24)
- Round 21: Sc in each stitch around (24)
Fasten off. Cut an 8-inch piece of wire, wrap both ends with medical tape to protect the stitches, and bend the bottom 0.4 inches into an L-shape. Insert this bent end into the foot, slide the wire up through the leg, and stuff the leg firmly around the wire.
The Tail
The tail is worked in continuous rounds. Stuff lightly as you go.
- Round 1: 6 sc in MR (6)
- Round 2: 6 inc (12)
- Round 3: [sc, inc] x 6 (18)
- Round 4: [2 sc, inc] x 6 (24)
- Round 5–16: Sc in each stitch around (24)
- Round 17: Dec, 22 sc (23)
- Round 18–19: Sc in each stitch around (23)
- Round 20: Dec, 21 sc (22)
- Round 21–22: Sc in each stitch around (22)
- Round 23: Dec, 20 sc (21)
- Round 24–25: Sc in each stitch around (21)
- Round 26: Dec, 19 sc (20)
- Round 27–28: Sc in each stitch around (20)
- Round 29: Dec, 18 sc (19)
- Round 30–31: Sc in each stitch around (19)
- Round 32: Dec, 17 sc (18)
- Round 33–34: Sc in each stitch around (18)
- Round 35: Dec, 16 sc (17)
- Round 36–37: Sc in each stitch around (17)
- Round 38: Dec, 15 sc (16)
- Round 39–40: Sc in each stitch around (16)
- Round 41: Dec, 14 sc (15)
- Round 42–43: Sc in each stitch around (15)
- Round 44: Dec, 13 sc (14)
- Round 45–46: Sc in each stitch around (14)
- Round 47: Dec, 12 sc (13)
- Round 48–49: Sc in each stitch around (13)
- Round 50: Dec, 11 sc (12)
- Round 51–70: Sc in each stitch around (12)
Fasten off. Insert a 12-inch piece of wrapped wire into the tail to make it fully poseable.
Arms and Hands (Make 2)
Step 1: The Fingers
For each hand, you will need to crochet 4 individual fingers. Do not cut the yarn on the 4th finger; you will use it to join the hand together.
- Round 1: 4 sc in MR (4)
- Round 2–4: Sc in each stitch around (4)
Step 2: Joining the Palm
- Round 1: Work 2 sc on the first finger, 2 sc on the second finger, 4 sc on the third finger, 2 sc on the remaining unworked stitches of the second finger, and 2 sc on the remaining unworked stitches of the first finger (12)
- Round 2–3: Sc in each stitch around (12)
For the Left Hand:
- Round 4: Join the 4th finger (the thumb) by crocheting 2 sc through both the palm and the finger, then 10 sc around the palm (12)
- Round 5: Crochet 2 sc along the unworked stitches of the thumb, then 10 sc around the palm (12)
For the Right Hand:
- Round 4: 10 sc around the palm, then join the 4th finger by crocheting 2 sc through both the palm and the finger (12)
- Round 5: 10 sc around the palm, then 2 sc along the unworked stitches of the thumb (12)
Step 3: Continuing the Arm
Lightly stuff the palm of the hand.
- Round 6–7: Sc in each stitch around (12)
- Round 8: [sc, dec] x 4 (8)
- Round 9–18: Sc in each stitch around (8)
- Round 19: [inc, 3 sc] x 2 (10)
- Round 20–23: Sc in each stitch around (10)
- Round 24: [inc, 4 sc] x 2 (12)
- Round 25–30: Sc in each stitch around (12)
Fasten off. Insert an 8-inch piece of wrapped wire down into the hand and stuff the arm firmly.
The Body
We will join the legs, tail, and arms directly into the body as we work to create a sturdy, seamless piece.
Chain 8. Starting in the second chain from your hook:
- Round 1: Inc, 5 sc, 4 sc in the last chain. Working down the opposite side of your chain: 5 sc, inc (18)
- Round 2: Crochet 4 sc (this is a short round to reach the center back of the body). Move your stitch marker here. Keep this marker running down the center front of the body, making shift stitches as necessary.
- Round 3: 3 sc, 4 inc, 5 sc, 4 inc, 2 sc (26)
- Round 4: 3 sc, [inc, sc] x 2, [sc, inc] x 2, 5 sc, [inc, sc] x 2, [sc, inc] x 2, 2 sc (34)
- Round 5: 3 sc, [inc, 2 sc] x 2, [2 sc, inc] x 2, 5 sc, [inc, 2 sc] x 2, [2 sc, inc] x 2, 2 sc (42)
- Round 6: Inc, 2 sc, [inc, 3 sc] x 2, [3 sc, inc] x 2, 2 sc, inc, 2 sc, [inc, 3 sc] x 2, [3 sc, inc] x 2, 2 sc (52)
- Round 7: 4 sc, [inc, 4 sc] x 2, [4 sc, inc] x 2, 6 sc, [inc, 4 sc] x 2, [4 sc, inc] x 2, 2 sc (60)
- Round 8: 4 sc, inc, 5 sc, inc, sc. Now join the right leg by crocheting 8 sc through both the body and the inner stitches of the leg. Sc, inc, 5 sc, inc, 6 sc, inc, 5 sc, inc, sc. Join the left leg by crocheting 8 sc through both the body and the inner stitches of the leg. Sc, inc, 5 sc, inc, 2 sc (68)
- Round 9: 4 sc, inc, 6 sc, inc, 2 sc, 1 sc in the joint, 16 sc around the unworked stitches of the right leg, 1 sc in the joint, 2 sc, [inc, 6 sc] x 3, inc, 2 sc, 1 sc in the joint, 16 sc around the unworked stitches of the left leg, 1 sc in the joint, 2 sc, inc, 6 sc, inc, 2 sc (96)
- Round 10: 5 sc, inc, 10 sc, dec, 12 sc, dec, [10 sc, inc] x 2, 10 sc, dec, 12 sc, dec, 10 sc, inc, 5 sc (96)
- Round 11: 6 sc, inc, [10 sc, dec] x 2, 11 sc, inc, 10 sc, inc, 11 sc, [dec, 10 sc] x 2, inc, 6 sc (96)
- Round 12–18: Sc in each stitch around (96)
- Round 19: 45 sc, join the tail by crocheting 6 sc through both the body and the tail, 45 sc (96)
- Round 20: 45 sc, 1 sc in the joint, 6 sc along the remaining unworked stitches of the tail, 1 sc in the joint, 45 sc (98)
- Round 21: 24 sc, [8 sc, dec] x 2, 10 sc, [dec, 8 sc] x 2, 24 sc (94)
- Round 22: 24 sc, [7 sc, dec] x 2, 10 sc, [dec, 7 sc] x 2, 24 sc (90)
- Round 23: [13 sc, dec] x 6 (84)
- Round 24: [12 sc, dec] x 6 (78)
- Round 25: [11 sc, dec] x 6 (72)
- Round 26: [10 sc, dec] x 6 (66)
- Round 27: 9 sc, dec, 42 sc, dec, 9 sc, dec (63)
- Round 28: 8 sc, dec, 41 sc, dec, 8 sc, dec (60)
- Round 29: 7 sc, dec, 40 sc, dec, 7 sc, dec (57)
- Round 30: 6 sc, dec, 39 sc, dec, 6 sc, dec (54)
- Round 31: 5 sc, dec, 40 sc, dec, 5 sc (52)
- Round 32: 4 sc, dec, 40 sc, dec, 4 sc (50)
- Round 33: Dec, 48 sc (49)
- Round 34: 47 sc, dec (48)
- Round 35–44: Sc in each stitch around (48)
- Round 45: 9 sc, join the right arm by crocheting 6 sc through both the body and the arm, 18 sc, join the left arm by crocheting 6 sc through both the body and the arm, 9 sc (48)
- Round 46: 9 sc, 6 sc along the unworked stitches of the right arm, 18 sc, 6 sc along the unworked stitches of the left arm, 9 sc (48)
- Round 47: Sc in each stitch around (48)
- Round 48: [dec, 6 sc] x 6 (42)
- Round 49: [dec, 5 sc] x 6 (36)
- Round 50: [dec, 4 sc] x 6 (30)
- Round 51: [dec, 3 sc] x 6 (24)
- Round 52: [dec, 2 sc] x 6 (18)
- Round 53–57: Sc in each stitch around (18)
Fasten off and leave a long tail. Twist the wires from the legs, arms, and tail securely together inside the body cavity, then stuff the body firmly with fiberfill.
The Head
We work the head from the nose area backward. Stuff firmly as you go.
Chain 8. Start in the second chain from your hook:
- Round 1: Inc, 5 sc, 4 sc in the last chain. Working down the opposite side of your chain: 5 sc, inc (18)
- Round 2: Crochet a short round of 4 sc to reach the center. Move your stitch marker here. Keep this marker running down the center front.
- Round 3: 3 sc, 4 inc, 5 sc, 4 inc, 2 sc (26)
- Round 4: 3 sc, [inc, sc] x 2, [sc, inc] x 2, 5 sc, [inc, sc] x 2, [sc, inc] x 2, 2 sc (34)
- Round 5: 3 sc, [inc, 2 sc] x 2, (place a marker for the ear position here), [2 sc, inc] x 2, 5 sc, [inc, 2 sc] x 2, (place a marker for the second ear here), [2 sc, inc] x 2, 2 sc (42)
- Round 6: 3 sc, inc, [6 sc, inc] x 5, 3 sc (48)
- Round 7: [7 sc, inc] x 6 (54)
- Round 8: 4 sc, inc, [8 sc, inc] x 5, 4 sc (60)
- Round 9: [9 sc, inc] x 6 (66)
- Round 10: 5 sc, inc, [10 sc, inc] x 5, 5 sc (72)
- Round 11–18: Sc in each stitch around (72)
- Round 19: 5 sc, dec, [10 sc, dec] x 5, 5 sc (66)
- Round 20: [9 sc, dec] x 6 (60)
- Round 21: 4 sc, dec, [8 sc, dec] x 5, 4 sc (54)
- Round 22: [7 sc, dec] x 6 (48)
- Round 23: 3 sc, dec, [6 sc, dec] x 5, 3 sc (42)
- Round 24: [5 sc, dec] x 6 (36)
- Round 25: 2 sc, dec, [4 sc, dec] x 5, 2 sc (30)
- Round 26: [3 sc, dec] x 6 (24)
- Stuff the head firmly with fiberfill.
- Round 27: Sc, dec, [2 sc, dec] x 5, sc (18)
Fasten off, leaving a very long tail for sewing the head to the body neck extension.
The Ears (Make 2)
The ears are worked in flat turning rows.
Chain 2. Starting in the second chain from your hook:
- Row 1: Inc, ch 1, turn (2)
- Row 2: 2 sc, ch 1, turn (2)
- Row 3: Inc, sc, ch 1, turn (3)
- Row 4: Inc, 2 sc, ch 1, turn (4)
- Row 5: 3 sc, inc, ch 1, turn (5)
- Row 6: Inc, 4 sc, ch 1, turn (6)
- Row 7: 6 sc (6)
To finish the ear, single crochet evenly down and around the side edges of the ear, placing a thin piece of craft wire inside your stitches to help the ears hold their shape. Work a 3-sc inc in the very tip of each ear. Fasten off, leaving a tail for assembly.
Facial Details: Eyelids, Eyes & Nose
The Eyelids (Make 2)
Chain 4. Starting in the second chain from your hook:
- Row 1: 3 inc, ch 1, turn (6)
- Row 2: [sc, inc] x 3, ch 1, turn (9)
- Row 3: [2 sc, inc] x 3 (12)
Fasten off, leaving a long sewing tail.
The Crocheted Nose (Optional)
If you prefer a crocheted nose over polymer clay, use black embroidery thread and a 1.0 mm hook:
- Round 1: 6 sc in MR (6)
- Round 2: 6 inc (12)
- Round 3: [sc, inc] x 6 (18)
- Round 4: [2 sc, inc] x 6 (24)
- Round 5–6: Sc in each stitch around (24)
- Round 7: 5 sc, 2 dc in the next stitch, 6 sc, 6 dec (19)
- Round 8: 1 sl st, fasten off.
Pinch the sides of the nose where the double crochets sit to form realistic nostrils, and pull slightly upward to give it shape before sewing.
Crocheted Eye Whites (Make 2)
- Round 1: 6 sc in MR (6)
- Round 2: 6 inc (12)
- Round 3: [sc, inc] x 6 (18)
- Round 4: [2 sc, inc] x 6 (24)
- Round 5: [sc, dec] x 6 (18)
- Round 6: [sc, dec] x 4 (12)
Leave this round unfinished. Stuff lightly and slip this piece inside the eyelid “pocket” before sewing it to the face.
Finishing & Assembly
1. Assemble the Face
- Position and sew the head to the neck extension of the body, adding more fiberfill to the neck before closing to prevent wobbling.
- Sew the ears onto the marked ear positions on the head.
- Pin the eyelids onto the face, curving them downward. Sew them along the bottom edge to create small “pockets.” Glue your clay eyes or insert the crocheted eye whites into these pockets and sew them down securely.
- Position and sew (or glue) the nose right between the eyes.
- Use black thread to embroider the mouth line, small freckle dots, and whiskers. You can use thin fishing line or stiff thread for realistic 3D whiskers.
2. Knit the Sweater
Using US Size 2 needles and your choice of colored yarn, cast on 42 stitches (40 body stitches + 2 edge stitches).
- Work in English Rib (or standard 1×1 ribbing) for approximately 2.75 inches (from the center of the belly up to the underarms).
- Divide the knitting into three parts: 11 stitches, 20 stitches, and 11 stitches.
- Knit the outer parts (11 stitches each) separately for another 1.2 inches, then bind off.
- Knit the center part (20 stitches) for 1 inch. Shape the neck by binding off the center 6 stitches, then decrease 1 stitch on each side of the neck opening twice.
- Sew the shoulder seams (5 stitches on each side, leaving 22 stitches for the collar).
- Pick up 22 stitches around the collar opening and knit in 1×1 ribbing for 2 inches. Bind off.
- Crochet along the side edges of the sweater, making small chain loops on one side for buttonholes. Sew tiny buttons on the opposite side. Fit it onto your cat!
3. Knit the Blanket
Using the Entrelac style (or a simple garter stitch stripe pattern if you prefer a beginner-friendly option), knit a mini blanket. For a classic checkerboard entrelac blanket, work 6 base triangles of 10 stitches each and swap colors every tier to create a cozy patchwork look.
Tips for Amigurumi Success
- Tension is Key: Keep your crochet stitches tight so the fiberfill stuffing does not show through. If your stitches look loose, try dropping down a hook size.
- Wire Safety: Always wrap the ends of your wire frames with tape. This prevents the metal from poking through your yarn over time.
- Face Sculpting: Before attaching the eyes, use a long strand of matching body yarn to sink the eye sockets slightly. Pulling back the sockets from the back of the neck gives the face an expressive, deep-set look.