Adorable Crochet Bunny Pattern: Step-by-Step Amigurumi Tutorial
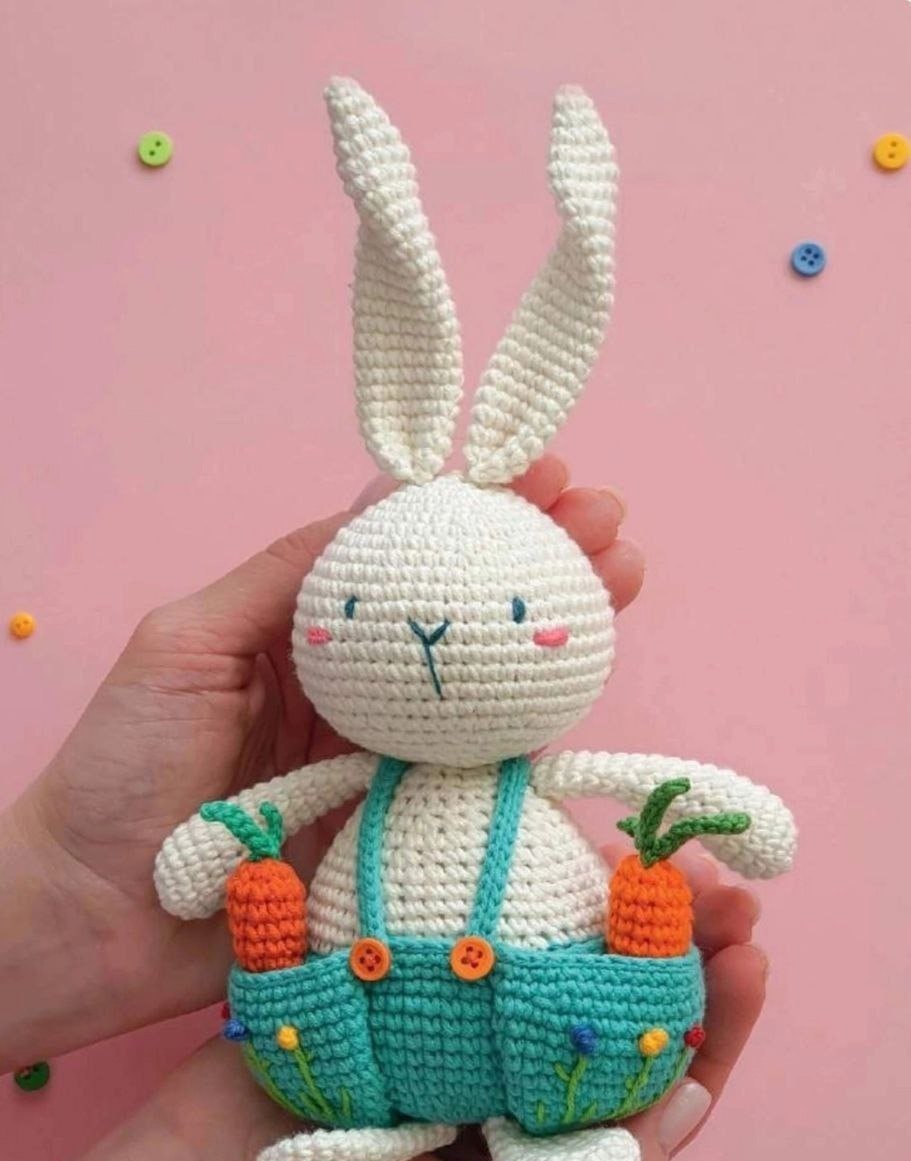
Looking for a sweet, cuddly project to brighten up your home or create the perfect handmade gift? This adorable crochet bunny is the perfect project for crafters of all levels. With his charming turquoise overalls and little carrots, this bunny brings a touch of springtime magic to any room. Whether you are an experienced amigurumi artist or a beginner looking for a rewarding challenge, this detailed guide will walk you through every stitch.
Our finished bunny stands approximately 5.5 inches tall (about 8.7 inches including the ears). He is designed with a cute, plump shape and whimsical details that make him irresistible. Let’s dive into the materials you’ll need and start stitching!
Materials & Abbreviations
To get the best results, we recommend using cotton or a cotton-blend yarn to give the bunny a clean, defined look. Here is everything you will need to complete this project:
Supplies
- Yarn:
- White cotton yarn (approximately 185 yards/50g) for the bunny’s body.
- Turquoise cotton/acrylic blend yarn (approximately 185 yards/50g) for the overalls, pockets, and straps.
- Small amounts of orange and green yarn for the carrots.
- Embroidery thread in pink, yellow, red, blue, and dark green for the facial features and flower details.
- Crochet Hook: 1.75 mm
- Notions: Yarn needle, scissors, polyester fiberfill stuffing, stitch markers, 4 small buttons (about 1/4 inch or 6-7mm diameter), and sewing pins.
Abbreviations (US Terms)
- MR: Magic Ring
- sc: Single Crochet
- inc: Increase (2 sc in one stitch)
- dec: Decrease (sc 2 together)
- ch: Chain
- sl st: Slip Stitch
- BLO: Back Loop Only
- st(s): Stitch(es)
Step-by-Step Instructions
The Head
Using white yarn, work in continuous rounds. Do not join the rounds with a slip stitch unless specified.
- Round 1: 6 sc in MR (6 sts)
- Round 2: inc in each st around (12 sts)
- Round 3: (1 sc, inc) x 6 (18 sts)
- Round 4: 1 sc, (inc, 2 sc) x 5, inc, 1 sc (24 sts)
- Round 5: 24 sc (24 sts)
- Round 6: (3 sc, inc) x 6 (30 sts)
- Round 7: 2 sc, (inc, 4 sc) x 5, inc, 2 sc (36 sts)
- Round 8: (5 sc, inc) x 6 (42 sts)
- Round 9: 3 sc, (inc, 6 sc) x 5, inc, 3 sc (48 sts)
- Round 10: (7 sc, inc) x 6 (54 sts)
- Rounds 11-17: 54 sc (54 sts for 7 rounds)
- Round 18: (7 sc, dec) x 6 (48 sts)
- Round 19: 3 sc, (dec, 6 sc) x 5, dec, 3 sc (42 sts)
- Round 20: (5 sc, dec) x 6 (36 sts)
- Round 21: 2 sc, (dec, 4 sc) x 5, dec, 2 sc (30 sts)
Begin stuffing the head firmly with fiberfill.
- Round 22: (3 sc, dec) x 6 (24 sts)
- Round 23: 1 sc, (dec, 2 sc) x 5, dec, 1 sc (18 sts)
- Round 24: (1 sc, dec) x 6 (12 sts)
- Round 25: 6 dec (6 sts)
Finish stuffing the head until it is firm. Cut the yarn, leaving a 6-inch tail. Use your needle to weave the tail through the remaining front loops and pull tight to close. Hide the end inside the head.
The Body & Overalls
The body is worked from the bottom up, starting with the turquoise overalls and transitioning to the white body.
The Overalls (Turquoise Yarn)
- Round 1: 6 sc in MR (6 sts)
- Round 2: inc in each st around (12 sts)
- Round 3: (1 sc, inc) x 6 (18 sts)
- Round 4: 1 sc, (inc, 2 sc) x 5, inc, 1 sc (24 sts)
- Round 5: (3 sc, inc) x 6 (30 sts)
- Round 6: 2 sc, (inc, 4 sc) x 5, inc, 2 sc (36 sts)
- Round 7: (5 sc, inc) x 6 (42 sts)
- Round 8: 3 sc, (inc, 6 sc) x 5, inc, 3 sc (48 sts)
- Round 9: (7 sc, inc) x 6 (54 sts)
- Rounds 10-15: 54 sc (54 sts for 6 rounds)
The Torso (White Yarn)
Change to white yarn and fasten off the turquoise.
- Round 16: Working in BLO: (7 sc, dec) x 6 (48 sts)
- Round 17: 48 sc (48 sts)
- Round 18: 7 sc, (dec, 14 sc) x 2, dec, 7 sc (45 sts)
- Round 19: (13 sc, dec) x 3 (42 sts)
- Round 20: 6 sc, (dec, 12 sc) x 2, dec, 6 sc (39 sts)
- Round 21: (11 sc, dec) x 3 (36 sts)
- Round 22: 5 sc, (dec, 10 sc) x 2, dec, 5 sc (33 sts)
Begin stuffing the torso gradually.
- Round 23: (9 sc, dec) x 3 (30 sts)
- Round 24: 4 sc, (dec, 8 sc) x 2, dec, 4 sc (27 sts)
- Round 25: (7 sc, dec) x 3 (24 sts)
- Round 26: 3 sc, (dec, 6 sc) x 2, dec, 3 sc (21 sts)
- Round 27: (5 sc, dec) x 3 (18 sts)
- Round 28: (1 sc, dec) x 6 (12 sts)
Stuff firmly, finish with a slip stitch, and leave a tail for sewing.
The Pockets
Make 2 pockets using turquoise yarn. Do not stuff these.
- Round 1: 6 sc in MR (6 sts)
- Round 2: inc in each st around (12 sts)
- Round 3: (1 sc, inc) x 6 (18 sts)
- Round 4: 1 sc, (inc, 2 sc) x 5, inc, 1 sc (24 sts)
- Round 5: (3 sc, inc) x 6 (30 sts)
- Round 6: 2 sc, (inc, 4 sc) x 5, inc, 2 sc (36 sts)
- Round 7: (5 sc, inc) x 6 (42 sts)
- Round 8: 3 sc, (inc, 6 sc) x 5, inc, 3 sc (48 sts)
- Round 9: (7 sc, inc) x 6 (54 sts)
- Rounds 10-15: 54 sc (54 sts for 6 rounds)
Finish with a slip stitch and fasten off, hiding the yarn on the inside.
Arms, Legs, Ears, and Tail
All these parts are worked in white yarn.
Front Paws (Make 2)
- Round 1: 6 sc in MR (6 sts)
- Round 2: inc in each st around (12 sts)
- Round 3: (3 sc, inc) x 3 (15 sts)
- Round 4: 15 sc (15 sts)
- Round 5: dec, 13 sc (14 sts)
- Round 6: dec, 12 sc (13 sts)
- Round 7: dec, 9 sc, dec (11 sts)
- Round 8: 1 sc, dec, 6 sc, dec (9 sts)
- Rounds 9-16: 9 sc (9 sts for 8 rounds)
- Round 17: (1 sc, dec) x 3 (6 sts)
Stuff only up to round 11. Fasten off and leave a tail for sewing.
Back Paws (Make 2)
- Round 1: 6 sc in MR (6 sts)
- Round 2: inc in each st around (12 sts)
- Round 3: (1 sc, inc) x 6 (18 sts)
- Round 4: 18 sc (18 sts)
- Round 5: (4 sc, dec) x 3 (15 sts)
- Rounds 6-7: 15 sc (15 sts for 2 rounds)
- Round 8: (3 sc, dec) x 3 (12 sts)
- Rounds 9-11: 12 sc (12 sts for 3 rounds)
- Round 12: (2 sc, dec) x 3 (9 sts)
- Rounds 13-14: 9 sc (9 sts for 2 rounds)
- Round 15: (1 sc, dec) x 3 (6 sts)
Do not stuff. Fasten off and close the hole.
Ears (Make 2)
- Round 1: 4 sc in MR (4 sts)
- Round 2: (1 sc, inc) x 2 (6 sts)
- Round 3: (2 sc, inc) x 2 (8 sts)
- Round 4: (3 sc, inc) x 2 (10 sts)
- Round 5: (4 sc, inc) x 2 (12 sts)
- Round 6: (5 sc, inc) x 2 (14 sts)
- Rounds 7-23: 14 sc (14 sts for 17 rounds)
- Round 24: (5 sc, dec) x 2 (12 sts)
Do not stuff. Fasten off and leave a tail for sewing.
Tail
- Round 1: 6 sc in MR (6 sts)
- Round 2: inc in each st around (12 sts)
- Rounds 3-4: 12 sc (12 sts for 2 rounds)
- Round 5: 6 dec (6 sts)
Stuff firmly and fasten off.
Straps & Accessories
Overalls Straps (Make 2)
Using turquoise yarn, chain 35. Starting from the second chain from the hook: 33 sl st, 3 sc in the last chain. Do not turn. Work along the opposite side of the chain: 32 sl st, 2 sc in the last chain (70 sts total). Fasten off.
The Carrots
Large Carrot: Use orange yarn. Start with 4 sc in MR. Inc to 12 sts. Work 5 rounds of 12 sc. Finish with 6 dec. Stuff as you go. For the greens: Chain 9, work 8 sl st back. Chain 8, work 7 sl st back. Chain 5, work 4 sl st back. Sew greens to carrot.
Small Carrot: Use orange yarn. Start with 4 sc in MR. Inc to 6, then 8, then 10, then 12. Work 2 rounds of 12 sc. Finish with 6 dec. For the greens: Chain 7, work 6 sl st back. Chain 5, work 4 sl st back. Sew greens to carrot.
Finishing & Assembly
Now comes the magic part—putting our bunny together!
- Attach Pockets: Go back to round 15 of the turquoise pants. Join turquoise yarn to the front loop. Work 10 sc across the pants, sl st into the first pocket, 36 sc around the pocket, skip 17 sts on the pants, sl st into the pants, 9 sc across, and sl st into the second pocket. Work 36 sc around the second pocket (94 sts total). On the next round, work decreases to shape the waist: (dec, 6 sc, dec) along the pants, (dec, 33 sc, dec) along each pocket. Finish with a round of 86 sl st.
- Sew Pockets: Sew the edges of the pockets securely to the bunny’s body.
- Head: Sew the head to the torso, ensuring the stuffing is smooth and there are no lumps.
- Paws: Sew the front arms between rounds 26-27 of the body. Sew the back paws to the bottom of the turquoise pants.
- Ears & Tail: Fold the ears slightly and sew them between rounds 1 and 4 of the head, spaced 1-2 stitches apart. Sew the tail to the center back of the pants between rounds 5-8.
- Details: Pin and sew the straps to the front and back of the overalls. Attach the buttons where the straps meet the waist.
- Face: Using dark green yarn, embroider the eyes between rounds 11-13, roughly 9 stitches apart. Embroider a small “Y” shape for the nose between the eyes. Use pink yarn to add soft blush circles under the eyes.
- Flower Pockets: Using green yarn, embroider small stems on the pockets. Use colorful yarn to create French knots at the top of the stems for tiny flowers.
Tips for Success
- Tension: Keep your tension tight, especially when working with cotton yarn, to ensure the stuffing doesn’t peak through the stitches.
- Invisible Decreases: For a professional look, use the “invisible decrease” method (front loops only) for all dec stitches.
- Symmetry: Use pins to position the ears and arms before sewing. This ensures your bunny looks balanced and symmetrical.
- Customization: Feel free to change the colors! A pastel pink or mint green would look just as lovely for the overalls.