DIY Cute Knitted Cat Plushie: Free Step-by-Step Pattern
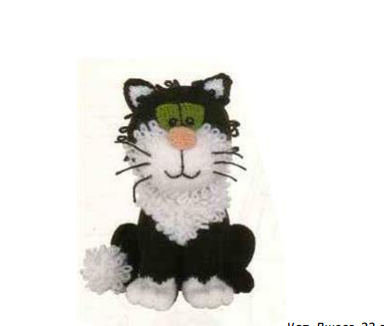
Creating your own handmade toys is one of the most rewarding parts of the fiber arts. If you are looking for a project that is equal parts adorable and challenging, this cute cat plushie is the perfect choice. Standing approximately 9 inches tall, this kitty features a classic tuxedo look with a fluffy chest and a playful expression.
This project uses a combination of classic stockinette stitch and a specialized “loop stitch” to create that signature fluffy texture on the chest and tail. Whether you are an intermediate maker looking for a new project or a beginner eager to practice your shaping, this detailed guide will walk you through every stitch.
Materials & Abbreviations
To get started on your cat plushie, gather the following materials. We recommend using a medium-weight acrylic or wool blend yarn for durability and a soft feel.
Materials Needed
- Yarn: Medium weight (Worsted) in Black, White, Green (for eyes), and Peach (for the nose).
- Needles: Knitting needles appropriate for your yarn weight (usually US 6 or 7).
- Stuffing: Polyester fiberfill or similar craft stuffing.
- Tools: Yarn needle for sewing, scissors, and stitch markers.
Abbreviations (US Terms)
- K: Knit
- P: Purl
- St: Stitch
- Inc: Increase (make one stitch)
- K2tog: Knit 2 stitches together (Right-leaning decrease)
- SSK: Slip, slip, knit (Left-leaning decrease)
- Stst: Stockinette stitch (Knit one row, Purl one row)
- Loop St: Long loop stitch (See instructions in the Tail section)
Step-by-Step Instructions
The Body
The body is worked from the bottom up, starting with a rectangular base and then shaping the torso.
Using black yarn, cast on 48 stitches. Work 10 rows in stockinette stitch.
- Increase Row: (K2, inc, K3) repeat to the end of the row (56 sts).
- Work 7 rows in stockinette stitch.
- Increase Row: (K3, inc, K3) repeat to the end of the row (64 sts).
- Work 6 rows in stockinette stitch.
- Increase Row: (K3, inc, K4) repeat to the end of the row (72 sts).
- Work 3 rows in stockinette stitch.
- Increase Row: (K4, inc, K4) repeat to the end of the row (80 sts).
- Work 5 rows in stockinette stitch.
Now we will begin shaping the top of the body to create a rounded silhouette:
- Decrease Row: (K3, K2tog, K3) repeat to the end of the row (70 sts).
- Work 3 rows in stockinette stitch.
- Decrease Row: (K3, K2tog, K2) repeat to the end of the row (60 sts).
- Work 3 rows in stockinette stitch.
- Decrease Row: (K2, K2tog, K2) repeat to the end of the row (50 sts).
- Work 3 rows in stockinette stitch.
- Decrease Row: (K2, K2tog, K1) repeat to the end of the row (40 sts).
- Work 1 row purl.
- Decrease Row: (K1, K2tog, K1) repeat to the end of the row (30 sts).
- Work 1 row purl.
- Decrease Row: (K1, K2tog) repeat to the end of the row (20 sts).
- Work 1 row purl.
- Decrease Row: (K2tog) repeat to the end of the row (10 sts).
Cut the yarn, pull it through the remaining stitches, and pull tight to close.
The Head
The head starts from the center of the face and expands outward.
Using black yarn, cast on 10 stitches. Work 2 rows in stockinette stitch.
- Increase Row: Inc in every stitch (20 sts).
- Work 1 row purl.
- Increase Row: (inc, K1) repeat to the end (30 sts).
- Work 1 row purl.
- Increase Row: (K1, inc, K1) repeat to the end (40 sts).
- Work 1 row purl.
- Increase Row: (K1, inc, K2) repeat to the end (50 sts).
- Work 1 row purl.
- Increase Row: (K2, inc, K2) repeat to the end (60 sts).
- Work 3 rows in stockinette stitch.
- Increase Row: (K2, inc, K3) repeat to the end (70 sts).
- Work 3 rows in stockinette stitch.
- Increase Row: (K3, inc, K3) repeat to the end (80 sts).
- Work 9 rows in stockinette stitch.
Shape the back of the head as follows:
- Decrease Row: (K3, K2tog, K3) repeat to the end (70 sts).
- Work 3 rows in stockinette stitch.
- Decrease Row: (K3, K2tog, K2) repeat to the end (60 sts).
- Work 3 rows in stockinette stitch.
- Decrease Row: (K2, K2tog, K2) repeat to the end (50 sts).
- Work 1 row purl.
- Decrease Row: (K2, K2tog, K1) repeat to the end (40 sts).
- Work 1 row purl.
- Decrease Row: (K1, K2tog, K1) repeat to the end (30 sts).
- Work 1 row purl.
- Decrease Row: (K1, K2tog) repeat to the end (20 sts).
- Work 1 row purl.
- Decrease Row: (K2tog) repeat to the end (10 sts).
Bind off and fasten off.
The Legs and Paws
Front Legs (Make 2)
Using white yarn, cast on 24 stitches. Work 1 row knit. For the next row, switch colors to create the markings: P5 black, (P4 white, P1 black) x2, P4 white, P5 black. On the next row, K6 black, (K2 white, K3 black) x2, K2 white, K6 black. Work 5 rows of stockinette in black (starting with a purl row).
To shape the top: Bind off 4 stitches at the beginning of the next 2 rows (16 sts). Then, decrease 1 stitch at the beginning of the next 10 rows (6 sts). Bind off remaining stitches.
Front Paws (Make 2)
Using white yarn, cast on 14 stitches. Work 2 rows in stockinette. Row 3: K1, (inc, K3, inc, K1) x2, K1 (18 sts). Row 4: Purl. Row 5: K1, (inc, K5, inc, K1) x2, K1 (22 sts). Work 17 rows in stockinette. Next row: K1, (K2tog, K6, SSK) x2, K1 (18 sts). Purl 1 row. Bind off.
Back Legs (Make 2)
Using black yarn, cast on 24 stitches. Work 4 rows in stockinette. Row 5: K9, inc, K3, inc, K10 (26 sts). Work 3 rows stockinette. Row 9: K9, inc, K5, inc, K10 (28 sts). Work 3 rows stockinette. Row 13: K9, inc, K7, inc, K10 (30 sts). Work 3 rows stockinette. Shape top: (K1, K2tog) to end (20 sts). Purl 1 row. (K2tog) to end (10 sts). Bind off.
Note: Knit Back Paws exactly like the Front Paws.
The Tail and Chest
The Tail
Using black yarn, cast on 9 stitches. Work 45 rows in stockinette. Switch to white yarn and purl 1 row. Now, we will use the “Long Loop Stitch”:
- Row 1: K1. To make a loop: with the right needle, pull the yarn from the loop on the left needle up about 0.6 to 0.8 inches. Drop the loop off the right needle, wrap the working yarn around the loop counter-clockwise, then K into the original stitch on the left needle to secure it. Alternate 1 loop and 1 K stitch to the end.
- Rows 2 & 4: Knit all stitches.
- Row 3: K2, (1 loop, K1) in a checkerboard pattern relative to Row 1, K1.
Repeat these 4 rows for a total of 13 rows. Bind off.
The Chest Bib
Using white yarn, cast on 25 stitches. Work 9 rows of the Loop Stitch pattern. Next row: Bind off 8 stitches, K to end (17 sts). Next row: Bind off 8 stitches, work 3 rows of Loop Stitch (9 sts). Work 1 row K. Work 1 row Loop Stitch. Next row: K, dec 1 st at beginning and end. Repeat these last 2 rows twice more (3 sts). Work 1 final row of Loop Stitch and bind off.
The Face and Ears
The Muzzle
Using white yarn, cast on 57 stitches. Work 1 row of Loop Stitch, then 3 rows of stockinette (starting with a purl row). Next row: K4, (SSK, K3, K2tog) x3, K7, (SSK, K3, K2tog) x3, K4 (45 sts). Work 3 rows stockinette. Next row: K4, (SSK, K1, K2tog) x3, K7, (SSK, K1, K2tog) x3, K4 (33 sts). Purl 1 row. Next row: K4, (Decrease-special, K1, Decrease-special) x3, K7, (Decrease-special, K1, Decrease-special) x3, K4 (21 sts). Purl 1 row. Bind off.
Front Ears (Make 2)
Using black yarn, cast on 11 stitches. Row 1: K2 black, K7 white, K2 black. Row 2: P2 black, P7 white, P2 black. Row 3: K1 black, SSK, K5 white, K2tog black, K1 black (9 sts). Row 4: P2 black, P5 white, P2 black. Row 5: K1 black, SSK, K3 white, K2tog black, K1 black (5 sts). Row 6: P2 black, P1 white, P2 black. Row 7: K1, SSK, K1, SSK, K1 (3 sts). Purl 1 row and bind off.
Back Ears (Make 2)
Using black yarn, cast on 11 stitches. Work 2 rows stockinette. Decrease 1 st at each end of the next row. Purl 1 row. Repeat these 2 rows 3 times (3 sts). Bind off.
Eyes and Nose
- Eyes (Make 2): Using green yarn, cast on 12 stitches. Work 4 rows stockinette. Dec 1 st at each end, Purl 1 row. Repeat this decrease sequence until 8 stitches remain. Bind off.
- Nose: Using peach yarn, cast on 7 stitches. Purl 1 row. Inc in every stitch (14 sts). Work 5 rows stockinette (starting with purl). (K2tog) to end (7 sts). Bind off.
Finishing
Now comes the magic! Stuff the body and head firmly with fiberfill, making sure to push the stuffing into the corners. Sew the head to the body using a yarn needle. Attach the legs, paws, and tail securely. Finally, sew the muzzle to the center of the face, and attach the ears, eyes, and nose. Use a small amount of black yarn to embroider a little mouth and whiskers for extra personality!
Tips for Success
- Tension is Key: Keep your tension consistent, especially when working the Loop Stitch, to ensure the “fluff” looks even.
- Stuffing: Don’t overstuff the neck area, or the head may tilt. Use small clumps of stuffing for a smoother shape.
- Seaming: Use a mattress stitch for the body and head seams to make the joints nearly invisible.
- Customization: Feel free to change the colors! A ginger cat or a grey tabby can be made using this same pattern.