How to Crochet a Cute Lilo Sheep Amigurumi: A Complete Step-by-Step Pattern
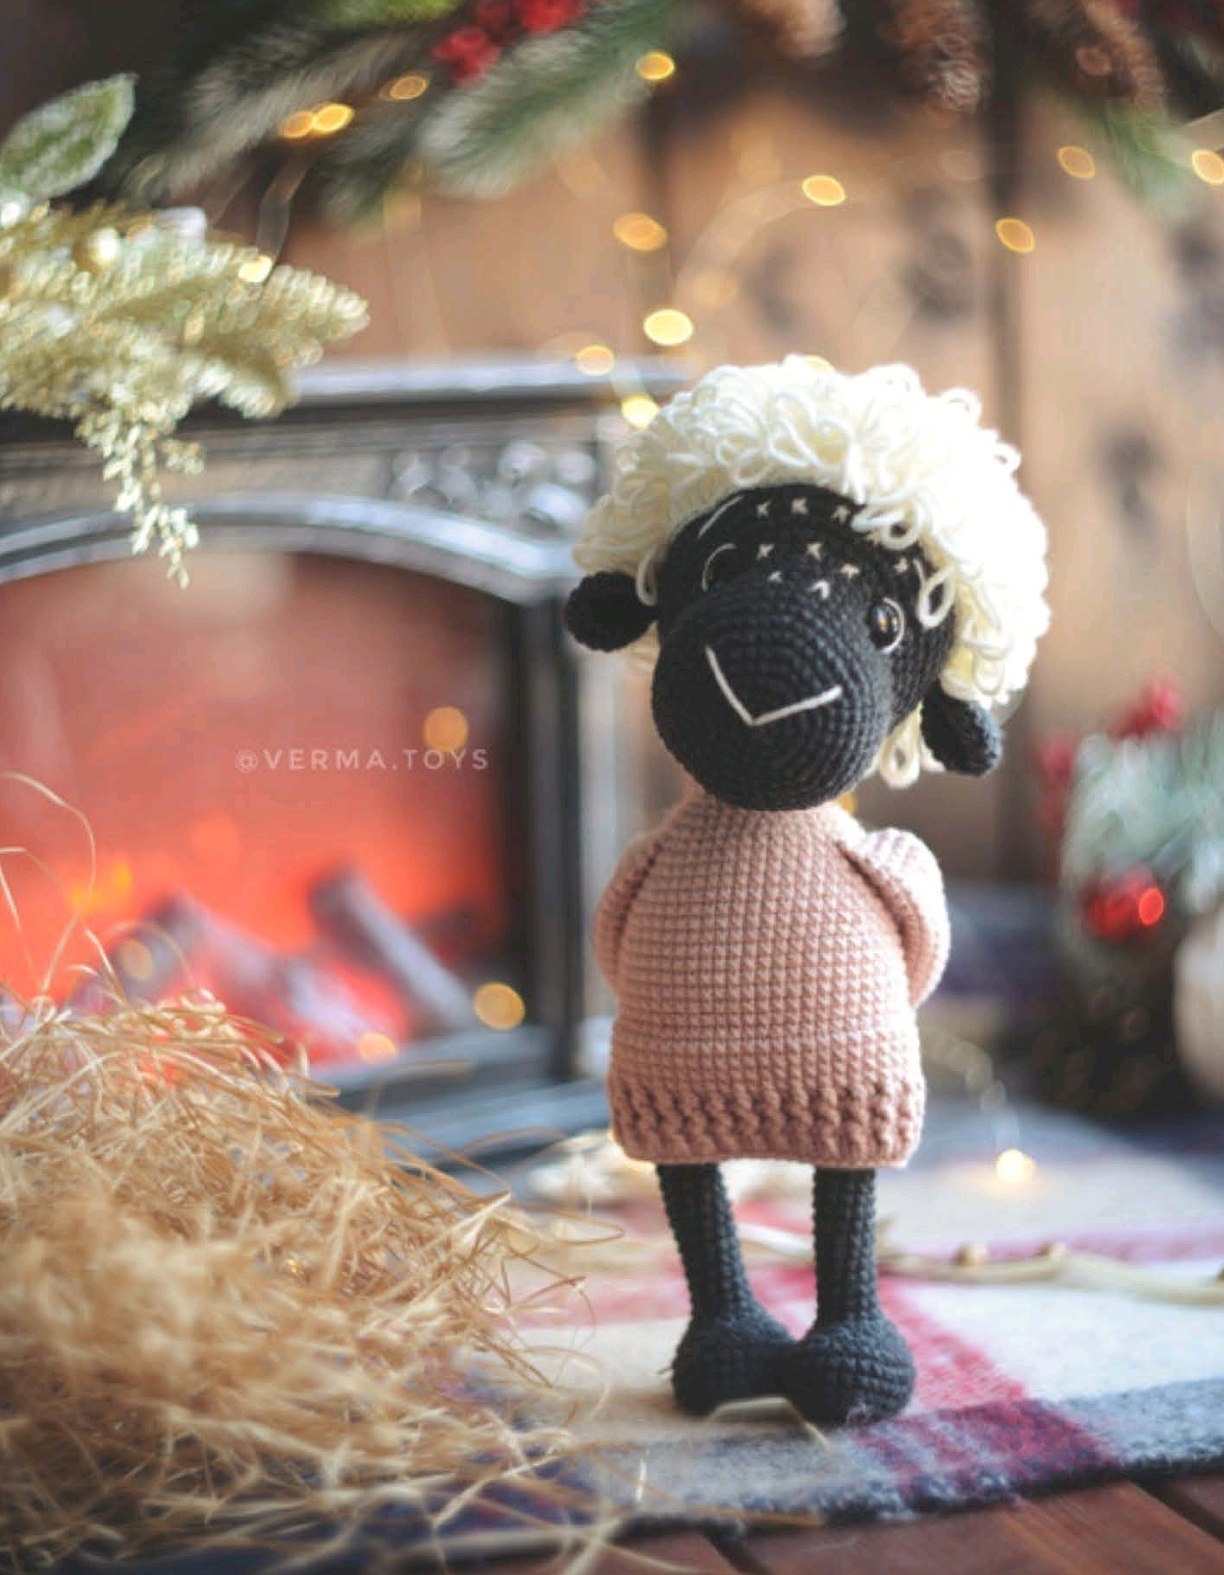
Are you looking for your next adorable crochet project? Meet Lilo, the sweetest little sheep you will ever encounter! With her fluffy, cloud-like wool, stylish little pink sweater, and expressive face, Lilo is the perfect companion for nursery decor or a unique gift for a loved one. This amigurumi project is designed to be engaging and rewarding, making it an excellent choice for intermediate beginners who want to practice texture work and assembly techniques.
In this detailed tutorial, we will walk through every single stitch needed to bring this little sheep to life. From the textured “popcorn” wool to the sturdy, realistic legs, you will learn how to combine different crochet techniques to create a high-quality, professional-looking toy. Grab your favorite hook and some cozy yarn, and let’s get started!
Materials and Abbreviations
Before we dive into the stitches, let’s make sure you have everything you need on your craft table. To achieve the look seen in the photos, I recommend using a cotton/acrylic blend yarn with a similar weight to YarnArt Jeans or Alize Cotton Gold. This will provide the stitch definition necessary for amigurumi.
Required Supplies
- Crochet Hook: 1.75 mm (or a size that creates a very tight tension)
- Yarn Colors:
- Graphite (Dark Grey) – for the head, ears, legs, and arms
- Milk (Cream/Off-white) – for the fluffy wool
- Powder (Soft Pink) – for the sweater and collar
- White – for eye highlights and embroidery
- Stuffing: High-quality polyester fiberfill
- Safety Eyes: 10 mm
- Extras: Scissors, long embroidery needle, strong thread for eye pulling, and a small piece of plastic (to use as an insole for the feet).
US Crochet Abbreviations
Please note that this pattern uses standard US terminology. Ensure your tension is tight to prevent stuffing from showing through.
- MR: Magic Ring
- sc: Single crochet
- inc: Increase (2 sc in the same stitch)
- dec: Decrease (sc 2 stitches together)
- sl st: Slip stitch
- ch: Chain
- dc: Double crochet
- hdc: Half double crochet
- fpdc: Front post double crochet
- bpdc: Back post double crochet
- ext sc: Extended single crochet (yarn over, insert hook, pull up a loop, yarn over, pull through one loop, yarn over, pull through both loops)
- Bobble: Bobble stitch (4 dc in the same stitch, yarn over, pull through all loops on hook)
Step-by-Step Instructions
The Head (Graphite Color)
We begin with the head. Remember to stuff the head firmly as you work to maintain its shape.
R1: 6 sc in MR (6)
R2: 6 inc (12)
R3: (1 sc, inc) * 6 (18)
R4: (2 sc, inc) * 6 (24)
R5: (3 sc, inc) * 6 (30)
R6: (4 sc, inc) * 6 (36)
R7: (5 sc, inc) * 6 (42)
R8: (6 sc, inc) * 6 (48)
R9-13: 48 sc (5 rounds total)
R14: (6 sc, dec) * 6 (42)
R15: 12 sc; (2 sc, inc) * 6; 12 sc (48)
R16: 12 sc; (inc, 3 sc) * 6; 12 sc (54)
R17: 12 sc; (4 sc, inc) * 6; 12 sc (60)
R18: 12 sc; (inc, 5 sc) * 6; 12 sc (66)
R19-29: 66 sc (11 rounds total)
Eye Placement: Insert the 10mm safety eyes between rounds 15 and 16. The distance between the eyes should be 14 sc measured along round 15.
R30: (9 sc, dec) * 6 (60)
R31: (8 sc, dec) * 6 (54)
R32: (7 sc, dec) * 6 (48)
R33: (6 sc, dec) * 6 (42)
R34: (5 sc, dec) * 6 (36)
R35: (4 sc, dec) * 6 (30)
R36: (3 sc, dec) * 6 (24)
R37: (2 sc, dec) * 6 (18)
R38: (1 sc, dec) * 6 (12)
R39: 6 dec
Fasten off, leaving a long tail for sewing. Pull the opening tight.
The Fluffy Wool (Milk Color)
This part creates Lilo’s signature texture. We will alternate between regular single crochet and extended single crochet to create a “curly” effect.
R1: 6 sc in MR (6)
R2: 6 inc using ext sc (12)
R3: (1 sc, inc) * 6 (18)
R4: (2 ext sc, inc using ext sc) * 6 (24)
R5: (3 sc, inc) * 6 (30)
R6: (4 ext sc, inc using ext sc) * 6 (36)
R7: (5 sc, inc) * 6 (42)
R8: (6 ext sc, inc using ext sc) * 6 (48)
R9: (7 sc, inc) * 6 (54)
R10: (8 ext sc, inc using ext sc) * 6 (60)
R11: (9 sc, inc) * 6 (66)
R12-20: Alternate between one round of 66 sc and one round of 66 ext sc.
Fasten off, leaving a very long tail for sewing to the head.
The Ears (Graphite Color)
Note: Do not stuff the ears.
R1: 6 sc in MR (6)
R2: 6 inc (12)
R3: (1 sc, inc) * 6 (18)
R4: 18 sc
R5: (4 sc, dec) * 3 (15)
R6: 15 sc
R7: (3 sc, dec) * 3 (12)
Fold the piece in half. Crochet through both layers: 6 sc across the fold. Fold it in half again and crochet through both layers: 3 sc across the fold. Fasten off, leaving a long tail.
The Legs (Graphite Color)
The legs are worked in an oval shape. We will use a plastic insole to give them a sturdy, realistic shape.
Foundation: Chain 9. Starting from the 2nd chain from hook:
R1: 7 sc; 3 sc in the last chain; 6 sc; inc (18)
R2: inc; 6 sc; 3 inc; 6 sc; 2 inc (24)
R3: 1 sc, inc; 6 sc; (1 sc, inc) * 3; 6 sc; (1 sc, inc) * 2 (30)
Cut out your plastic insole to fit the size of this oval. Insert it into the leg.
R4: (Working in back loops only) 30 sc
R5-7: 30 sc
R8: 3 sc; (2 sc, dec) * 6; 3 sc (24)
R9: 3 sc; (dec, 1 sc) * 6; 3 sc (18)
R10: (1 sc, dec) * 6 (12)
R11-25: 12 sc
Fasten off the left leg. Leave a long tail on the right leg for joining.
Connecting the Legs & Body (Pink and Graphite)
First, we join the legs. Place them parallel to each other, toe to toe. Mark the center of the inner thigh area.
To Join: On the right leg, finish your sc until you reach the marker. Chain 9 and join to the marker on the left leg using a sc. This sc counts as the first stitch of the left leg.
Body R1: 12 sc around the left leg; 9 sc across the joining chain; 12 sc around the right leg; 9 sc across the other side of the chain (42)
R2: (6 sc, inc) * 6 (48)
R3: (7 sc, inc) * 6 (54)
R4-8: 54 sc
Fasten off the body part.
The Sweater (Powder Pink): Chain 54 and join into a ring. Ensure the chain isn’t twisted.
R1: 2 ch, 54 dc, sl st (54)
R2-3: 2 ch, (1 fpdc, 1 bpdc) * 27, sl st
R4-7: 54 sc (working in a spiral without turning chains)
Combining Body and Sweater: Place the sweater piece over the body piece.
R9: 54 sc through both the body and the sweater layers (54)
R10-15: 54 sc
Move the marker to the center of the back.
R16: (16 sc, dec) * 3 (51)
R17-18: 51 sc
R19: (15 sc, dec) * 3 (48)
R20: 48 sc
R21: (14 sc, dec) * 3 (45)
R22: 45 sc
R23: (13 sc, dec) * 3 (42)
R24: 42 sc
R25: (5 sc, dec) * 6 (36)
R26: (4 sc, dec) * 6 (30)
R27: (3 sc, dec) * 6 (24)
Switch to Graphite color for the neck.
R28: (Back loops only) 24 sc
R29-31: 24 sc
Neck (Turning Rows): Move marker to the center of the neck. We will work back and forth.
R32: 5 sc, ch 1, turn; from the 2nd stitch, 10 sc, sl st into the next available stitch from R31, ch 1, turn; from the 2nd stitch, 11 sc, sl st into the next available stitch from R31.
The Collar (Powder Pink)
Join pink yarn to the remaining back loops of R27.
R1: 2 ch, 24 dc, sl st
R2-3: 2 ch, (1 fpdc, 1 bpdc) * 27, sl st
R4-7: 54 sc (spiral)
The Arms (Graphite and Pink)
R1: 6 sc in MR (6)
R2: 6 inc (12)
R3: (3 sc, inc) * 3 (15)
R4-6: 15 sc
R7: 7 sc, 1 bobble, 7 sc (15)
R8: 15 sc
R9: (3 sc, dec) * 3 (12)
R10: (2 sc, dec) * 3 (9)
Switch to Pink color.
R11: (Back loops only) 9 sc
R12: 9 sc
R13: (2 sc, inc) * 3 (12)
R14-28: 12 sc
Fold the arm in half and crochet through both sides: 6 sc. Leave a long tail for sewing.
Sleeves: Join pink yarn to the back loops of R10 of the arm. R1: 9 sc. Fasten off.
Finishing
Assembly is where Lilo really comes to life! Follow these steps carefully:
Face Details
- Eye Pulling: Use a long needle and strong thread to pull the eyes slightly inward. This creates that characteristic “socket” look and gives the face more depth.
- Eye Highlights: Using white yarn, embroider a small white crescent or dot in the corner of each eye to add a bright, lively expression.
- Nose & Mouth: Use milk-colored yarn to embroider a simple “V” shape for the nose and a small smile.
- Decoration: For an extra touch of magic, you can embroider small white stars on the forehead.
Final Assembly
- Hair: Sew the fluffy wool piece to the top of the head. Position it slightly at an angle for a more natural, whimsical look.
- Ears: Sew the ears close to the edge of the wool, just slightly below the eye line.
- Arms: Sew the arms to the body between rounds 22 and 23 of the sweater.
- Head: Sew the head to the body. Pro Tip: As you sew, add a little extra stuffing into the neck area to ensure the head stays upright and stable.
Tips for Success
- Tension is Key: Since amigurumi is stuffed, your stitches need to be very tight. If you find your stuffing peeking through, try a smaller hook.
- Color Changes: When changing colors, always work the color change into the last stitch of the previous row to ensure a seamless transition.
- Stitch Consistency: For the textured wool, make sure your extended single crochet stitches are consistent in height to create an even “cloud” effect.
- Safety First: If this toy is intended for a small child, consider embroidering the eyes instead of using plastic safety eyes to prevent choking hazards.