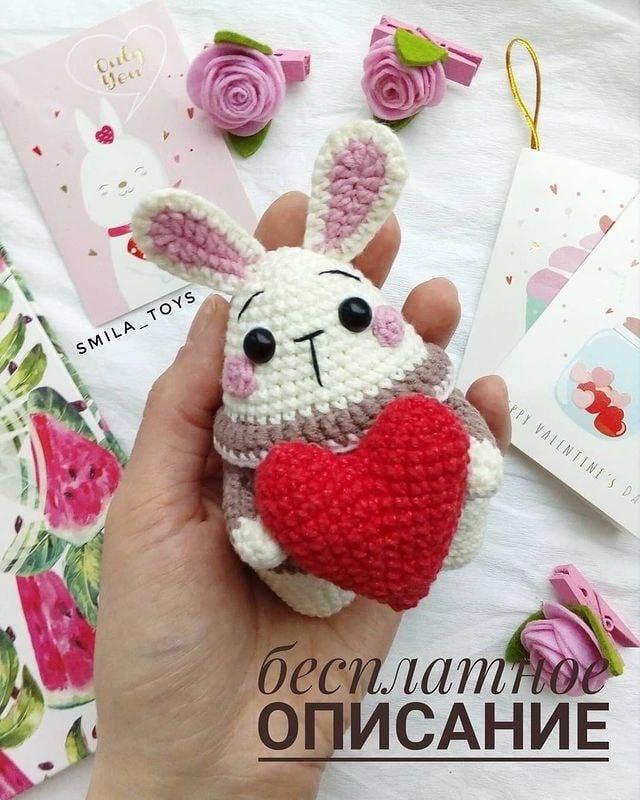
Adorable Crochet Bunny with Heart: A Step-by-Step Amigurumi Pattern
Are you looking for the perfect, heartwarming project to whip up for a loved one? This adorable crochet bunny, clutching a tiny red heart, is the ultimate amigurumi project! Whether you are making a Valentine’s Day gift, a nursery decoration, or a sweet addition to your crochet collection, this little bunny is sure to bring a smile to anyone’s face. This pattern is designed to be beginner-friendly, focusing on basic stitches to help you create something truly special.
In this tutorial, we will walk through the process of creating every single piece—from the tiny feet and floppy ears to the sweet little heart. Grab your favorite cozy yarn and let’s get stitching!
Materials & Abbreviations
Before we dive into the pattern, let’s make sure you have everything you need on your crochet hook. For this project, I recommend using a medium-weight cotton or acrylic yarn to ensure the stitches stay tight and the stuffing doesn’t peek through.
What You Will Need
- Yarn (Medium weight/Worsted): Milk/Cream color, Coffee/Brown color, Light Pink color, and Red color.
- Crochet Hook: A size suitable for your yarn (typically 3.25mm to 4.0mm).
- Safety Eyes: Small black safety eyes (or black beads/embroidery thread).
- Stuffing: Polyester fiberfill for amigurumi.
- Tapestry Needle: For sewing pieces together and weaving in ends.
- Embroidery Floss: Black for the face details and pink for the cheeks.
- Scissors.
Abbreviations (US Terms)
- MR: Magic Ring
- Ch: Chain
- Sc: Single Crochet
- Inc: Increase (2 sc in one stitch)
- Dec: Decrease (sc 2 together)
- Sl st: Slip Stitch
- Hdc: Half Double Crochet
- Dc: Double Crochet
- BLO: Back Loops Only
- St(s): Stitch(es)
Step-by-Step Instructions
The Legs & Body
We will start by making the legs. Note that the body and head are worked in one continuous piece once the legs are joined.
Legs (Make 2)
Start with the Milk/Cream color.
- Round 1: 6 sc in a MR (6)
- Round 2: 6 inc (12)
- Round 3: (1 sc, inc) * 6 (18)
- Rounds 4-6: 18 sc
For the first leg, fasten off the yarn. For the second leg, do not fasten off. Instead, ch 3, sl st into the first leg to join them together.
Body & Head
- Round 7: 18 sc along the first leg, 3 sc in the ch (the bridge between legs), 18 sc along the second leg, and 3 sc along the other side of the ch (42)
- Round 8: (6 sc, inc) * 6 (48)
- Round 9: (7 sc, inc) * 6 (54)
- Round 10: (8 sc, inc) * 6 (60)
- Round 11: 60 sc
Switch to the Coffee/Brown color.
- Rounds 12-13: 60 sc
- Round 14: (1 sc light pink, 3 sc coffee) * 15 (60)
- Round 15: 2 sc coffee, (1 sc light pink, 3 sc coffee) * 14, 1 sc light pink, 1 sc coffee.
Fasten off the pink yarn. Now, continue with the coffee color.
- Round 16: (8 sc, dec) * 6 (54)
- Round 17: 54 sc
- Round 18: (7 sc, dec) * 6 (48)
- Round 19: 48 sc
- Round 20: (6 sc, dec) * 6 (42)
- Rounds 21-22: 42 sc
Switch to the Milk/Cream color.
- Round 23: 42 sc in BLO (Back Loops Only)
- Rounds 24-25: 42 sc
- Round 26: (5 sc, dec) * 6 (36)
- Rounds 27-29: 36 sc
- Round 30: (4 sc, dec) * 6 (30)
- Rounds 31-32: 30 sc
- Round 33: (3 sc, dec) * 6 (24)
- Round 34: (2 sc, dec) * 6 (18)
- Round 35: (1 sc, dec) * 6 (12)
- Round 36: 6 dec
Fasten off and weave in the ends. Don’t forget to stuff the body firmly as you go!
The Arms (Make 2)
Start with the Main Color (Coffee).
- Round 1: 6 sc in a MR (6)
- Round 2: (1 sc, inc) * 3 (9)
- Round 3: 9 sc
Switch to the Sweater Color (Coffee).
- Rounds 4-8: 9 sc
Fold the arm in half and sc through both layers for 4 stitches. Fasten off, leaving a long tail for sewing. Sew the arms to the body between rounds 16 and 19.
The Ears (Make 2)
Pink Inner Ear:
Using the Light Pink color, ch 8. Starting in the 2nd ch from hook: sl st, 2 sc, 3 dc, 5 hdc in the very last stitch. Now, work along the other side of the chain: 3 dc, 2 sc, sl st (17). Fasten off.
White Outer Ear:
Repeat the steps above using the Milk/Cream color, but do not fasten off. Place the pink and white pieces together (wrong sides facing each other) and work a round of sc around the entire edge, making 5 increases within the hdc stitches to give the ear shape. Sew the ears onto the head between rounds 33 and 35.
The Cheeks (Make 2)
Using the Light Pink color, simply work 6 sc in a MR. Fasten off.
The Heart
Using the Red color.
- Round 1: 6 sc in a MR (6)
- Round 2: 6 inc (12)
- Round 3: 12 sc
- Round 4: (1 sc, inc) * 6 (18)
Fasten off the first piece. Repeat the entire process for the second piece, but do not fasten off. Join the two pieces together using a sl st. Continue working around both pieces:
- Rounds 5-6: 36 sc
- Round 7: (4 sc, dec) * 6 (30)
- Rounds 8-9: 30 sc
- Round 10: (3 sc, dec) * 6 (24)
- Round 11: 24 sc
- Round 12: (2 sc, dec) * 6 (18)
- Round 13: 18 sc
- Round 14: (1 sc, dec) * 6 (12)
- Round 15: 12 sc
- Round 16: 6 dec
Pull the opening tight, fasten off, and stuff well. Sew the heart to the bunny’s belly, and then sew the arms so they appear to be hugging the heart.
Finishing
Now for the magic part! This is where your bunny comes to life.
- Eyes: Glue or sew your safety eyes on between rounds 28 and 29. Keep them about 5 sc apart for a cute look.
- Face: Use black embroidery floss to stitch a tiny “T” shape for the nose/mouth.
- Cheeks: Sew the pink crochet circles onto the face just below the eyes.
Tips for Success
Crocheting amigurumi can be a little tricky at first, but don’t be discouraged! Here are a few pro-tips to help you achieve a professional finish:
- Tension is Key: Try to keep your stitches tight. This prevents the white stuffing from showing through your stitches, which is especially important with lighter colors like the milk/cream yarn.
- Use Stitch Markers: In amigurumi, it’s very easy to lose count. Always use a stitch marker to mark the first stitch of every round.
- Color Changes: To make color changes look seamless, pull the new color through the last two loops of the final stitch of the previous color.
- Stuffing Technique: Stuff your project in small amounts at a time. This allows you to push the stuffing into the corners (like the feet and ears) so the shape stays even and smooth.