Adorable Crochet Alpaca Pattern: A Step-by-Step Amigurumi Tutorial
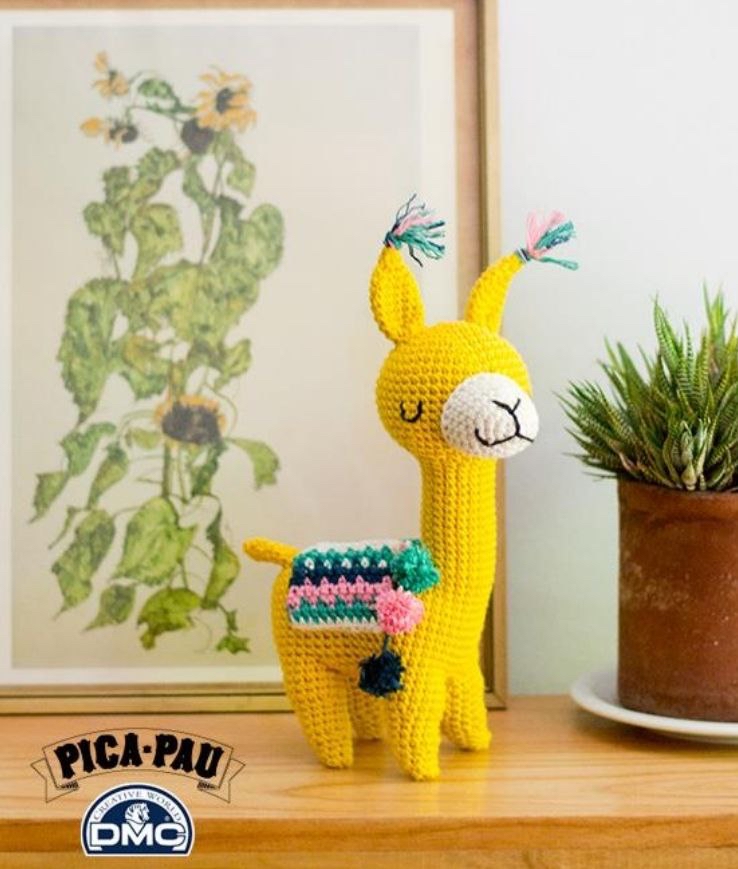
If you are looking for your next cozy crochet project, look no further! This adorable crochet alpaca (or llama, if you prefer!) is the perfect addition to your amigurumi collection. With its sweet face, colorful patterned blanket, and chunky, huggable body, this little creature is sure to become a favorite on any shelf or nursery bed.
This pattern is designed with beginners in mind. While it uses some advanced techniques like tapestry crochet for the blanket, the body construction is straightforward and rewarding. Whether you are making this as a gift for a little one or a treat for yourself, this tutorial will guide you through every stitch to ensure your alpaca turns out perfectly.
Materials and Supplies
To create this alpaca, you will need a few basic crochet supplies. Having everything ready before you start will make your crafting experience much smoother.
- Yarn: Medium weight (worsted) yarn. You will need the following colors:
- Yellow (for the main body, ears, and tail)
- White (for the muzzle and blanket)
- Pink (for the blanket pattern)
- Green (for the blanket pattern)
- Blue (for the blanket pattern)
- Crochet Hook: 4 mm (approximately a G/6 hook).
- Stuffing: Polyester fiberfill to give your alpaca its shape.
- Embroidery Thread: Black thread for facial details (nose and mouth).
- Stitch Marker: Essential for working in continuous rounds.
- Tapestry/Sewing Needle: For joining pieces and weaving in ends.
- Scissors
Crochet Abbreviations
This pattern uses standard US crochet terms. Please ensure you are using US terminology to avoid any confusion with stitch heights.
- MR: Magic Ring (or Magic Circle)
- Sc: Single crochet
- Inc: Increase (2 single crochets in the same stitch)
- Dec: Decrease (invisible decrease recommended for amigurumi)
- Ch: Chain
- Sl st: Slip stitch
- St(s): Stitch(es)
- Rnd: Round
- Rep: Repeat
Step-by-Step Instructions
When working amigurumi, it is best to work in continuous spirals. Use your stitch marker to keep track of the beginning of each round.
Making the Muzzle
The muzzle provides the alpaca’s friendly expression. Use the white yarn for this part.
Rnd 1: 6 sc in a Magic Ring (6)
Rnd 2: 6 inc (12)
Rnd 3: (1 sc, inc) repeat 6 times (18)
Rnd 4: (2 sc, inc) repeat 6 times (24)
Rnd 5-8: Sc in each stitch around (24)
Fasten off, leaving a long tail for sewing. Once finished, embroider a small nose and mouth with black thread, then lightly stuff the muzzle.
Creating the Head and Body
The head and body are worked as one continuous piece to create a seamless look. Use the yellow yarn.
Rnd 1: 6 sc in a Magic Ring (6)
Rnd 2: 6 inc (12)
Rnd 3: (1 sc, inc) repeat 6 times (18)
Rnd 4: (2 sc, inc) repeat 6 times (24)
Rnd 5: (3 sc, inc) repeat 6 times (30)
Rnd 6: (4 sc, inc) repeat 6 times (36)
Rnd 7: (5 sc, inc) repeat 6 times (42)
Rnd 8-15: Sc in each stitch around (42)
Rnd 16: (5 sc, dec) repeat 6 times (36)
Rnd 17: (4 sc, dec) repeat 6 times (30)
Note: At this stage, sew the muzzle to the head and embroider the eyes.
Rnd 18: (3 sc, dec) repeat 6 times (24)
Rnd 19: (2 sc, dec) repeat 6 times (18)
Rnd 20-31: Sc in each stitch around (18)
Rnd 32 (The Transition): This round builds the neck and widens the body. Chain 13. These stitches will form part of the spine. Working in a spiral, start with 1 inc, then 12 sc (the final sc should be worked into the very first chain stitch of the 13). Then, work 18 sc around the neck area, 11 sc into the remaining chain stitches, and finish with 1 inc (45).
Rnd 33: 2 inc, 42 sc, 1 inc (48)
Rnd 34: (1 sc, inc) repeat 2 times, 41 sc, inc, 1 sc, inc (52)
Rnd 35: (1 sc, inc) repeat 2 times, 45 sc, 1 inc, 1 sc, inc (56)
Rnd 36-44: Sc in each stitch around (56)
Stuff the neck very firmly to ensure the head stays upright. You will now split the piece at the bottom to create the legs.
Crafting the Four Legs
All legs follow a similar construction. For the first leg, find the marking points on the back of the body to ensure even placement.
The First Leg
Starting: Ch 9 + 6 ch (15 total stitches).
Rnd 1-4: Sc in each stitch (15)
Rnd 5: (3 sc, dec) repeat 3 times (12)
Rnd 6-8: Sc in each stitch around (12)
Rnd 9: (1 sc, dec) repeat 4 times (8)
Rnd 10-11: Sc in each stitch around (8)
Rnd 12: 4 dec (4)
Fasten off, leaving a long tail. Stuff the leg firmly and sew it to the body.
The Remaining Legs
Second and Fourth Legs (Front Legs): Count 7 stitches away from the left leg to find the placement for the front legs. Follow the exact same instructions as the first leg.
Third Leg (Back Leg): Count 3 stitches to the left of the front leg to place the third leg. Follow the same instructions as the first leg.
The Belly and Body Details
To give your alpaca a realistic shape, we will add a belly patch and join the legs.
The Belly: Locate the 7 stitches between the front and back legs. Working horizontally (back and forth) using the white yarn:
Rnd 1-10: Sc in each stitch (7)
Fasten off, leaving a tail for sewing.
Connecting the Body: To finish the lower body, work horizontal single crochet stitches in the gaps between the legs (specifically between the back legs and between the front legs) to bridge the sections together. Once the body is structurally sound, stuff the remaining body cavity completely before sewing the belly patch on from point to point.
Ears and Tail
Use the yellow yarn for both these small details.
Ears (Make 2)
Rnd 1: 5 sc in a Magic Ring (5)
Rnd 2: Sc in each stitch around (5)
Rnd 3: 5 inc (10)
Rnd 4-10: Sc in each stitch around (10)
Do not stuff the ears. Fasten off, leaving a long tail for sewing.
Tail
Rnd 1: 4 sc in a Magic Ring (4)
Rnd 2: Sc in each stitch around (4)
Rnd 3: 4 inc (8)
Rnd 4-6: Sc in each stitch around (8)
Do not stuff. Fasten off and leave a long tail.
The Colorful Tapestry Crochet Blanket
This blanket uses “tapestry crochet,” where you carry the unused colors inside your stitches to create a pattern. Use white, green, pink, and blue yarn.
Setup: Ch 13.
Rnd 1-22: Work in single crochet across 12 stitches (the ch 1 is the turning chain). Follow the color pattern grid provided in the visual chart to change colors as you work. Use the white, green, pink, and blue yarn to create the repeating geometric design.
Fasten off and weave in all ends securely.
Assembly and Finishing Touches
Now comes the fun part—bringing your alpaca to life!
- Attach the Ears: Sew the ears to the top of the head, ensuring they are symmetrical.
- Attach the Tail: Sew the tail to the back of the body.
- Attach the Blanket: Drape the blanket over the alpaca’s back and sew it into place. For a cute touch, you can add a small fringe to the edges of the blanket.
- Final Details: Check that the facial features are centered. If the alpaca feels a bit floppy, add a little extra stuffing to the neck area.
Expert Tips for Success
To ensure your alpaca looks professional and stays sturdy, keep these tips in mind:
- Use Invisible Decreases: When working amigurumi, standard decreases can leave visible gaps. Using the “invisible decrease” method (inserting the hook into the front loops only of the next two stitches) will create a much smoother, tighter finish.
- Tension is Key: Try to keep your stitches tight. This prevents the polyester stuffing from peeking through the holes in your work.
- Tapestry Crochet Tip: When changing colors in the blanket, pull the new color through the last two loops of the previous stitch to create a clean color transition.
- Symmetry Matters: When sewing on the ears and legs, use stitch markers to find the exact center points before you start sewing. This prevents the alpaca from looking lopsided.
Happy crocheting! We hope you enjoy making this charming little alpaca as much as we enjoyed sharing the pattern with you.