Adorable Amigurumi Duckling Crochet Pattern: A Step-by-Step Tutorial
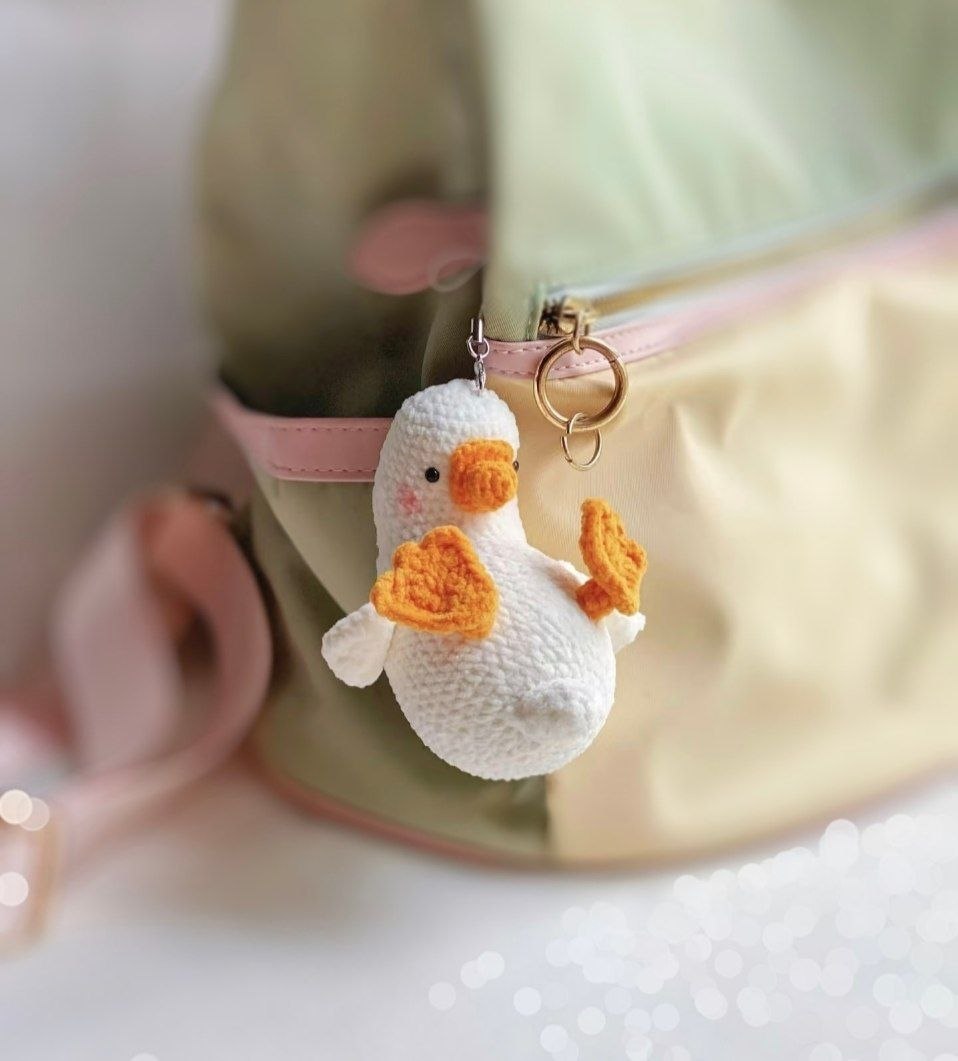
Are you looking for a quick, heartwarming crochet project that you can whip up in a single afternoon? This adorable amigurumi duckling is the perfect addition to your crochet collection! Whether you want to make a cute keychain, a tiny desk companion, or a sweet gift for a little one, this little duckling is sure to bring a smile to everyone’s face. This pattern is designed to be beginner-friendly, focusing on basic stitches and simple assembly to help you build your confidence with amigurumi.
In this tutorial, we will guide you through creating a tiny, round duckling with sturdy, poseable legs. This duckling isn’t just cute; it’s also functional! With the wire-leg technique, you can actually make your duckling stand up or sit in various poses, making it a wonderful little character for photography or play.
Materials and Abbreviations
Before we dive into the stitches, let’s make sure you have everything you need on your crochet hook. For this project, we will be using small hooks and yarn to ensure the stitches are tight enough to hold the stuffing securely.
What You’ll Need:
- Yarn: Cotton or acrylic yarn in white and orange. You will need enough white for the body and head, and enough orange for the beak and feet.
- Crochet Hooks: A 2.0mm (B/1) hook for the body and a 1.5mm (1/B) hook for the beak.
- Stuffing: Polyester fiberfill (poly-fill) to give your duckling its shape.
- Eyes: Dark blue round beads of an appropriate size for your duckling’s head.
- Wire: A piece of metal wire, approximately 3.5 inches long.
- Adhesive: Hot glue gun to secure the wire and beads.
US Crochet Abbreviations:
Please note that this pattern uses standard US crochet terminology. Working in a continuous spiral is recommended for amigurumi projects to avoid visible seams.
- MR: Magic Ring
- sc: Single crochet
- inc: Increase (2 sc in the same stitch)
- dec: Decrease (sc 2 together)
- ch: Chain
- sl st: Slip stitch
- hdc: Half double crochet
- dc: Double crochet
- tr: Treble crochet
- BLO: Back loop only
- FLO: Front loop only
- st(s): Stitch(es)
Step-by-Step Instructions
The Body (White)
The body is the heart of your duckling. We will start with a magic ring and gradually increase the size before tapering it off to create a rounded shape.
- Round 1: 6 sc in a MR (6)
- Round 2: inc in each st around (12)
- Round 3: (1 sc, inc) x 6 (18)
- Round 4: (1 sc, inc, 1 sc) x 6 (24)
- Round 5: (3 sc, inc) x 6 (30)
- Round 6: (2 sc, inc, 2 sc) x 6 (36)
- Round 7: (5 sc, inc) x 6 (42)
- Round 8: (3 sc, inc, 3 sc) x 6 (48)
- Rounds 9-20: sc in each st around (48)
- Round 21: (3 sc, dec, 3 sc) x 6 (42)
- Round 22: sc in each st around (42)
- Round 23: (5 sc, dec) x 6 (36)
- Round 24: sc in each st around (36)
- Round 25: (2 sc, dec, 2 sc) x 6 (30)
- Round 26: sc in each st around (30)
- Round 27: (3 sc, dec) x 6 (24)
- Round 28: sc in each st around (24)
- Round 29: (1 sc, dec, 1 sc) x 6 (18)
- Round 30: sc in each st around (18)
- Round 31: (1 sc, dec) x 6 (12)
- Round 32: dec in each st (6)
Fasten off, leaving a long tail for sewing. Use a tapestry needle to pull the thread through the remaining stitches to close the hole tightly. Stuff the body firmly with fiberfill.
The Tail (White)
The tail adds a cute little detail to the back of your duckling.
- Round 1: 6 sc (6)
- Round 2: (1 sc, inc) x 3 (9)
- Round 3: (1 sc, inc, 1 sc) x 3 (12)
- Round 4: (3 sc, inc) x 3 (15)
- Round 5: sl st, 1 sc, (dec, ch 1, small picot), 1 sc, 4 sl st, 1 sc, (dec, ch 1, small picot), 1 sc, 2 sl st.
Fasten off and weave in your ends.
The Head and Neck (White)
The head and neck are worked as one continuous piece to create a seamless transition.
- Round 1: 6 sc in a MR (6)
- Round 2: inc in each st around (12)
- Round 3: (1 sc, inc) x 6 (18)
- Round 4: (1 sc, inc, 1 sc) x 6 (24)
- Round 5: (3 sc, inc) x 6 (30)
- Rounds 6-8: sc in each st around (30)
- Round 9: (2 sc, inc, 2 sc) x 3, (2 sc, dec, 1 sc) x 3 (30)
- Rounds 10-11: sc in each st around (30)
- Round 12: (2 hdc, dec using hdc, 2 hdc) x 3, (2 sc, inc, 1 sc) x 3 (30)
- Rounds 13-16: (3 hdc, 9 sc, 3 hdc, 15 sc)
Stuff the head firmly. Fasten off and leave a tail for sewing the head to the body.
The Feet (Make 2 – Orange)
The feet are worked starting from a chain to create a flat, webbed look.
- Foundation: Chain 6.
- Round 1: Starting from the 2nd chain from the hook: 2 sc, 1 hdc, 1 dc, (3 dc in the same stitch), working on the other side of the chain: 1 dc, 1 hdc, 2 sc.
- Round 2: 3 sc, (1 hdc, 1 dc), (1 tr, ch 3, sl st, ch 1, 2 hdc, ch 1, sl st), (sl st, ch 2, 1 tr, 1 dc), 1 hdc, 3 sc, 2 sl st, (2 sl st in one st).
Fasten off and weave in ends.
The Beak (Orange)
Use your 1.5mm hook for the beak to ensure the stitches are very tight.
- Round 1: 5 sc in a MR (5)
- Round 2: inc in each st around (10)
- Round 3: sc in each st in the BLO (Back Loop Only) (10)
- Round 4: (2 sc, inc, 2 sc) x 2 (14)
- Round 5: Working in the FLO (Front Loop Only): 1 hdc, 3 sc, (sl st, ch 2, 1 hdc), 2 hdc, (1 hdc, ch 2, sl st), 3 sc, 1 hdc.
Fasten off and leave a tail for sewing.
Finishing and Assembly
Constructing the Poseable Legs
This is the most important step to ensure your duckling can stand!
- Prepare the Wire: Take your 3.5-inch metal wire and bend it twice to create two “legs.”
- Cover the Wire: Carefully wrap the wire with your orange yarn. Keep wrapping until the wire is the desired thickness and completely covered.
- Secure: Use hot glue to secure the ends of the yarn to the wire.
- Shape the Legs: Bend the wrapped wire into an “L” shape.
- Attach to Feet: Use hot glue to attach the bottom of the “L” to the bottom of the orange feet.
- Attach to Body: Once the feet are secure, use hot glue to attach the top of the “L” legs to the bottom of the duckling’s body.
Final Assembly
- Attach the Head: Use the tail left from the head to sew it onto the top of the body. Ensure it is centered and upright.
- Attach the Beak: Sew the beak to the front of the head.
- Attach the Tail: Sew the tail to the back of the body.
- Add the Eyes: Sew the dark blue beads onto the head, slightly above where the beak will be attached.
- Clean Up: Ensure all yarn tails are tucked inside the body and no stuffing is peeking through.
Tips for Success
To make your amigurumi duckling look professional, keep these tips in mind:
- Tension is Key: Try to maintain even tension. If your stitches are too loose, the stuffing will show through. Using a smaller hook than recommended for the yarn type is a great way to ensure tight stitches.
- The Magic Ring: If you are new to amigurumi, practice the Magic Ring (MR) technique. It is the best way to ensure there is no hole in the center of your starting round.
- Stuffing: When stuffing, use small clumps of fiberfill at a time. This allows you to push the stuffing into the corners and avoid lumps.
- Creative Flair: While the pattern doesn’t include wings, you can easily crochet two small oval shapes (similar to the tail) to act as wings and sew them to the sides of the body!