Adorable Amigurumi Dragon Crochet Pattern: A Step-by-Step Tutorial
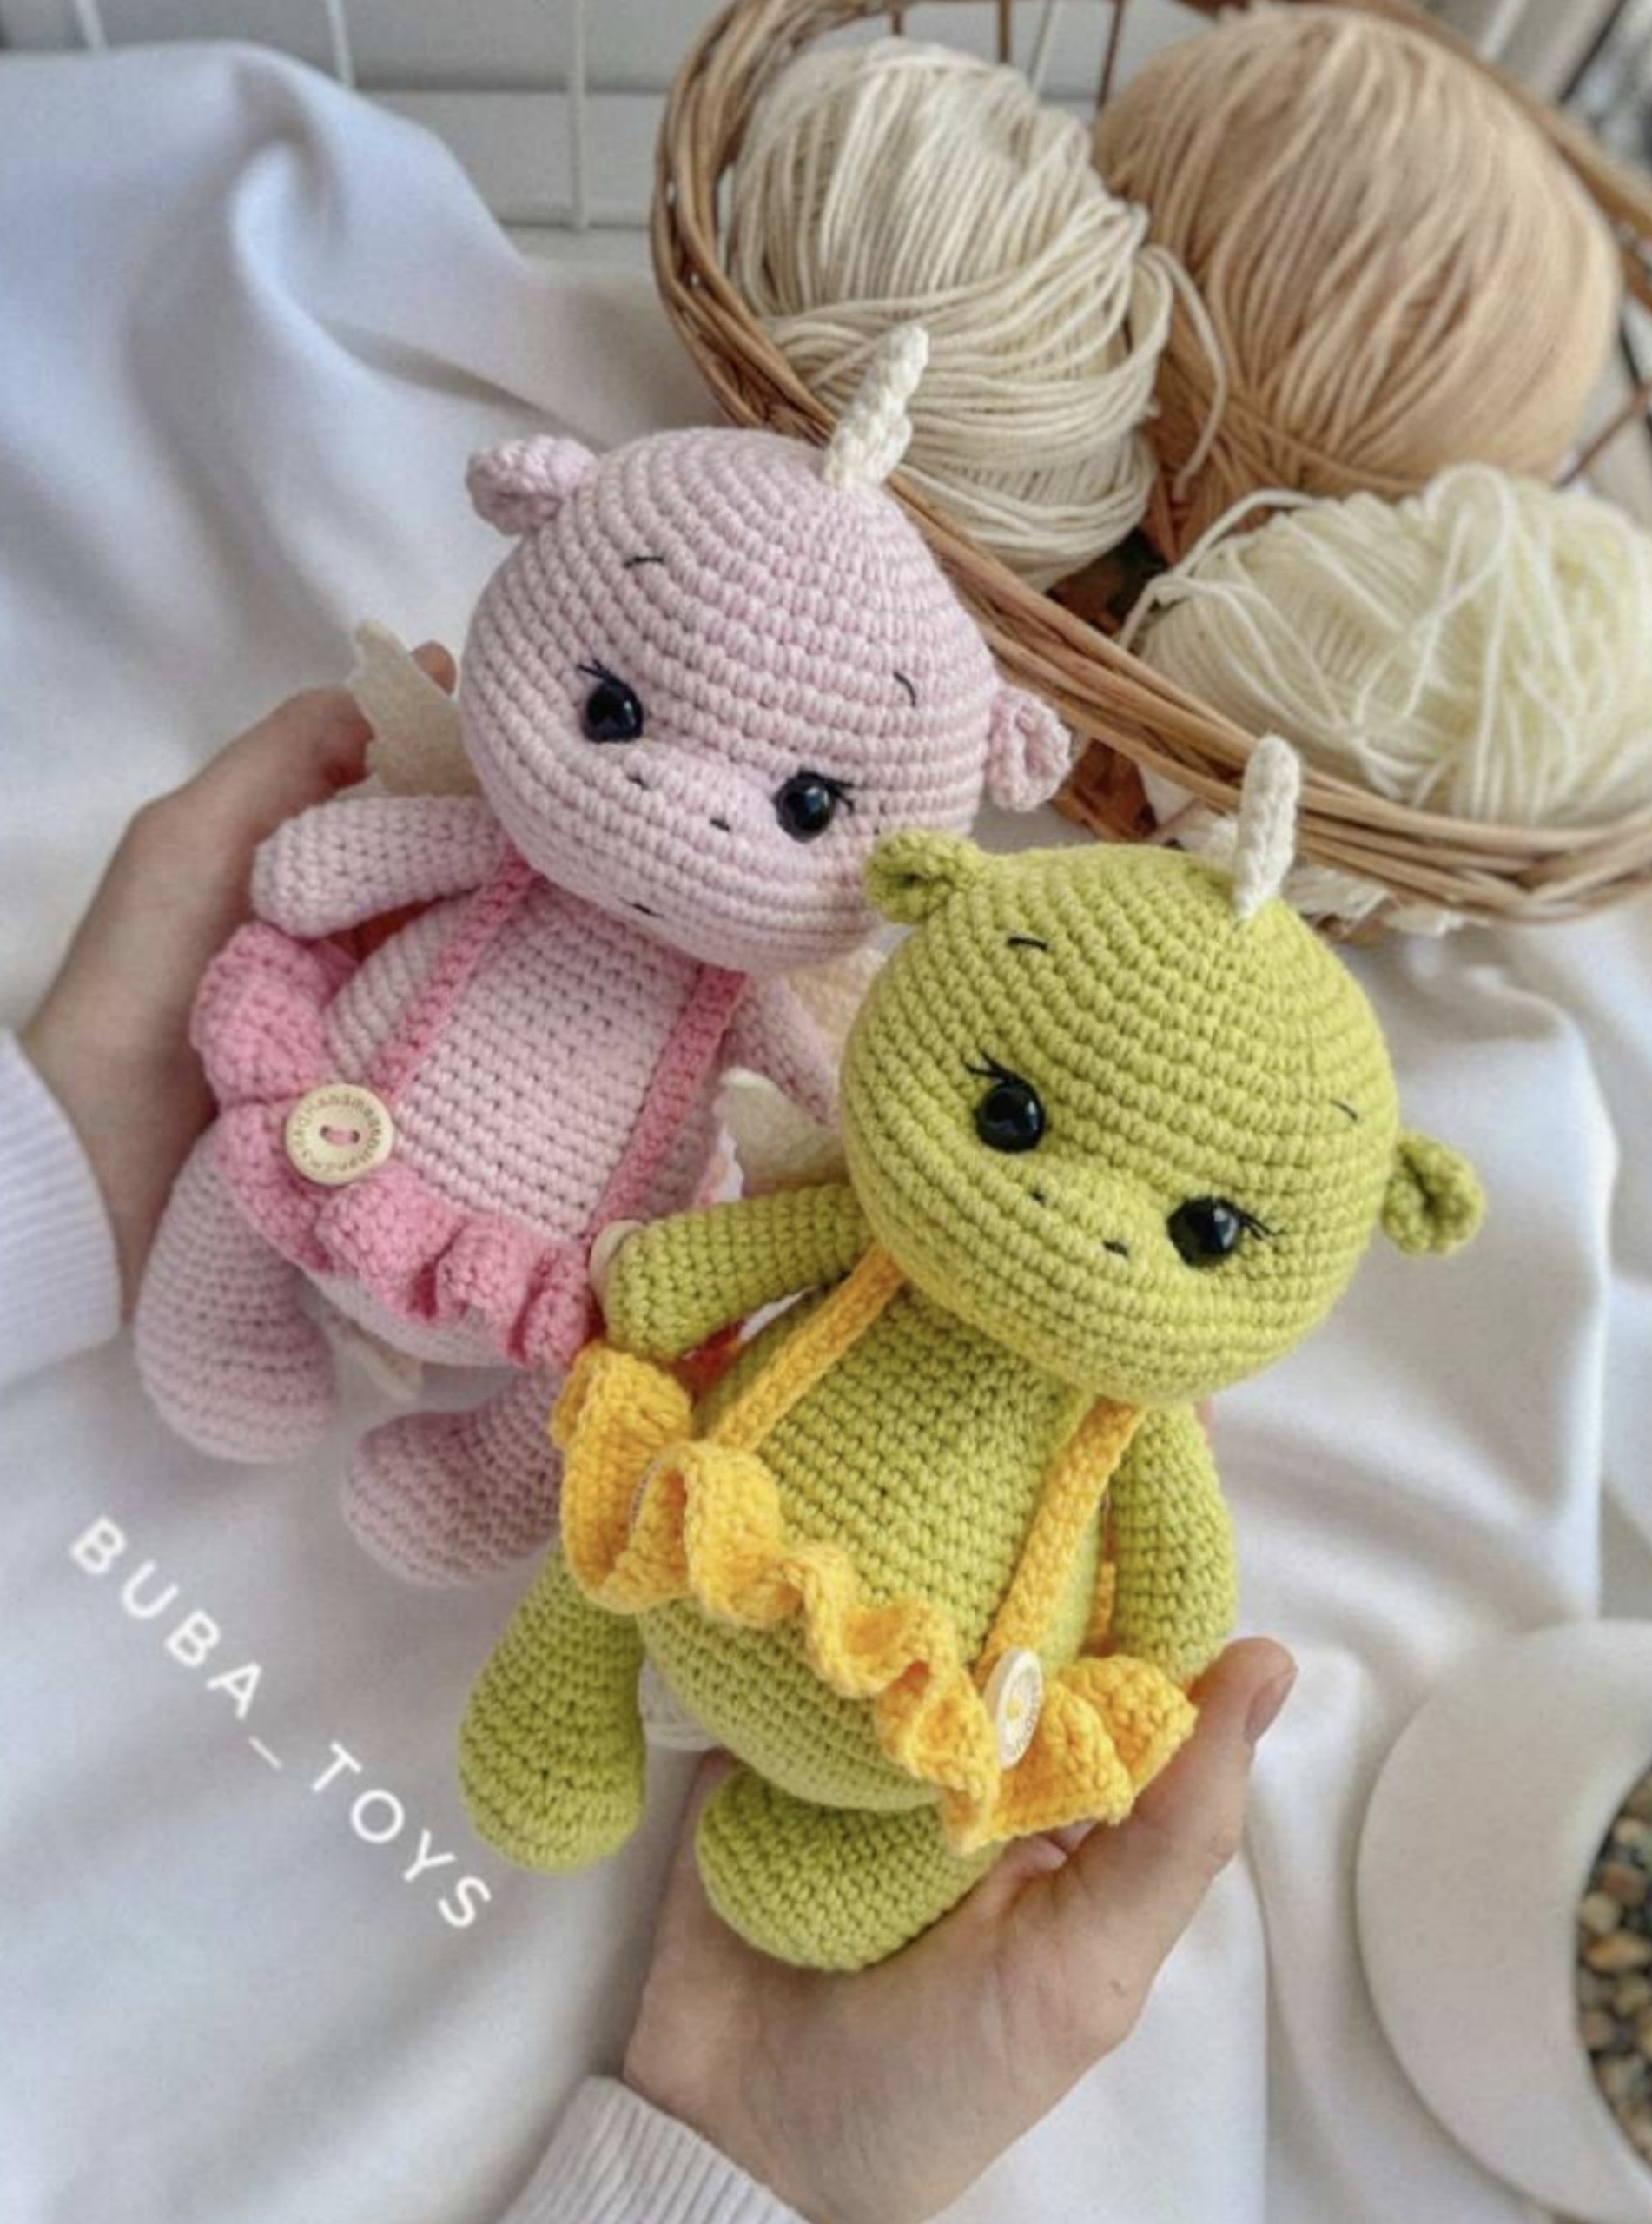
Are you looking for your next adorable crochet project? This whimsical amigurumi dragon is the perfect addition to your collection! With its tiny wings, cute little horns, and even a darling little dress, this dragon is sure to become a favorite for children and crochet enthusiasts alike. Whether you are making a nursery decoration or a gift for a friend, this pattern is designed to be fun, engaging, and rewarding.
This tutorial is perfect for intermediate beginners who are comfortable with basic stitches but want to practice shaping and assembly. By the end of this guide, you will have a charming little dragon measuring approximately 8 to 9 inches tall.
Materials & Abbreviations
To ensure your dragon turns out just like the photos, I recommend using high-quality cotton yarn. Cotton provides great stitch definition, which is essential for amigurumi.
Materials Needed
- Yarn: Cotton yarn (such as YarnArt Jeans, 50g/160m). You will need:
- Main Color (e.g., Pink or Green)
- Cream/Milk Color (for wings and spikes)
- Black Color (for small embroidery details like eyebrows and nostrils)
- Crochet Hook: 2.0 mm (or size needed to achieve tight tension)
- Safety Eyes: 10 mm
- Stuffing: Polyfill or polyester fiberfill
- Notions: Stitch marker, scissors, tapestry needle, and pins
- Optional: Small buttons for the dress
Abbreviations (US Terms)
- MR: Magic Ring
- ch: Chain
- sc: Single crochet
- inc: Increase (2 sc in one stitch)
- dec: Decrease (sc 2 together)
- hdc: Half double crochet
- dc: Double crochet
- tr: Treble crochet
- sl st: Slip stitch
- ch-sp: Chain space (turning chain)
Step-by-Step Instructions
The Head
We start with the head to establish the character’s expression right away. Work in a continuous spiral.
- 6 sc in MR (6)
- 6 inc (12)
- (1 sc, inc) * 6 (18)
- 1 sc, inc, (2 sc, inc) * 5, 1 sc (24)
- (3 sc, inc) * 6 (30)
- 2 sc, inc, (4 sc, inc) * 5, 2 sc (36)
- (5 sc, inc) * 6 (42)
- 3 sc, inc, (6 sc, inc) * 5, 3 sc (48)
- (7 sc, inc) * 6 (54)
- 54 sc
- 4 sc, inc, (8 sc, inc) * 5, 4 sc (60)
- 12-13. 60 sc (2 rows)
- 14. 27 sc, 6 inc, 27 sc (66)
- 15-19. 66 sc (5 rows)
Eye Placement & Contouring: Before finishing the head, insert your 10mm safety eyes between rows 13 and 14. Space them so there are 9 sc between them (which will look like 7 visible sc). To give the dragon a more expressive face, use your main color yarn and a needle to contour the area between the eyes. Insert the needle at row 2, pull through to the eye area, catch a stitch, and pull through to create a slight “snout” indentation. Repeat for the second eye.
- (9 sc, dec) * 6 (60)
- 60 sc
- (8 sc, dec) * 6 (54)
- 54 sc
- (7 sc, dec) * 6 (48)
- (6 sc, dec) * 6 (42)
- (5 sc, dec) * 6 (36)
- (4 sc, dec) * 6 (30)
- (3 sc, dec) * 6 (24)
Stuff the head firmly with polyfill. Leave a long tail for sewing.
The Body
- 6 sc in MR (6)
- 6 inc (12)
- (1 sc, inc) * 6 (18)
- (2 sc, inc) * 6 (24)
- (3 sc, inc) * 6 (30)
- (4 sc, inc) * 6 (36)
- (5 sc, inc) * 6 (42)
- (6 sc, inc) * 6 (48)
- (7 sc, inc) * 6 (54)
- 54 sc
- (8 sc, inc) * 6 (60)
- 12-14. 60 sc (3 rows)
- 15. (28 sc, dec) * 2 (58)
- 58 sc
- (dec, 12 sc) * 4, 2 sc (54)
- 54 sc
- (7 sc, dec) * 6 (48)
- 20-21. 48 sc (2 rows)
- (6 sc, dec) * 6 (42)
- 42 sc
- (5 sc, dec) * 6 (36)
- 25-26. 36 sc (2 rows)
- (4 sc, dec) * 6 (30)
- 30 sc
- (3 sc, dec) * 6 (24)
- 24 sc
Stuff the body firmly. Leave a long tail for sewing.
The Ears (Make 2)
- 6 sc in MR (6)
- 6 inc (12)
- (3 sc, inc) * 3 (15)
- 15 sc
Fold the piece in half and join the edges with 7 sc. Fold it in half again and use a tapestry needle to sew the remaining edge with 3-4 sc. Leave a long tail for sewing.
The Spikes (Make 5)
Use the cream/milk color.
- 4 sc in MR (4)
- (1 sc, inc) * 2 (6)
- (2 sc, inc) * 2 (8)
- (3 sc, inc) * 2 (10)
- (4 sc, inc) * 2 (12)
Fold the spikes in half and join the edges with 6 sc. Leave a long tail for sewing.
The Arms (Upper – Make 2)
- 6 sc in MR (6)
- 6 inc (12)
- (3 sc, inc) * 3 (15)
- 15 sc
- 6 sc, 2 dec, 5 sc (13)
- 6 sc, 1 dec, 5 sc (12)
- 7-14. 12 sc (8 rows)
Stuff the arms about 2/3 full. Fold in half and join the bottom with 6 sc. Leave a long tail.
The Legs (Lower – Make 2)
- 6 sc in MR (6)
- 6 inc (12)
- (1 sc, inc) * 6 (18)
- (2 sc, inc) * 6 (24)
- (3 sc, inc) * 6 (30)
- 30 sc
- 9 sc, 1 dec, 9 sc (24)
- 24 sc
- 6 sc, 1 dec, 6 sc (18)
- 8 sc, 1 dec, 8 sc (17)
- 11-19. 17 sc (9 rows)
Stuff the legs about 2/3 full. Fold in half and join the bottom with 8 sc. Leave a long tail.
The Wings (Make 2)
- Ch 18. In the 2nd ch from hook, work 16 sc (16).
- ch, turn, 14 sc (leaving 2 stitches unworked at the end).
- ch, turn, 13 sc (leaving 1 stitch unworked).
- ch, turn, 11 sc (leaving 2 stitches unworked).
- ch, turn, 10 sc (leaving 1 stitch unworked).
- ch, turn, 8 sc (leaving 2 stitches unworked).
- ch, turn, 7 sc (leaving 1 stitch unworked).
Finally, work single crochets along the starting chain to close the wing shape. Leave a long tail for sewing.
The Tail
The tail consists of three parts. First, the long part:
- 6 sc in MR (6)
- 2-14. 6 sc (13 rows)
Fold it in half and join the sides with 3 sc. Next, make two small hearts to attach to the end. For one heart: MR, 3 ch, 3 tr, 3 dc, 1 tr, ch. Mirror this for the second half, then join the two hearts together with the long part in the middle using yarn in the heart’s color.
The Little Dress
Skirt:
- Ch 60, join with a sl st to form a circle.
- ch, inc in every stitch (120)
- 2 ch, hdc in every stitch, sl st to join.
- 4-5. ch, sc in every stitch, sl st to join.
Straps (Make 2): Ch 35, work 34 sc in the chain. Sew these to the skirt and add small buttons if desired!
Finishing
Assembly Guide
Assembly is where the magic happens! Follow these steps carefully to bring your dragon to life:
- Head to Body: Sew the head onto the body. Make sure the bulging part of the belly is facing forward. Add extra stuffing in the neck area during assembly to keep the head stable.
- Upper Arms: Sew these one row below the head. Position them about 6 sc apart on the chest.
- Lower Legs: Sew these between rows 11 and 12 of the body, spaced about 20 sc apart.
- Spikes: Sew 3 spikes onto the top of the head (starting from the magic ring) and 2 spikes along the back. Space them about 2 sc apart.
- Wings: Attach the wings to the back as shown in your reference photos.
- Tail: Sew the tail between rows 12 and 13 of the body.
Final Details
- Face Embroidery: Using black yarn, embroider small nostrils between rows 15 and 16. You can also add a tiny mouth between rows 20 and 21. For eyebrows, use a single strand of black yarn between rows 8 and 9.
- Ears: Sew the ears between rows 10 and 11. Space them 25 sc apart on the face. For a more secure fit, sew the base of the ear closer to the head.
Tips for Success
- Tension is Key: When working amigurumi, try to keep your stitches tight. This prevents the stuffing from peeking through the gaps.
- Use a Stitch Marker: Because you are working in a continuous spiral, it is very easy to lose your place. Always use a marker!
- Stuffing Technique: Stuff your pieces gradually. If you stuff too much at once, it can be difficult to close the piece neatly.
- Eyes First: Always place your safety eyes and contour the face before you stuff the head completely. It is much harder to adjust the expression once the head is firm.
Congratulations! Your adorable amigurumi dragon is complete. Enjoy your new little friend!