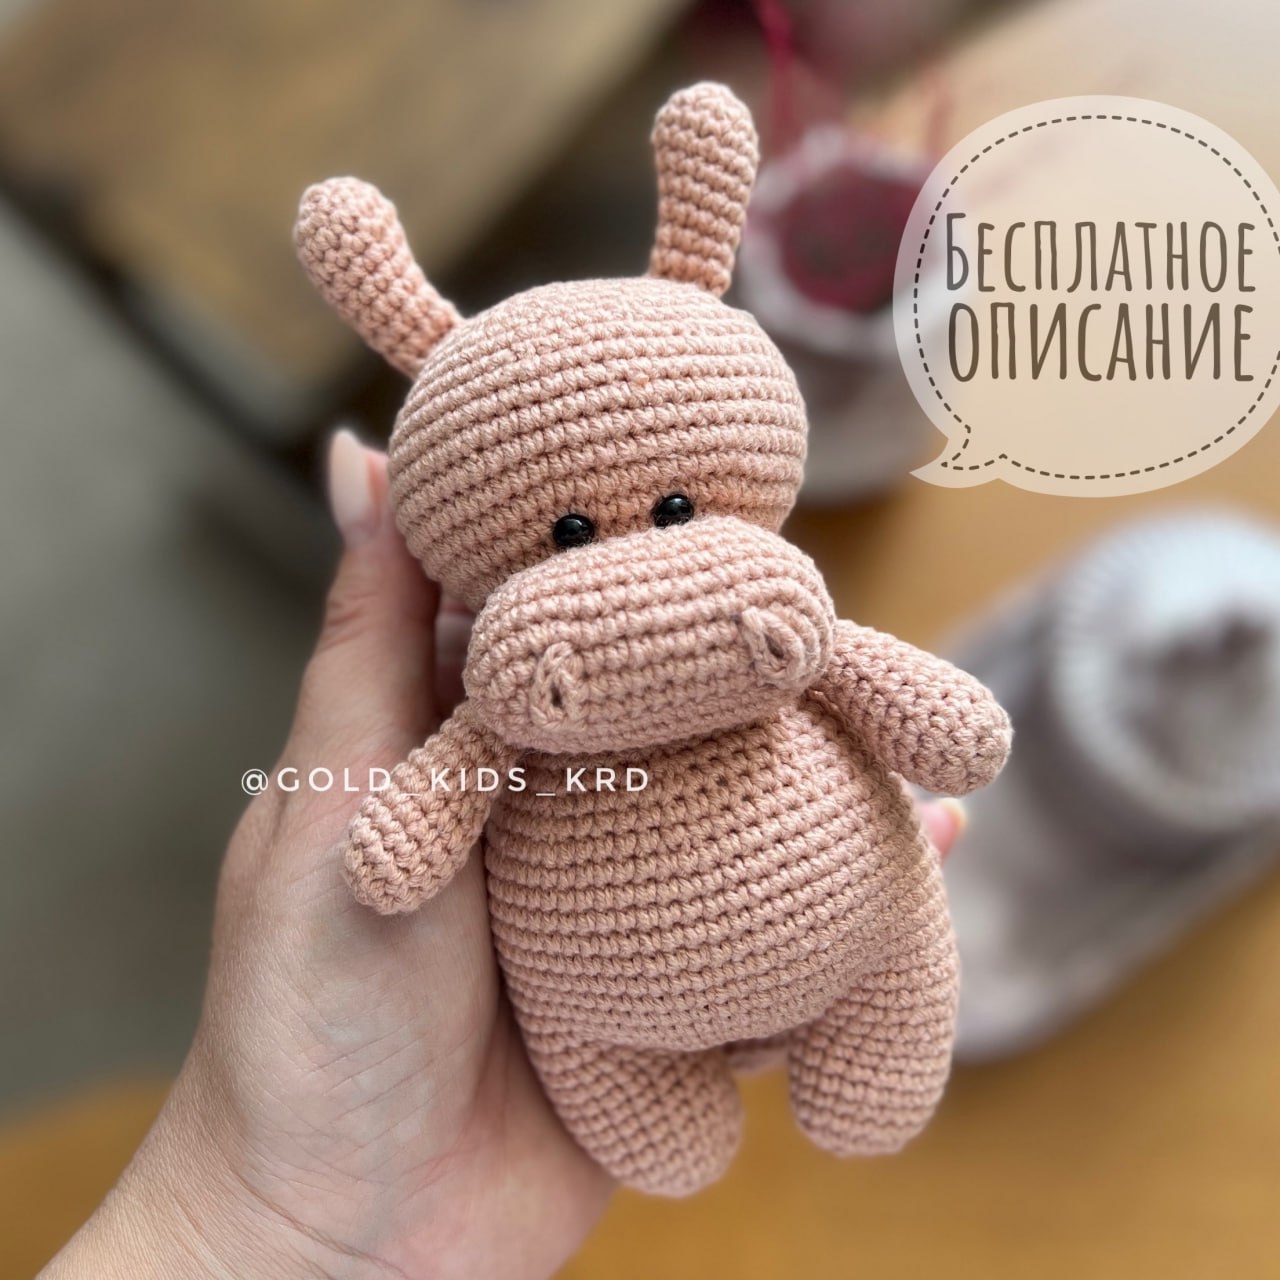
Crochet Plush Hippo Pattern: Adorable Amigurumi Tutorial
Are you looking for your next cuddle-worthy crochet project? This adorable plush amigurumi hippo is the ultimate huggable companion! Crocheted with super-soft velvet or chenille blanket yarn, this finished hippo stands at a generous 16 inches tall. It is perfect for baby showers, nursery decor, or as a cozy gift for anyone who loves sweet plushies.
This beginner-friendly tutorial uses basic stitches and a clever, low-sew construction method. The legs, body, head, arms, and tail are worked in one continuous piece, meaning less sewing and a sturdier toy for playtime! Grab your favorite plush yarn and let’s get crocheting.
Materials & Abbreviations
Supplies Needed:
- Yarn: Super Bulky plush yarn (Size 6, chenille or blanket style) — approx. 180 to 240 yards (1.5 to 2 skeins).
- Crochet Hook: US size G/6 (4.0 mm) or 7 (4.5 mm) crochet hook.
- Stuffing: Premium polyester fiberfill.
- Eyes: 12mm safety eyes (or sew-on black buttons).
- Eyelashes (Optional): False eyelashes and craft glue or hot glue for a sweet expression.
- Tools: Stitch markers, scissors, and a wide-eyed yarn needle.
Abbreviations (US Crochet Terms):
- MR: Magic Ring (or Magic Circle)
- ch: Chain stitch
- sc: Single crochet
- inc: Increase (work 2 single crochets into the same stitch)
- dec: Decrease (single crochet 2 stitches together — invisible decrease recommended)
- sl st: Slip stitch
- st(s): Stitch(es)
- ( … ) * x: Repeat instructions within parentheses the indicated number of times
Note: If you struggle to make a magic ring using plush yarn, chain 2 and work the required number of single crochets into the second chain from your hook.
Step-by-Step Instructions
Arms (Make 2)
We begin by making the smaller parts first so they can be crocheted directly into the body later.
- Round 1: 7 sc in MR (7)
- Round 2: 7 inc (14)
- Rounds 3-6: 14 sc (14) — 4 rounds total
- Round 7: 2 dec, 10 sc (12)
- Round 8: 1 dec, 10 sc (11)
- Round 9: 1 dec, 9 sc (10)
- Round 10: 1 dec, 8 sc (9)
- Round 11: 1 dec, 7 sc (8)
- Rounds 12-14: 8 sc (8) — 3 rounds total
- Round 15: 1 dec, 6 sc (7)
Stuff the arms lightly as you work. Leave the last two rounds unstuffed so the arms lie flat against the body. Pinch the top opening flat, and work 4 sc through both layers to close. Fasten off and set aside.
Tail
- Round 1: 6 sc in MR (6)
- Round 2: 6 inc (12)
- Rounds 3-4: 12 sc (12) — 2 rounds total
- Round 5: (1 dec, 4 sc) * 2 (10)
- Round 6: 1 dec, 8 sc (9)
- Round 7: 1 dec, 7 sc (8)
- Round 8: 8 sc (8)
Stuff the tail very lightly. Fold the top opening flat and work 3 sc through both layers to close. Fasten off and set aside.
Ears (Make 2)
- Round 1: 6 sc in MR (6)
- Round 2: 6 inc (12)
- Round 3: (5 sc, 1 inc) * 2 (14)
- Round 4: 14 sc (14)
- Round 5: 1 dec, 12 sc (13)
- Round 6: 1 dec, 11 sc (12)
- Round 7: 1 dec, 10 sc (11)
- Round 8: 1 dec, 9 sc (10)
- Round 9: 1 dec, 8 sc (9)
- Round 10: 9 sc (9)
Stuff very lightly. Because the decreases are worked on one side only, the ears will naturally curve. Fold flat and work 4 sc through both layers to close. Fasten off, leaving a tail for sewing.
Legs (Make 2) & Joining
Now we will make the legs and join them to begin the body.
First Leg:
- Round 1: 9 sc in MR (9)
- Round 2: 9 inc (18)
- Rounds 3-8: 18 sc (18) — 6 rounds total
Cut the yarn, but do not pull the loop too tight.
Second Leg:
Repeat Rounds 1 through 8. Do not cut the yarn on the second leg.
Joining the Legs:
From the second leg, chain 4. Join to the first leg using 1 sc worked into the loose loop of the first leg’s last stitch. This will count as the first stitch of Round 9.
The Body & Head
Place your stitch marker here. This marks the new beginning of each round.
- Round 9: Work 46 sc all the way around both legs and across both sides of the chain (46)
- Round 10: 17 sc, 7 inc, 22 sc (53) — Note: The 7 increases should sit centrally at the front to form a cute chubby belly. Adjust the placement of these increases slightly if your stitches are shifted.
- Round 11: 1 inc, 16 sc, (1 inc, 5 sc) * 2, 1 inc, 16 sc, 1 inc, 3 sc, 1 inc, 2 sc (59)
- Rounds 12-13: 59 sc (59) — 2 rounds total
- Round 14: 55 sc, 3 sc through both body and tail to join, 1 sc (59) — Ensure the tail is centered on the back.
- Rounds 15-22: 59 sc (59) — 8 rounds total
- Round 23: 1 dec, 27 sc, 1 dec, 20 sc, 1 dec, 6 sc (56)
- Round 24: (12 sc, 1 dec) * 4 (52)
- Round 25: 5 sc, (1 dec, 11 sc) * 3, 1 dec, 6 sc (48)
- Round 26: (10 sc, 1 dec) * 4 (44)
- Round 27: 4 sc, (1 dec, 9 sc) * 3, 1 dec, 5 sc (40)
- Round 28: (6 sc, 1 dec) * 5 (35)
- Round 29: 2 sc, (1 dec, 5 sc) * 4, 1 dec, 3 sc (30)
- Round 30: (4 sc, 1 dec) * 5 (25)
- Round 31: (3 sc, 1 dec) * 5 (20)
- Round 32: (2 sc, 1 dec) * 5 (15)
- Round 33 (Join Arms): 15 sc around. Incorporate the arms during this round: work 4 sc through both the first arm and the body, work 5 sc across the chest, work 4 sc through the second arm and the body, and work 2 sc across the back (15)
- Round 34: 7 sc, 1 inc, 7 sc (16)
Important Stuffing Step: Pack the neck area very firmly with fiberfill to prevent your hippo’s head from wobbling!
Continuing to the Head:
- Round 35: (1 sc, 1 inc) * 8 (24)
- Round 36: (2 sc, 1 inc) * 8 (32)
- Round 37: (3 sc, 1 inc) * 8 (40)
- Round 38: (4 sc, 1 inc) * 8 (48)
- Round 39: (5 sc, 1 inc) * 8 (56)
- Round 40: (7 sc, 1 inc) * 7 (63)
- Rounds 41-45: 63 sc (63) — 5 rounds total
- Round 46: (7 sc, 1 dec) * 7 (56)
- Round 47: (12 sc, 1 dec) * 4 (52)
- Round 48: (11 sc, 1 dec) * 4 (48)
- Round 49: (6 sc, 1 dec) * 6 (42)
- Round 50: (5 sc, 1 dec) * 6 (36)
Start stuffing the head firmly. Keep shaping it as you fill it to make sure it becomes a nice, uniform sphere.
- Round 51: (4 sc, 1 dec) * 6 (30)
- Round 52: (3 sc, 1 dec) * 6 (24)
- Round 53: (2 sc, 1 dec) * 6 (18)
- Round 54: (1 sc, 1 dec) * 6 (12)
- Round 55: 6 dec (6)
Cut yarn, weave through the remaining 6 front loops, pull tight to close the hole, and hide the yarn tail inside the head.
Muzzle (Nose)
The muzzle is worked around a foundation chain.
- Round 1: Chain 12.
- Round 2: Start in the second chain from your hook. Work 1 inc, 9 sc along the chain. In the last chain stitch, work 4 sc. Rotate your work to crochet along the opposite side of the chain: 9 sc, 1 inc (26)
- Round 3: 2 inc, 9 sc, 4 inc, 9 sc, 2 inc (34)
- Round 4: (1 sc, 1 inc) * 2, 11 sc, (1 sc, 1 inc) * 3, 12 sc, 1 inc (40)
- Round 5: (3 sc, 1 inc) * 2, 7 sc, (3 sc, 1 inc) * 3, 12 sc, 1 inc (46)
- Round 6: (1 dec, 21 sc) * 2 (44)
- Round 7: (1 dec, 20 sc) * 2 (42)
- Round 8: 42 sc (42) — The muzzle will now begin to bowl and curve.
- Round 9: (1 dec, 19 sc) * 2 (40)
- Round 10: 2 dec, 12 sc, 4 dec, 12 sc, 2 dec (32)
- Round 11: 3 sc, 1 dec, (6 sc, 1 dec) * 3, 3 sc (28)
Fasten off, leaving a long yarn tail for sewing. Stuff the muzzle firmly with fiberfill.
Finishing & Assembly
1. Attaching the Muzzle
Position the stuffed muzzle on the front of the head, centering it between Rounds 35 and 41. Pin the muzzle securely in place using knitting needles or straight pins. Once you are happy with the placement, sew it to the head using your yarn needle and whip stitch around.
2. Adding Nostrils
Cut two equal pieces of plush yarn, about 6 to 8 inches long. Thread your crochet hook from inside the muzzle out to the front surface where you want a nostril to sit. Pull a loop of the yarn piece through, forming a small raised loop on the snout. Secure the yarn ends firmly inside the muzzle, and repeat for the second nostril.
3. Eyes & Eyelashes
If you are using glue-on craft eyes, attach false eyelashes to the back edges of your 12mm eyes first. Insert the eyes into the head just above the muzzle. For a highly secure placement on finished pieces, use a hot glue gun to gently insert the eye stems deep into the fiberfill between the yarn stitches, holding them in place until the glue sets.
4. Sewing the Ears
Position the curved ears on top of the head around Round 48. Sew them securely using the yarn tails, making sure they are symmetrical.
Tips for Crocheting with Plush Blanket Yarn
- Use Stitch Markers: Velvet and chenille yarns can make it very hard to see individual stitches. Always mark your first stitch to keep your count accurate.
- Mind Your Tension: Keep your tension firm. If your stitches are too loose, the fiberfill stuffing will peek through the gaps.
- Shedding Solution: To prevent the ends of plush yarn from fraying or shedding while you work, use a lighter to quickly singe and melt the very tip of the polyester fibers.
Congratulations, your plush hippo is complete and ready for endless snuggles!