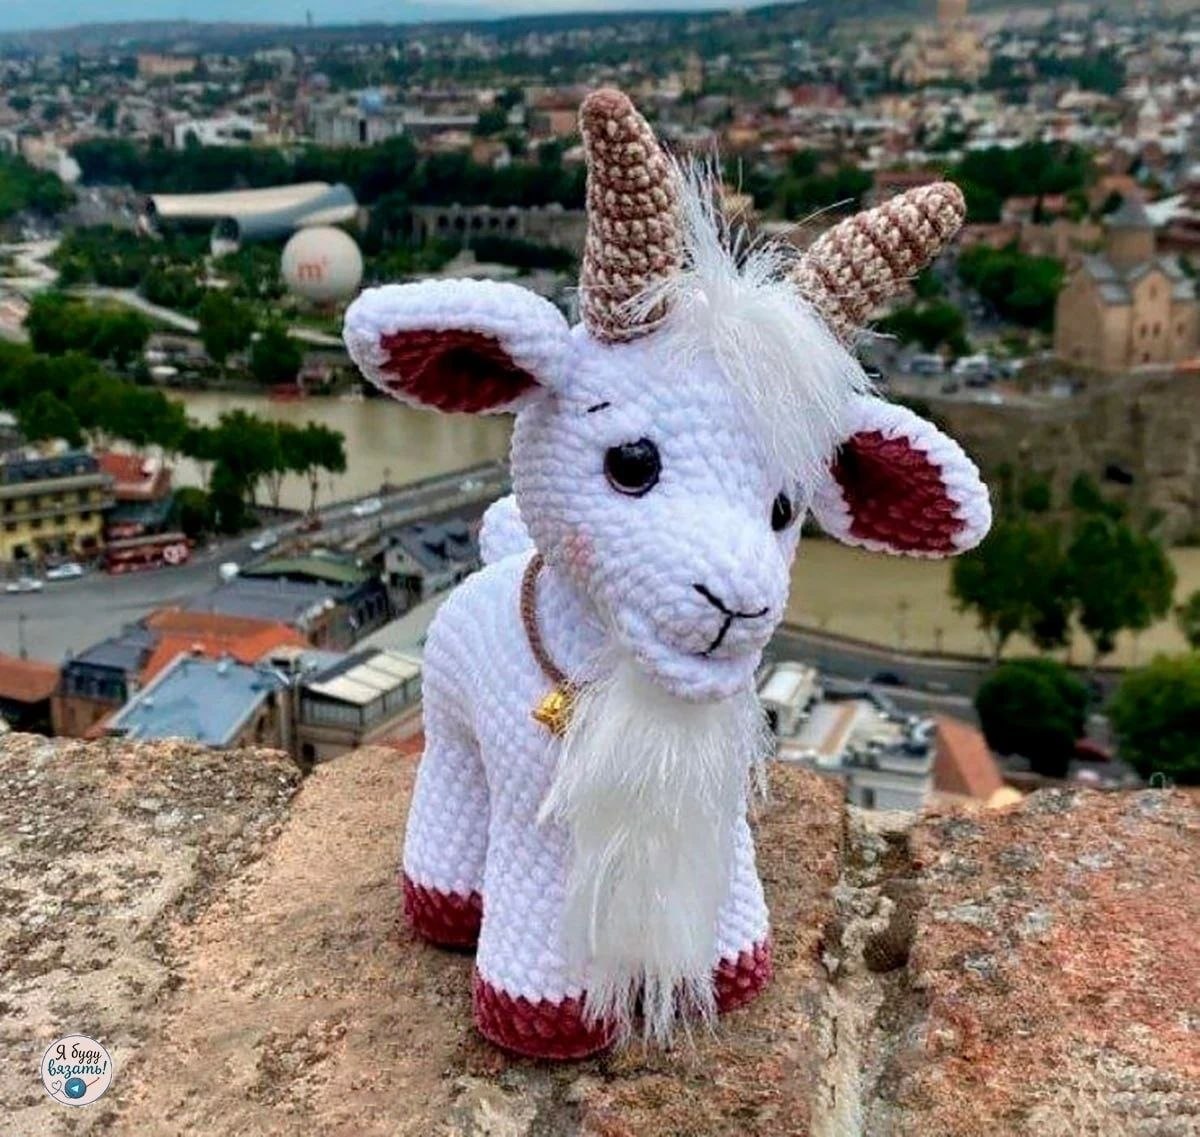
Adorable Amigurumi Horned Goat Crochet Pattern: A Step-by-Step Guide
Are you looking for your next cozy crochet project? This adorable Horned Goat amigurumi is the perfect blend of “cute” and “challenging.” With its plush texture, expressive eyes, and charming little horns, this goat makes for a wonderful nursery decoration or a unique gift for animal lovers. Whether you are a beginner looking to practice shaping or an intermediate crafter wanting to try out a jointed head, this tutorial will guide you through every single stitch.
Materials & Abbreviations
To achieve the soft, chunky look seen in the photos, I recommend using plush or chenille-style yarn. If you use thinner yarn, your goat will be smaller, so keep your tension consistent!
What You’ll Need
- Main Body Yarn: 100% Micro-polyester (Medium 4/Worsted weight). You will need approximately 93 yards (85m) of a primary color (white is shown) and a small amount of a contrast color (like dusty rose) for the ears and hooves.
- Hair Yarn (Bangs & Beard): Bulky 5 weight long-pile yarn (faux fur style). You’ll need about 70-80 yards.
- Horn Yarn: Fine 2 weight cotton/acrylic blend. You will need two colors (e.g., brown and beige) to create the striped effect.
- Stuffing: Approximately 5 oz (140g) of polyester fiberfill.
- Eyes: 14mm safety eyes.
- Hooks:
- 2.5mm (for main body)
- 3.5mm (for hair/beard)
- 1.75mm or 2mm (for horns)
Note: If using extra-thick plush yarn, upgrade to a 3.5mm or 4mm hook.
- Extras: Large-eye sewing needle, scissors, stitch markers, stuffing, and optional eye lashes (glue-on lashes work great!).
- Stability (Optional): For a more upright goat, you can use small foam/sponge discs (about 1.4 inches/35mm in diameter) to reinforce the neck and legs.
Abbreviations (US Terms)
- MR: Magic Ring
- ch: Chain
- sc: Single Crochet
- inc: Increase (2 sc in one stitch)
- dec: Decrease (sc 2 together)
- sl st: Slip Stitch
- st(s): Stitch(es)
Step-by-Step Instructions
1. The Lower Jaw
Work in your primary color.
- Row 1: 6 sc in MR (6)
- Row 2: 6 inc (12)
- Row 3: (1 sc, inc) repeat 6 times (18)
- Row 4: Fold the piece in half and sc through both layers 9 times (9). Fasten off, leaving a small tail for sewing.
2. The Head
Work in your primary color, starting from the snout area.
- Row 1: 6 sc in MR (6)
- Row 2: 6 inc (12)
- Row 3: (3 sc, inc) repeat 3 times (15)
- Row 4: (4 sc, inc) repeat 3 times (18)
- Row 5: (5 sc, inc) repeat 3 times (21)
- Row 6: From the marker, work 16 sc. Now, join the lower jaw piece to the head. Work 5 sc along the jaw and 5 sc along the face to complete the round (21).
- Row 7: 4 sc along the jaw/face, inc, 5 sc, inc, 5 sc, inc, 4 sc (24)
- Row 8: 6 sc, inc, 1 sc, inc, 1 sc, inc, 1 sc, inc, 1 sc, inc, 1 sc, inc, 7 sc (30)
- Row 9: 7 sc, inc, 2 sc, inc, 2 sc, inc, 2 sc, inc, 2 sc, inc, 7 sc (36)
- Row 10: 8 sc, inc, 3 sc, inc, 3 sc, inc, 3 sc, inc, 3 sc, inc, 3 sc, inc, 7 sc (42)
- Row 11: 9 sc, inc, 4 sc, inc, 4 sc, inc, 4 sc, inc, 4 sc, inc, 4 sc, inc, 7 sc (48)
- Rows 12-19: Work 48 sc in each round.
Setting the Eyes & Eyelids
Between rows 10 and 11, mark the eye placement (roughly 12 stitches apart). Insert your safety eyes here. To add eyelids, locate row 12. Turn the head so the face is away from you. Work 3 sc on each side of the eye area. Fasten off and secure from the inside.
Finishing the Head
If you want a rotating head, insert a ball-joint kit between rows 15 and 16 before continuing. If not, continue decreasing:
- Row 20: (6 sc, dec) repeat 6 times (42)
- Row 21: (5 sc, dec) repeat 6 times (36)
- Row 22: (4 sc, dec) repeat 6 times (30)
- Row 23: (3 sc, dec) repeat 6 times (24)
- Row 24: (2 sc, dec) repeat 6 times (18). Stuff firmly.
- Row 25: (1 sc, dec) repeat 6 times (12)
- Row 26: 6 dec (6). Fasten off and weave in ends.
3. The Neck
Work in your primary color.
- Row 1: 7 sc in MR (7)
- Row 2: 7 inc (14)
- Row 3: (1 sc, inc) repeat 7 times (21)
- Rows 4-6: 21 sc (21)
Pro Tip: For extra stability, insert a small foam disc inside the neck before proceeding to the body.
4. The Body
From the neck, ch 10. You will now work around both the chain and the neck.
- Row 1: In the 2nd ch from hook, work 3 sc. Work 15 sc along the chain and around the neck, inc, 4 sc, inc, 16 sc along the remaining chain and neck (42).
- Row 2: 3 inc, 16 sc, inc, 2 sc, inc, 2 sc, inc, 16 sc (48)
- Row 3: (1 sc, inc) repeat 3 times, 17 sc, inc, 3 sc, inc, 3 sc, inc, 16 sc (54)
- Row 4: (2 sc, inc) repeat 3 times, 18 sc, inc, 4 sc, inc, 4 sc, inc, 16 sc (60)
- Row 5: (3 sc, inc) repeat 3 times, 19 sc, inc, 5 sc, inc, 5 sc, inc, 16 sc (66)
- Row 6: (4 sc, inc) repeat 3 times, 20 sc, inc, 6 sc, inc, 6 sc, inc, 16 sc (72)
- Rows 7-9: 72 sc (72)
- Row 10: (10 sc, dec) repeat 6 times (66)
- Row 11: 66 sc (66)
Creating Leg Openings
Mark the leg locations. On the front, mark the middle 2 stitches. On the back, mark 2 stitches at an equal distance from the front (about 12 stitches away from the first mark on the back). Work the leg cutouts:
- Row 12: From the marker, ch 3, skip 12 sts, 2 sc, ch 3, skip 12 sts, 7 sc, ch 3, skip 12 sts, 2 sc, ch 3, skip 12 sts, 7 sc (30)
- Row 13: 30 sc (30)
- Row 14: (1 sc, dec) repeat 10 times (20)
- Row 15: 10 dec (10)
- Row 16: 5 dec (5). Fasten off.
5. The Legs & Hooves
Make 4 legs. Work in primary color first, then switch to your contrast color for the last two rows to create the hooves.
- Row 1: 15 sc in MR (15)
- Rows 2-4: 15 sc (15)
- Row 5: (4 sc, inc) repeat 3 times (18)
- Rows 6-8: 18 sc (18)
- Row 9: (5 sc, inc) repeat 3 times (21)
- Rows 10-11: 21 sc (21)
- Rows 12-13 (Contrast Color): 21 sc (21). Finish with a sl st.
Stuff legs firmly. To make the hooves, work a small round of 21 sc in the contrast color and attach it to the bottom of the leg.
6. The Ears, Horns, & Tail
Ears: Use two colors. Start with 6 sc in MR. Increase through several rows, alternating colors to create a decorative edge. Fold in half and work around the edge to finish the shape.
Horns: Use your thinnest yarn. Work in a spiral, alternating colors (e.g., brown and beige) every few rows to create stripes. Stuff lightly.
Tail: 6 sc in MR, increase to 9, then work straight for a few rows, then decrease back to 6. Fold in half and crochet through both sides to close.
Finishing
Assembly is key to making your goat look professional!
- Sewing: Use a needle and the primary color yarn to sew the ears between rows 16 and 18. Sew the horns near rows 15-18.
- The Beard & Bangs: Use your long-pile yarn. For the bangs, work 3 rows of long loops from the top of the head. For the beard, work rows of sc starting from the jaw area.
- Embroidery: Using black thread, embroider a small nose and thin eyebrows to give your goat personality.
- Final Touches: You can add a little “blush” to the cheeks using dry pastel or makeup blush for an extra cute look!
Tips for Success
- Plush Yarn Hack: When working with very fuzzy yarn, it can be hard to see your stitches. Use stitch markers religiously!
- Tight Tension: Always crochet tightly. If your tension is too loose, the stuffing will peek through the holes.
- Color Changes: To make color changes look neat, try to change colors on the last stitch of the previous row rather than starting a new row.
- Scale: If you use much thicker yarn, remember to increase the size of your eyes and your horn/ear patterns so they stay in proportion.