Crochet Curly Sheep Pattern: A Cute Amigurumi Tutorial
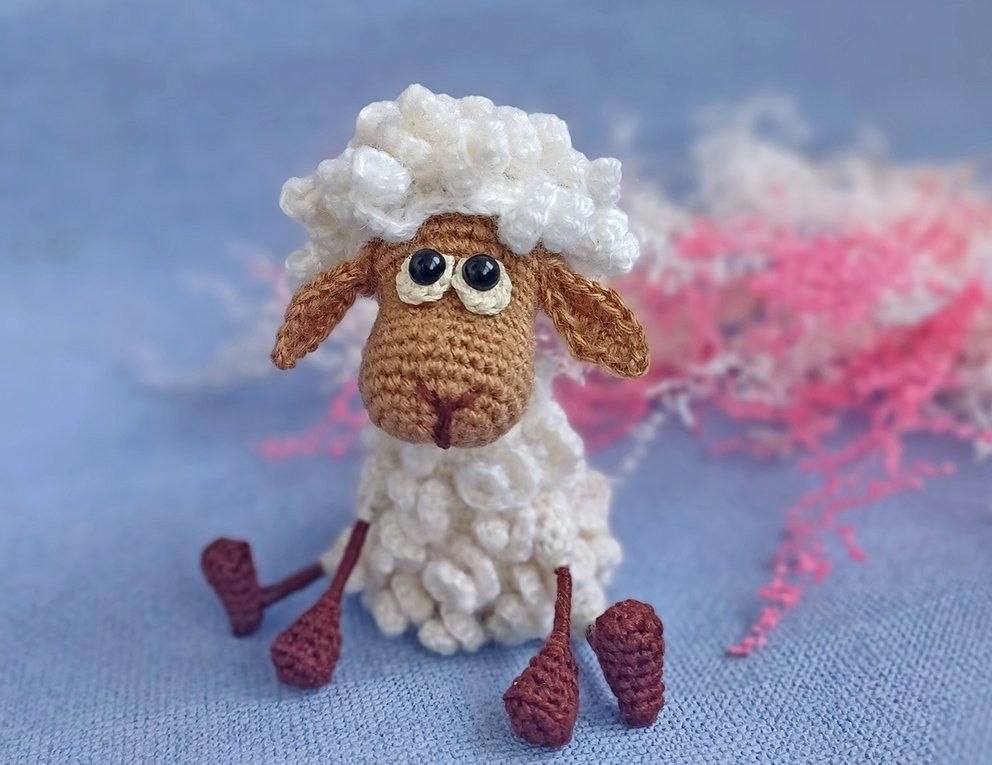
Are you looking for a sweet, whimsical project to add to your amigurumi collection? This crochet curly sheep is the perfect project! With its fluffy, textured body and adorable little limbs, this sheep makes for a wonderful nursery decoration, a unique gift for animal lovers, or a charming addition to a woodland-themed display. While it is rated as a medium-difficulty project, the repetitive nature of the curls makes it a very meditative and rewarding experience once you get into the rhythm.
In this detailed tutorial, we will walk you through every single step, from crafting the wire-reinforced legs that allow the sheep to pose, to creating that signature “curly” wool texture that makes it so irresistible. Grab your favorite yarn and let’s get started!
Materials & Abbreviations
Materials
To ensure your sheep looks just like the one in the photos, you will need the following supplies. You can substitute these with similar yarns depending on the look you want to achieve (velour works wonderfully for extra fluffiness!).
- Yarn: Use medium-weight yarn (such as acrylic, wool, or cotton). You will need:
- White (for the body, sleeves, and hair)
- Light Brown (for the head and ears)
- Dark Brown (for the arms and legs)
- Crochet Hook: 1.25 mm (or the smallest hook that produces tight stitches with your chosen yarn).
- Stuffing: Poly-fill or similar fiberfill.
- Eyes: 1/4-inch (6 mm) half-beads or ready-made safety eyes. You can also use white cotton yarn to embroider the eyes.
- Wire: 1/16-inch (1 mm) diameter wire. You will need 4 pieces, each approximately 4 inches long.
- Adhesives & Tools: Clear universal glue, adhesive fabric tape (or medical tape), a sewing needle, and embroidery floss in black or dark brown.
Abbreviations
Please note that these terms are in US crochet terminology:
- MR: Magic Ring
- ch: Chain
- sc: Single Crochet
- inc: Increase (2 sc in one stitch)
- dec: Decrease (sc 2 together)
- hdc: Half Double Crochet
- dc: Double Crochet
- sl st: Slip Stitch
- BLO: Back Loop Only
- (…) x N: Repeat the instructions inside the parentheses N times
Step-by-Step Instructions
Arms and Sleeves
We will start by making the limbs. The arms use a wire core so they can be posed.
Arms (Make 2)
Use dark brown yarn.
Round 1: 6 sc in MR (6)
Round 2: 6 inc (12)
Round 3: Working in BLO: (2 sc, 1 dec) x 3 times (9)
Round 4: 7 sc, 1 dec (8)
Round 5: 8 sc (8)
Adding Wire: Prepare two 4-inch pieces of wire. Create a small loop at the end of each piece and insert it into the arm. Round 6: (Skip 1 stitch, 1 sc) x 4 times (4). Cut the yarn, leaving a 12-inch tail. Apply a little clear glue to the half of the wire and carefully wrap the yarn around it to add thickness and color. Secure the end with glue.
Sleeves (Make 2)
Use white yarn.
Round 1: 5 sc in MR (Do not pull too tight!) (5)
Round 2: 1 inc, 4 sc (6)
Round 3: (2 sc, 1 inc) x 2 times (8)
Round 4: 7 sc, 1 sl st (18). Cut the yarn, leaving a tail for sewing.
Legs and Lower Legs
The legs are also reinforced with wire to allow the sheep to sit or stand.
Legs (Make 2)
Use dark brown yarn.
Round 1: 5 ch, from the 2nd ch from hook: 3 sc, 3 sc in the last ch. Working on the other side of the chain: 2 sc, 1 inc (10)
Rounds 2-3: 10 sc (10)
Round 4: 9 sc, leave the last stitch unworked. Move your marker to this stitch (10)
Round 5: (1 dec, 3 sc) x 2 times (8)
Adding Wire: Prepare two 4-inch pieces of wire with loops at the ends. The loop length should match the foot length. Round 6: 2 sc, insert wire into the leg, 1 ch, skip 1 stitch, 5 sc (7 + 1 ch). Lightly stuff. Round 7: 2 sc, 1 sc in the ch, 5 sc (8). Cut the yarn, leaving a 35-inch tail. Wrap the wire in yarn with glue as you did for the arms.
Lower Legs/Shanks (Make 2)
Use white yarn.
Round 1: 6 sc in MR (6)
Round 2: (1 sc, 1 inc) x 3 times (9)
Round 3: (2 sc, 1 inc) x 3 times (12)
Round 4: 11 sc, 1 sl st (12). Cut yarn, leaving a tail for sewing.
Assembly Note: Insert the legs into the holes of the shanks. Twist the two wires together to secure them. Ensure both legs are the same length, then use adhesive tape to bind the wires. Stuff the shanks lightly and sew them to the body later.
The Curly Body
This is the most unique part of the pattern. We will be working in rounds and incorporating “curls” to create the sheep’s wool.
Use white yarn. Stuff as you go.
Round 1: 6 ch, from 2nd ch from hook: 1 inc, 3 sc, 3 sc in the last ch, working on the other side: 4 sc (12)
Round 2: 3 sc in one stitch, (1 sc, 1 inc) x 2 times, 1 sc, 3 sc in one stitch, 1 sc, 1 inc, 1 sc. Leave the last 2 stitches unworked (19). Move your marker to the back of the body.
Round 3: (1 inc, 2 sc) x 2 times, (1 inc, 1 sc) x 3 times, (1 sc, 1 inc) x 3 times, 1 sc (27)
Round 4: (1 sc, 1 inc) x 4 times, 2 sc, 1 inc, 3 sc, 1 inc, 2 sc, 1 inc, 9 sc (34)
Round 5: 13 sc, 1 inc, (3 sc, 1 inc) x 2 times, 8 sc, (1 inc, 1 sc) x 2 times (39)
Creating the Curls
Before starting Round 6, learn the “Curl” pattern: 9 ch, from 2nd ch from hook: 1 sl st, 6 inc, 1 sc.
Round 6: (1 sc, 1 inc) x 2 times, Curl, 4 sc, Curl, 7 sc, Curl, 3 sc, 1 inc, 3 sc, Curl, 7 sc, Curl, 5 sc, Curl, 5 sc (42). Move marker.
Round 7: 5 sc, skip the bottom curl, 4 sc, skip the bottom curl, 7 sc, skip the bottom curl, 8 sc, skip the bottom curl, 7 sc, skip the bottom curl, 5 sc, skip the bottom curl, 5 sc.
Tail: 4 ch, from 3rd ch from hook: 2 hdc (4).
Round 8: 4 sc, Curl, 10 sc, place extra marker, 7 sc, Curl, 7 sc, place extra marker, 7 sc, Curl, 7 sc (42).
Round 9: 9 sc, Curl, 15 sc, Curl, 18 sc (42).
Round 10: 12 sc, Curl, 3 sc, Curl, 12 sc, Curl, 4 sc, Curl, 3 sc, 1 dec, 1 sc, 1 dec, Curl, 1 sc, 1 dec (39).
Round 11: (1 sc, 1 dec) x 3 times, 8 sc, Curl, 22 sc (36).
Round 12: 3 sc, Curl, 33 sc (36).
Round 13: 13 sc, 1 dec, 2 sc, Curl, 4 sc, 1 dec, 6 sc, 1 dec, 5 sc (33).
Round 14: 5 sc, 1 dec, 13 sc, Curl, 7 sc, Curl, 1 dec, 1 sc, 1 dec, Curl, 1 sc (30).
Round 15: (1 dec, 1 sc) x 2 times, Curl, 4 sc, Curl, 2 sc, (1 dec, 1 sc) x 3 times, 9 sc (25).
Rounds 16-17: Follow the pattern of decreases and curls as indicated: 25 sc, then 2 sc, 1 dec, 2 sc, marker for arm, 3 sc, 1 dec, 2 sc, Curl, 1 sc, 1 dec, 3 sc, marker for arm, 2 sc, 1 dec, 2 sc (21).
Round 18: 2 sc, Curl, 13 sc, Curl, 6 sc (21).
Round 19: 5 sc, Curl, (1 dec, 5 sc) x 2 times, Curl, 1 dec (18). Move marker.
Round 20: 7 sc, Curl, 11 sc (18).
Round 21: 10 sc, Curl, 8 sc (18).
Round 22: (1 dec, 4 sc) x 2 times, 1 dec, 3 sc, Curl, 1 sc (15).
Round 23: (3 sc, 1 dec) x 2 times, 2 sc, 1 dec, 1 sc (12).
Round 24: 12 sc (12).
Round 25: 2 sc, Curl, 1 dec, 2 sc, 1 dec, 1 sc, Curl, 1 sc, 1 dec (9).
Rounds 26-27: 9 sc (9)
The Head and Wig
Head: Use light brown yarn.
Round 1: 6 sc in MR (6)
Round 2: 6 inc (12)
Round 3: (1 sc, 1 inc) x 6 times (18)
Round 4: (1 sc, 1 inc, 1 sc) x 6 times (24)
Round 5: (3 sc, 1 inc) x 6 times (30)
Rounds 6-9: 30 sc (30)
Round 10: (1 dec, 8 sc) x 3 times (27)
Rounds 11-12: 27 sc (27)
Round 13: 12 sc, 3 ch, skip 3 stitches (this creates the neck hole), 12 sc (27)
Round 14: 12 sc, 3 sc in the ch, 12 sc (27)
Round 15: (8 sc, 1 inc) x 3 times (30)
Round 16: (2 sc, 1 inc, 2 sc) x 6 times (36)
Rounds 17-22: 36 sc (36)
Round 23: (2 sc, 1 dec, 2 sc) x 6 times (30)
Round 24: (1 dec, 3 sc) x 6 times (24)
Round 25: (1 dec, 2 sc) x 6 times (18)
Round 26: (1 dec, 1 sc) x 6 times (12)
Round 27: 6 dec (6). Stuff firmly and sew to the body.
Wig: Use white yarn.
Round 1: 6 sc in MR (6)
Round 2: 6 inc (12)
Round 3: Curl, (1 sc, 1 inc) x 2 times, Curl, (1 sc, 1 inc) x 2 times, Curl, (1 sc, 1 inc) x 2 times (18)
Round 4: Skip bottom curl, 2 sc, 1 inc, Curl, 2 sc, 1 inc, skip bottom curl, 2 sc, 1 inc, Curl, 2 sc, 1 inc, skip bottom curl, 2 sc, 1 inc, Curl, 2 sc, 1 inc (24)
Round 5: 3 sc, 1 inc, skip bottom curl, (3 sc, 1 inc) x 2 times, skip bottom curl, (3 sc, 1 inc) x 2 times, skip bottom curl, 3 sc, 1 inc (30)
Round 6: 4 sc, 1 inc, 3 sc, Curl, 1 sc, 1 inc, 2 sc, Curl, 2 sc, 1 inc, 4 sc, 1 inc, 2 sc, Curl, 2 sc, 1 inc, 3 sc, Curl, 1 sc, 1 inc (36)
Round 7: 1 sc, Curl, 20 sc, Curl, 15 sc (36)
Round 8: 4 sc, Curl, 7 sc, Curl, 6 sc, Curl, 11 sc, Curl, 8 sc (36)
Round 9: 7 sc, Curl, 12 sc, Curl, 5 sc, Curl, 7 sc, Curl, 4 sc, Curl, 1 sc (36)
Round 10: 14 sc, Curl, 12 sc, Curl, 10 sc (36)
Round 11: 2 sc, Curl, 7 sc, Curl, 7 sc, Curl, 6 sc, Curl, 7 sc, Curl, 7 sc (36). Cut and hide the tail. Sew or glue the wig onto the head.
Eyes and Ears
Eyes: Use white yarn.
Round 1: 3 ch, from the 2nd ch from hook: 7 hdc, sl st in ring (7). Cut and hide the tail. Glue your 1/4-inch half-beads onto the face or use them as a base for eyes made from polymer clay.
Ears (Make 2): Use light brown yarn.
Round 1: 8 ch, from 2nd ch from hook: 1 sc, 2 hdc, 1 dc, 1 hdc, 1 sc, in the last ch: 1 sl st, 1 sc, 1 dc, 1 hdc, 2 hdc, 1 sc (15). Cut and hide the tail. Sew the ears onto the head.
Finishing
Now comes the most rewarding part—assembling your creation! Follow these steps for a professional look:
- Sew the Head: Attach the head to the neck opening of the body.
- Attach Limbs: Sew the arms and the leg/shank assemblies onto the body at the marked locations.
- Embroider the Nose: Use your black or brown embroidery floss to sew a small nose on the face between the eyes.
- Final Check: Make sure all the wire is tucked away and all tails are securely fastened.
Tips
- Tension is Key: Since this pattern uses very fine hooks and small stitches, try to keep your tension even. If your stitches are too loose, the stuffing will peek through the holes.
- Working with Wire: When wrapping yarn around wire, use a tiny amount of glue to prevent the yarn from slipping. This ensures your sheep can hold poses without the limbs drooping.
- Curl Variations: If you want much larger, fluffier curls, you can try starting the curl with 12 chains instead of 9 (1 dc, 9 inc, 1 sc).
- Marking Stitches: Always use a stitch marker, especially when working the complicated “body curl” rounds. It is very easy to lose track of your count in amigurumi!