How to Crochet a Cute Fuzzy Sheep: A Beginner-Friendly Amigurumi Pattern
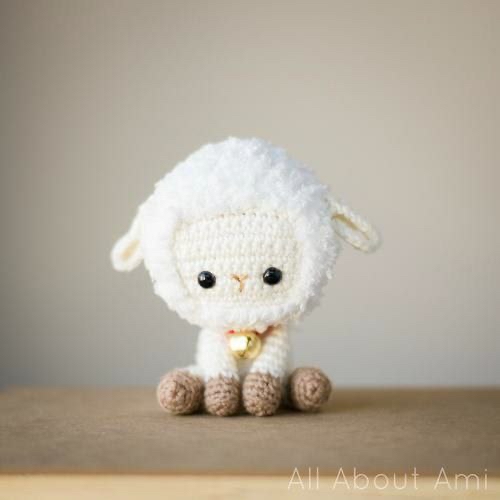
There is nothing quite as heartwarming as a handmade plushie. If you are looking for your next crochet project, look no further! This adorable, ultra-soft fuzzy sheep is the perfect addition to a nursery, a sweet gift for a baby shower, or a charming companion for your own desk. This amigurumi project combines different textures—smooth cotton for the face and legs, and fluffy, bouclé-style yarn for the body—to create a professional, high-end look that is surprisingly easy to achieve.
This tutorial is designed with beginners in mind. We will walk through every step, from creating the tiny muzzle to assembling the fluffy body. Grab your hook and some cozy yarn, and let’s get started on making your very own little sheep!
Materials & Abbreviations
To ensure your sheep turns out looking just like the pictures, it is important to use the right combination of yarn weights and hook sizes. Using a smaller hook than recommended for your yarn will help keep your stitches tight, preventing the stuffing from peeking through.
What You Will Need
- Beige Yarn: A smooth cotton or acrylic yarn (suitable for a 2mm hook).
- Brown Yarn: A smooth cotton or acrylic yarn (suitable for a 2mm hook).
- White Fuzzy Yarn: A high-texture, fluffy, or bouclé yarn (suitable for a 3.5mm hook).
- Crochet Hooks: 2mm (approx. B-1) and 3.5mm (approx. E-4).
- Safety Eyes: Small black plastic eyes.
- Stuffing: High-quality polyester fiberfill.
- Notions: A yarn needle, scissors, and stitch markers.
US Crochet Abbreviations
This pattern uses standard US crochet terms. Please ensure you are using the US versions to avoid confusion!
- MR: Magic Ring (or Magic Circle)
- ch: Chain
- sc: Single Crochet
- hdc: Half Double Crochet
- inc: Increase (2 sc in the same stitch)
- dec: Decrease (sc 2 stitches together)
- st(s): Stitch(es)
- R: Round
- BLO: Back Loops Only
- FLO: Front Loops Only
Step-by-Step Instructions
The Muzzle
The muzzle is worked as a flat piece using beige yarn and a 2mm hook. Working in a flat row allows you to create a structured shape for the face.
R1: Ch 11. In the 2nd ch from the hook, work 10 sc.
R2: Ch 1, turn. 1 inc, 8 sc, 1 inc (12 sc).
R3-8: 12 sc.
R9: Ch 1, turn. (4 sc, 1 dec) repeat twice – 10 sc total.
Finishing the Muzzle: Once finished, you will work in rounds around the entire edge of this piece to create a border. Work a total of 42 sc around the perimeter. To give the muzzle its rounded shape, work 2 sc into every corner stitch.
The Head
For the head, switch to your white fuzzy yarn and a 3.5mm hook. Before you begin, attach your safety eyes to the muzzle piece (if you are attaching the muzzle to the head) or plan their placement on the head rounds.
R1: 42 sc in a magic ring.
R2: *2 sc, 1 inc* repeat 3 times. Then, *2 sc, 1 dec* repeat 8 times. Work 1 sc in the final stitch (37 sc).
R3: *2 sc, 1 inc* repeat 4 times. Then, *2 sc, 1 dec* repeat 6 times. Work 1 sc in the final stitch (35 sc).
R4: 15 sc, then *2 sc, 1 dec* repeat 5 times (30 sc).
R5-7: 30 sc.
R8: *8 sc, 1 dec* repeat 3 times (27 sc).
Pro Tip: At this stage, embroider a small nose onto the muzzle piece to give your sheep more personality.
R9: *1 sc, 1 dec* repeat 9 times (18 sc). Start stuffing the head firmly.
R10: *1 sc, 1 dec* repeat 6 times (12 sc).
R11: *1 dec* repeat 6 times (6 sc).
R12: *1 dec* repeat 3 times (3 sc). Fasten off, leaving a long tail for sewing.
The Ears (Make 2)
Use beige yarn and a 2mm hook. These are worked in rows to create a leaf-like shape.
R1: Ch 8. In the 2nd ch from the hook, work 6 sc in the BLO (back loops only). Work 2 sc in the very last ch. Turn your work.
R2: Work 6 sc in the FLO (front loops only). Then, work 2 hdc in each of the next 6 stitches. Finally, work 4 sc. (20 sts total).
Fasten off, leaving a long tail for sewing to the head.
The Body
Switch to the white fuzzy yarn and a 3.5mm hook.
R1: 6 sc in a magic ring.
R2: 1 inc in every stitch (12 sc).
R3: 3 sc, 1 inc repeat 3 times (15 sc).
R4-5: 15 sc.
R6: 3 sc, 1 dec repeat 3 times (12 sc).
R7-9: 12 sc.
Stuff the body firmly and leave a long tail for sewing to the head.
The Arms (Make 2)
Begin with brown yarn and a 2mm hook.
R1: 5 sc in a magic ring.
R2: 1 inc in every stitch (10 sc).
R3: 10 sc in the BLO.
R4-5: 10 sc.
Color Change: Switch to beige yarn.
R6: 3 sc, 1 dec repeat 2 times (8 sc).
R7-10: 8 sc.
R11: 2 sc, 1 dec repeat 2 times (6 sc). Fasten off, leaving a tail.
The Legs (Make 2)
Begin with brown yarn and a 2mm hook.
R1: 6 sc in a magic ring.
R2: 1 inc in every stitch (12 sc).
R3: 12 sc in the BLO.
R4-5: 12 sc.
Color Change: Switch to beige yarn.
R6: 4 sc, 1 dec repeat 2 times (10 sc).
R7-10: 10 sc.
R11: 3 sc, 1 dec repeat 2 times (8 sc).
R12: 2 sc, 1 dec repeat 2 times (6 sc). Fasten off, leaving a tail.
The Tail
Use white fuzzy yarn and a 3.5mm hook.
R1: 5 sc in a magic ring.
R2: 5 sc. Fasten off, leaving a tail.
Finishing
Assembly is the most important part of amigurumi! This is where your pieces turn into a character.
Assembly Steps
- The Face: Sew the muzzle to the center of the head. Ensure the eyes are placed symmetrically just above the muzzle.
- The Ears: Sew the ears to the sides of the head, slightly behind the eye line.
- The Body: Sew the head to the body. Depending on the look you want, you can sew it directly on top or slightly angled forward.
- Limbs: Sew the arms to the sides of the body and the legs to the bottom. Since the legs are worked in rounds, they will sit nicely as “feet” for the sheep.
- The Tail: Attach the small fuzzy tail to the back of the body.
Tips for Success
Perfecting Your Amigurumi
If this is your first time making an amigurumi, don’t get discouraged! Here are a few professional tips to help you succeed:
Maintain Even Tension
When working with fuzzy yarn, it can be tricky to see your stitches. Use stitch markers religiously! A stitch marker will help you identify the beginning of a round so you don’t accidentally add or lose stitches.
Don’t Under-Stuff
It is tempting to stop stuffing once the piece feels “okay,” but for amigurumi, you want a firm shape. If the stuffing is too loose, the limbs might sag. However, be careful not to over-stuff to the point where the stitches stretch and show the white fiberfill underneath.
Hiding Your Ends
To make your sheep look professional, use your yarn needle to weave in all ends securely. Instead of just pulling the yarn through, weave it in a “zig-zag” pattern through the stitches to ensure it won’t pop out later.
Happy crocheting!