Adorable Amigurumi Hedgehog Crochet Pattern: A Step-by-Step Guide
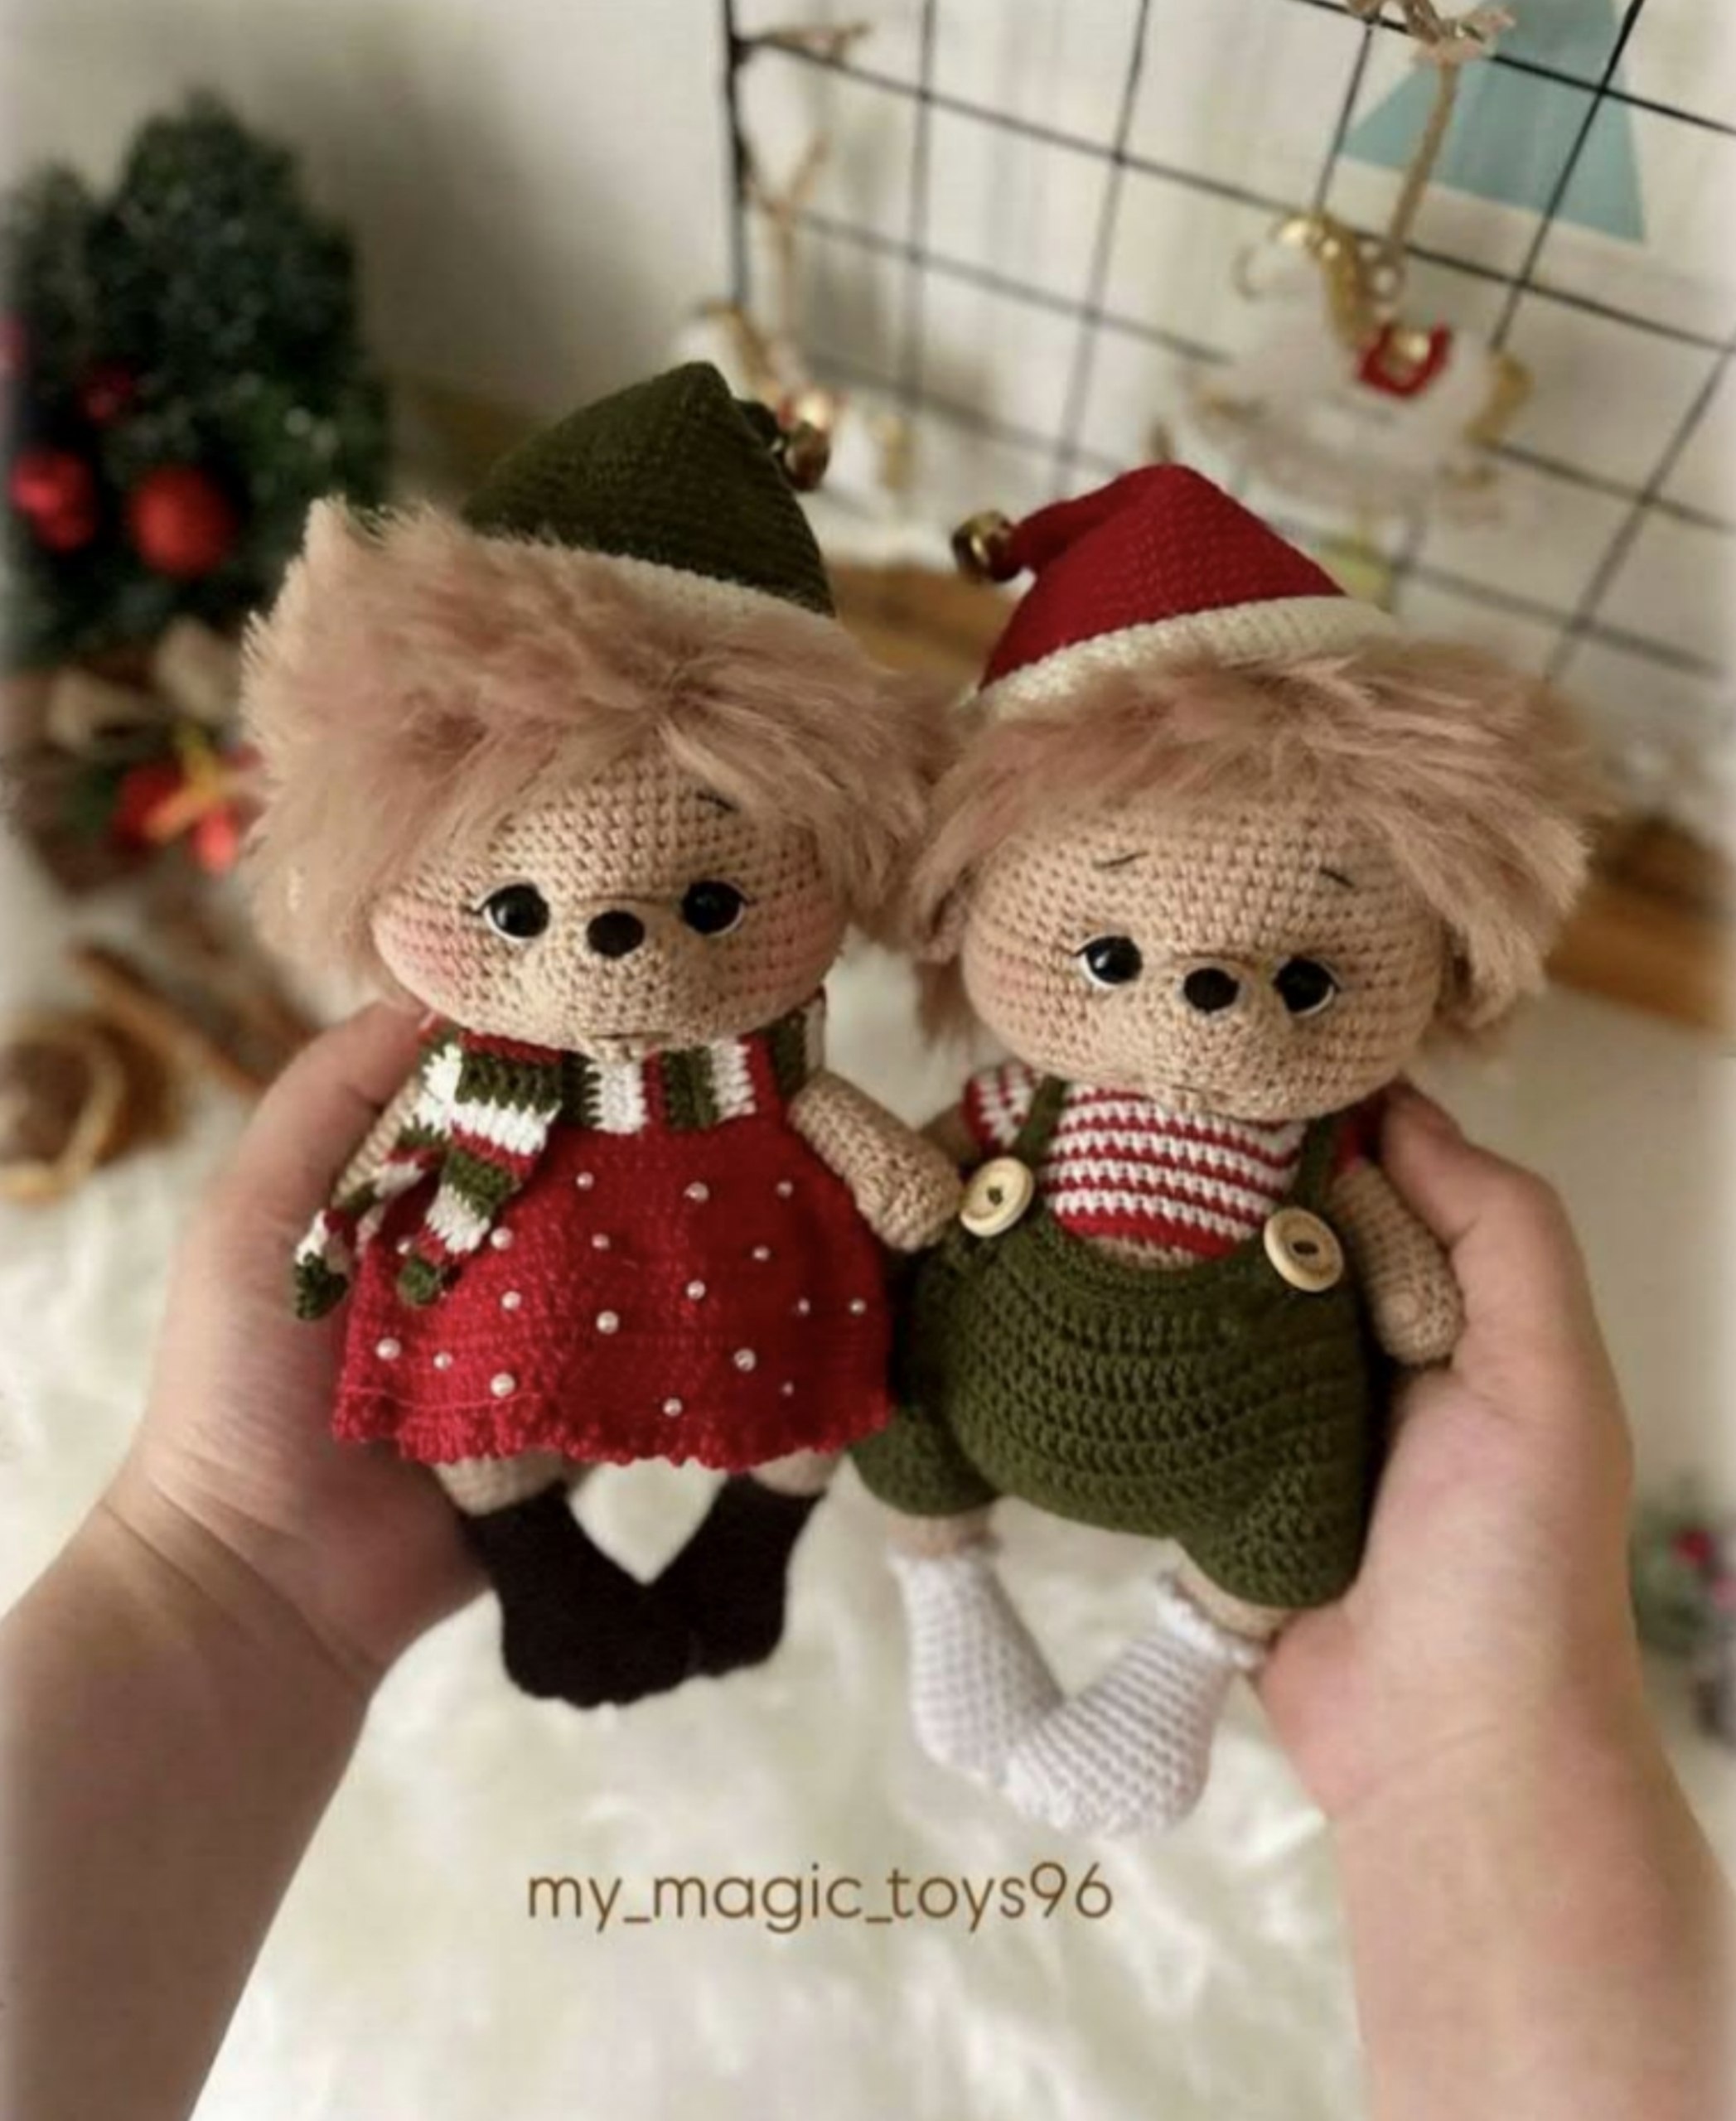
Are you looking for the perfect cozy project to brighten up your home or create a heartwarming gift? This adorable amigurumi hedgehog is a delightful project that captures the whimsical spirit of the season. With its fuzzy hair, tiny paws, and charming little outfits, these hedgehogs are perfect for holiday decor or as a unique nursery companion.
In this detailed tutorial, we will walk you through every single step, from crafting the tiny nose to sculpting the expressive face and crocheting adorable seasonal clothing. Whether you want to make a little boy hedgehog in green overalls or a sweet girl hedgehog in a red polka-dot dress, this pattern is versatile enough to satisfy your creativity!
Materials & Abbreviations
Before we pick up our hooks, let’s make sure you have everything you need. Because amigurumi requires tight stitches to keep the stuffing inside, I recommend using a slightly smaller hook than what is suggested for standard garments.
Required Materials
- Crochet Hooks:
- 2.0mm (for the main body)
- 2.25mm (for the hat)
- 2.5mm (for the clothing)
- 3.0mm (for the fluffy wig/hair)
- Yarn: Cotton or cotton-blend yarn in various colors (Skin/Beige for the body, Green, Red, White, Brown, and a “fluffy” yarn for the hair).
- Safety Eyes: 10mm to 12mm safety eyes.
- Stuffing: High-quality polyester fiberfill.
- Tools:
- A long embroidery needle (for face sculpting and sewing)
- A short embroidery needle (for facial details)
- Scissors
- Stitch markers
- Tailor’s pins
- Small buttons (8mm to 10mm)
- Small bells (optional, for the hat)
Abbreviations (US Terms)
- MR: Magic Ring
- ch: Chain
- sc: Single crochet
- hdc: Half double crochet
- dc: Double crochet
- inc: Increase (2 sc in the same stitch)
- dec: Decrease (sc 2 together)
- sl st: Slip stitch
- sl st (blo): Slip stitch in the back loop only
Note: Color changes should always be made on the last stitch of the previous color to ensure a clean transition.
Step-by-Step Instructions
The Nose
We start with the nose to help define the center of the face later.
- 6 sc in MR (6)
- (2 sc, 3 sc in one stitch) * 2 (10)
- (2 sc, inc, 1 sc, inc) * 2 (14)
- 3 sc, inc, 1 sc, inc, 4 sc, inc, 1 sc, inc, 1 sc (18)
- 5 sc, 3 sc in one stitch, 8 sl st, 3 sc in one stitch, 3 sc (22)
Fasten off and weave in the end.
The Head
The head is worked in continuous rounds to create a smooth sphere.
- 6 sc in MR (6)
- 6 inc (12)
- (1 sc, inc) * 6 (18)
- (inc, 2 sc) * 6 (24)
- (3 sc, inc) * 6 (30)
- 1 sc, inc, (4 sc, inc) * 5, 3 sc (36)
- (5 sc, inc) * 6 (42)
- 2 sc, inc, (6 sc, inc) * 5, 4 sc (48)
- (7 sc, inc) * 6 (54)
- 3 sc, inc, (8 sc, inc) * 5, 5 sc (60)
- Rounds 11-18: 60 sc (60) — 60 sc for 8 rounds.
Face Sculpting (The “Utyazhka” Technique)
This is the secret to making your hedgehog look alive! Use a double strand of yarn and a long needle. You will be pulling the thread through the head to create indentations for the eyes and muzzle.
Step 1: Creating the Eye Wells
Mark points 1 and 4 at the bottom of the head (between rounds 30-31). Mark points 2 and 6 on the outer edges of where the eyes will be, and points 3 and 5 on the inner edges.
Thread the needle: Enter at point 1, exit at 2, enter 3, exit 1, enter 4, exit 5, enter 6, and exit 4. Pull tight to create the eye sockets and press them in with your fingers.
Step 2: Refining the Eye Shape
Repeat a similar process by entering at point 1, exiting at 2, entering 3, exiting 1, entering 4, exiting 5, entering 6, and exiting 4, but focus on the inner corners to deepen the look.
Step 3: Shaping the Muzzle
Enter the needle at the back of the head (between rounds 18-19), exit at the upper inner corner of the eye (point 2), enter the lower inner corner (point 3), exit at the back of the head, enter point 1, exit point 4, enter point 5, and exit point 1. Pull to create the snout.
Step 4: Final Eye Depth
Enter at the bottom (points 1 and 4), exit at the lower inner corner (points 2 and 3). Pull to pull the eyes forward between the snout and the forehead.
Step 5: Shaping the Mouth
Enter the needle between rounds 8-9 of the nose (3 sc apart) and exit at the top of the head (between rounds 3-4). Pull to create the indentation for the mouth.
The Body
- 8 sc in MR (8)
- 8 inc (16)
- (1 sc, inc) * 8 (24)
- (3 sc, inc) * 6 (30)
- 1 sc, inc, (4 sc, inc) * 5, 3 sc (36)
- (5 sc, inc) * 6 (42)
- 2 sc, inc, (6 sc, inc) * 5, 4 sc (48)
- (7 sc, inc) * 6 (54)
- 3 sc, inc, (8 sc, inc) * 5, 5 sc (60)
- Rounds 10-15: 60 sc (60) — 6 rounds.
- (8 sc, dec) * 6 (54)
- 54 sc (54)
- 3 sc, dec, (7 sc, dec) * 5, 4 sc (48)
- 48 sc (48)
- 13 sc, (2 sc, dec) * 6, 11 sc (42)
- Rounds 21-22: 42 sc (42) — 2 rounds.
- 14 sc, (1 sc, dec) * 6, 10 sc (36)
- Rounds 24-25: 36 sc (36) — 2 rounds.
- (10 sc, dec) * 3 (33)
- 4 sc, dec, (9 sc, dec) * 2, 5 sc (30)
- (8 sc, dec) * 3 (27)
- 3 sc, dec, (7 sc, dec) * 2, 4 sc (24)
- (2 sc, dec) * 6 (18)
Stuff the body firmly before closing.
Limbs (Arms & Legs)
Upper Limbs (Arms)
- 8 sc in MR (8)
- 8 inc (16)
- Rounds 3-4: 16 sc (16) — 2 rounds.
- Right Arm: 2 sc, 2 dec, 2 sc, 4 dc in one stitch, 7 sc (14)
- Left Arm: 7 sc, 4 dc in one stitch, 2 sc, 2 dec, 2 sc (14)
- Rounds 7-19: 12 sc (12) — 13 rounds.
- Shaping: For the right arm, dec at specific intervals; for the left, adjust the offset.
- Fold in half and sc through both sides: 1 sc, 2 dec, 1 sc (4)
Lower Limbs (Legs/Socks)
The legs include a color change to create a “sock” effect.
- Ch 4, sc in 2nd ch from hook: 2 sc, 4 dc in one stitch, working on the other side of the chain: 4 dc in one stitch, 1 sc (8)
- 3 ch, sc in 2nd ch from hook: 2 sc, 2 sc in 1st finger, 6 sc, 3 dc in one stitch, 1 sc (12)
- 3 ch, sc in 2nd ch from hook: 2 sc, 2 sc in 1st finger, 2 sc in 2nd finger, 8 sc, 3 dc in one stitch, 1 sc (16)
- 3 ch, sc in 2nd ch from hook: 2 sc, 2 sc in 1st, 2 sc in 2nd, 2 sc in 3rd, 10 sc, 3 dc in one stitch, 3 sc in one stitch (22)
- Rounds 5-6: 22 sc (22) — 2 rounds.
- (9 sc, dec) * 2 (20)
- 9 sc, dec, 8 sc, dec (18)
- 8 sc, dec, 7 sc, dec (16)
- 7 sc, dec, 6 sc, dec (14)
- For right leg, no offset; for left leg, 7 stitch offset.
- Rounds 12-13: Follow pattern for tapering (14-16 sts).
- Stuff lightly after round 15, then more firmly. Fold and sc through both sides: 1 sc, 2 dec, 1 sc (6)
Facial Details, Ears & Wig
- Ears: 6 sc in MR (6), 6 inc (12), 3 rounds of 12 sc. Fold in half and sc through both sides (5-6 sc). Sew between rounds 19 and 20 of the head.
- Mouth: 6 sc in MR, ch, turn, 6 sc. Sew below the nose.
- Eyes: Use black thread to embroider the eye whites, lashes, and eyebrows.
- Wig: Using 3mm hook and fluffy yarn, work in rounds (6 sc in MR, then standard increases up to 66 sc). Work until it reaches the neck and covers the forehead.
Finishing
Clothing Options
The Festive Hat
Using a 2.25mm hook, work in rounds: MR 6, incs to 72 sc. Change color for the brim. Work 3 rounds of 72 sc, then work in the back loops only for 2 rounds to create a ridge. Finish with a bell on the tip.
The Striped Scarf
Worked in rows with a 2.5mm hook. Use multiple colors (Red, Green, White) to create stripes. Aim for a length of about 20 inches so it can wrap around the neck twice.
The Dress (For Girl Hedgehog)
Worked in rows using a 2.5mm hook. Use color changes for stripes. For the ruffled bottom, work in the front loops of the last rounds. Add small beads for decoration and a button at the back.
The Overalls (For Boy Hedgehog)
Crochet the shorts in green using a 2.5mm hook. For the straps, chain 32, then work 7 hdc, 4 ch, skip 4 stitches, 19 hdc, and sl st. Sew the straps to the back of the shorts and attach buttons to the front.
Assembly Tips
- Attach the Wig: Pin the wig to the head first. Sew it starting from the back, catching the back edge of the wig to hide the seam. Use a crochet hook to pull any stray fibers through the seam for a seamless look.
- Attach the Head: Sew the head to the body starting from the front, then work around to the back. Hide the yarn tails inside the head.
- Attach Limbs: Sew legs between rounds 13 and 14 of the body (approx. 0.75 inch apart). Sew arms between rounds 29 and 30 of the body (approx. 0.3 inches apart).
Tips for Success
Tension Matters: If your stuffing is visible, your stitches are too loose. Try a smaller hook or crochet more tightly.
Sculpting is Key: Don’t be afraid to pull the thread tight during the face sculpting phase. This is what gives the hedgehog its “personality” and prevents the eyes from looking flat.
Size Adjustments: The final size of your hedgehog will be approximately 8.5 inches tall. If you want a larger or smaller version, adjust your yarn weight and hook size accordingly.
Mixing Textures: Using a regular cotton yarn for the body and a “fluffy” or “eyelash” yarn for the wig creates a beautiful tactile contrast that makes the hedgehog look even more realistic.