Crochet Teddy Bear Pattern: A Complete DIY Amigurumi Tutorial
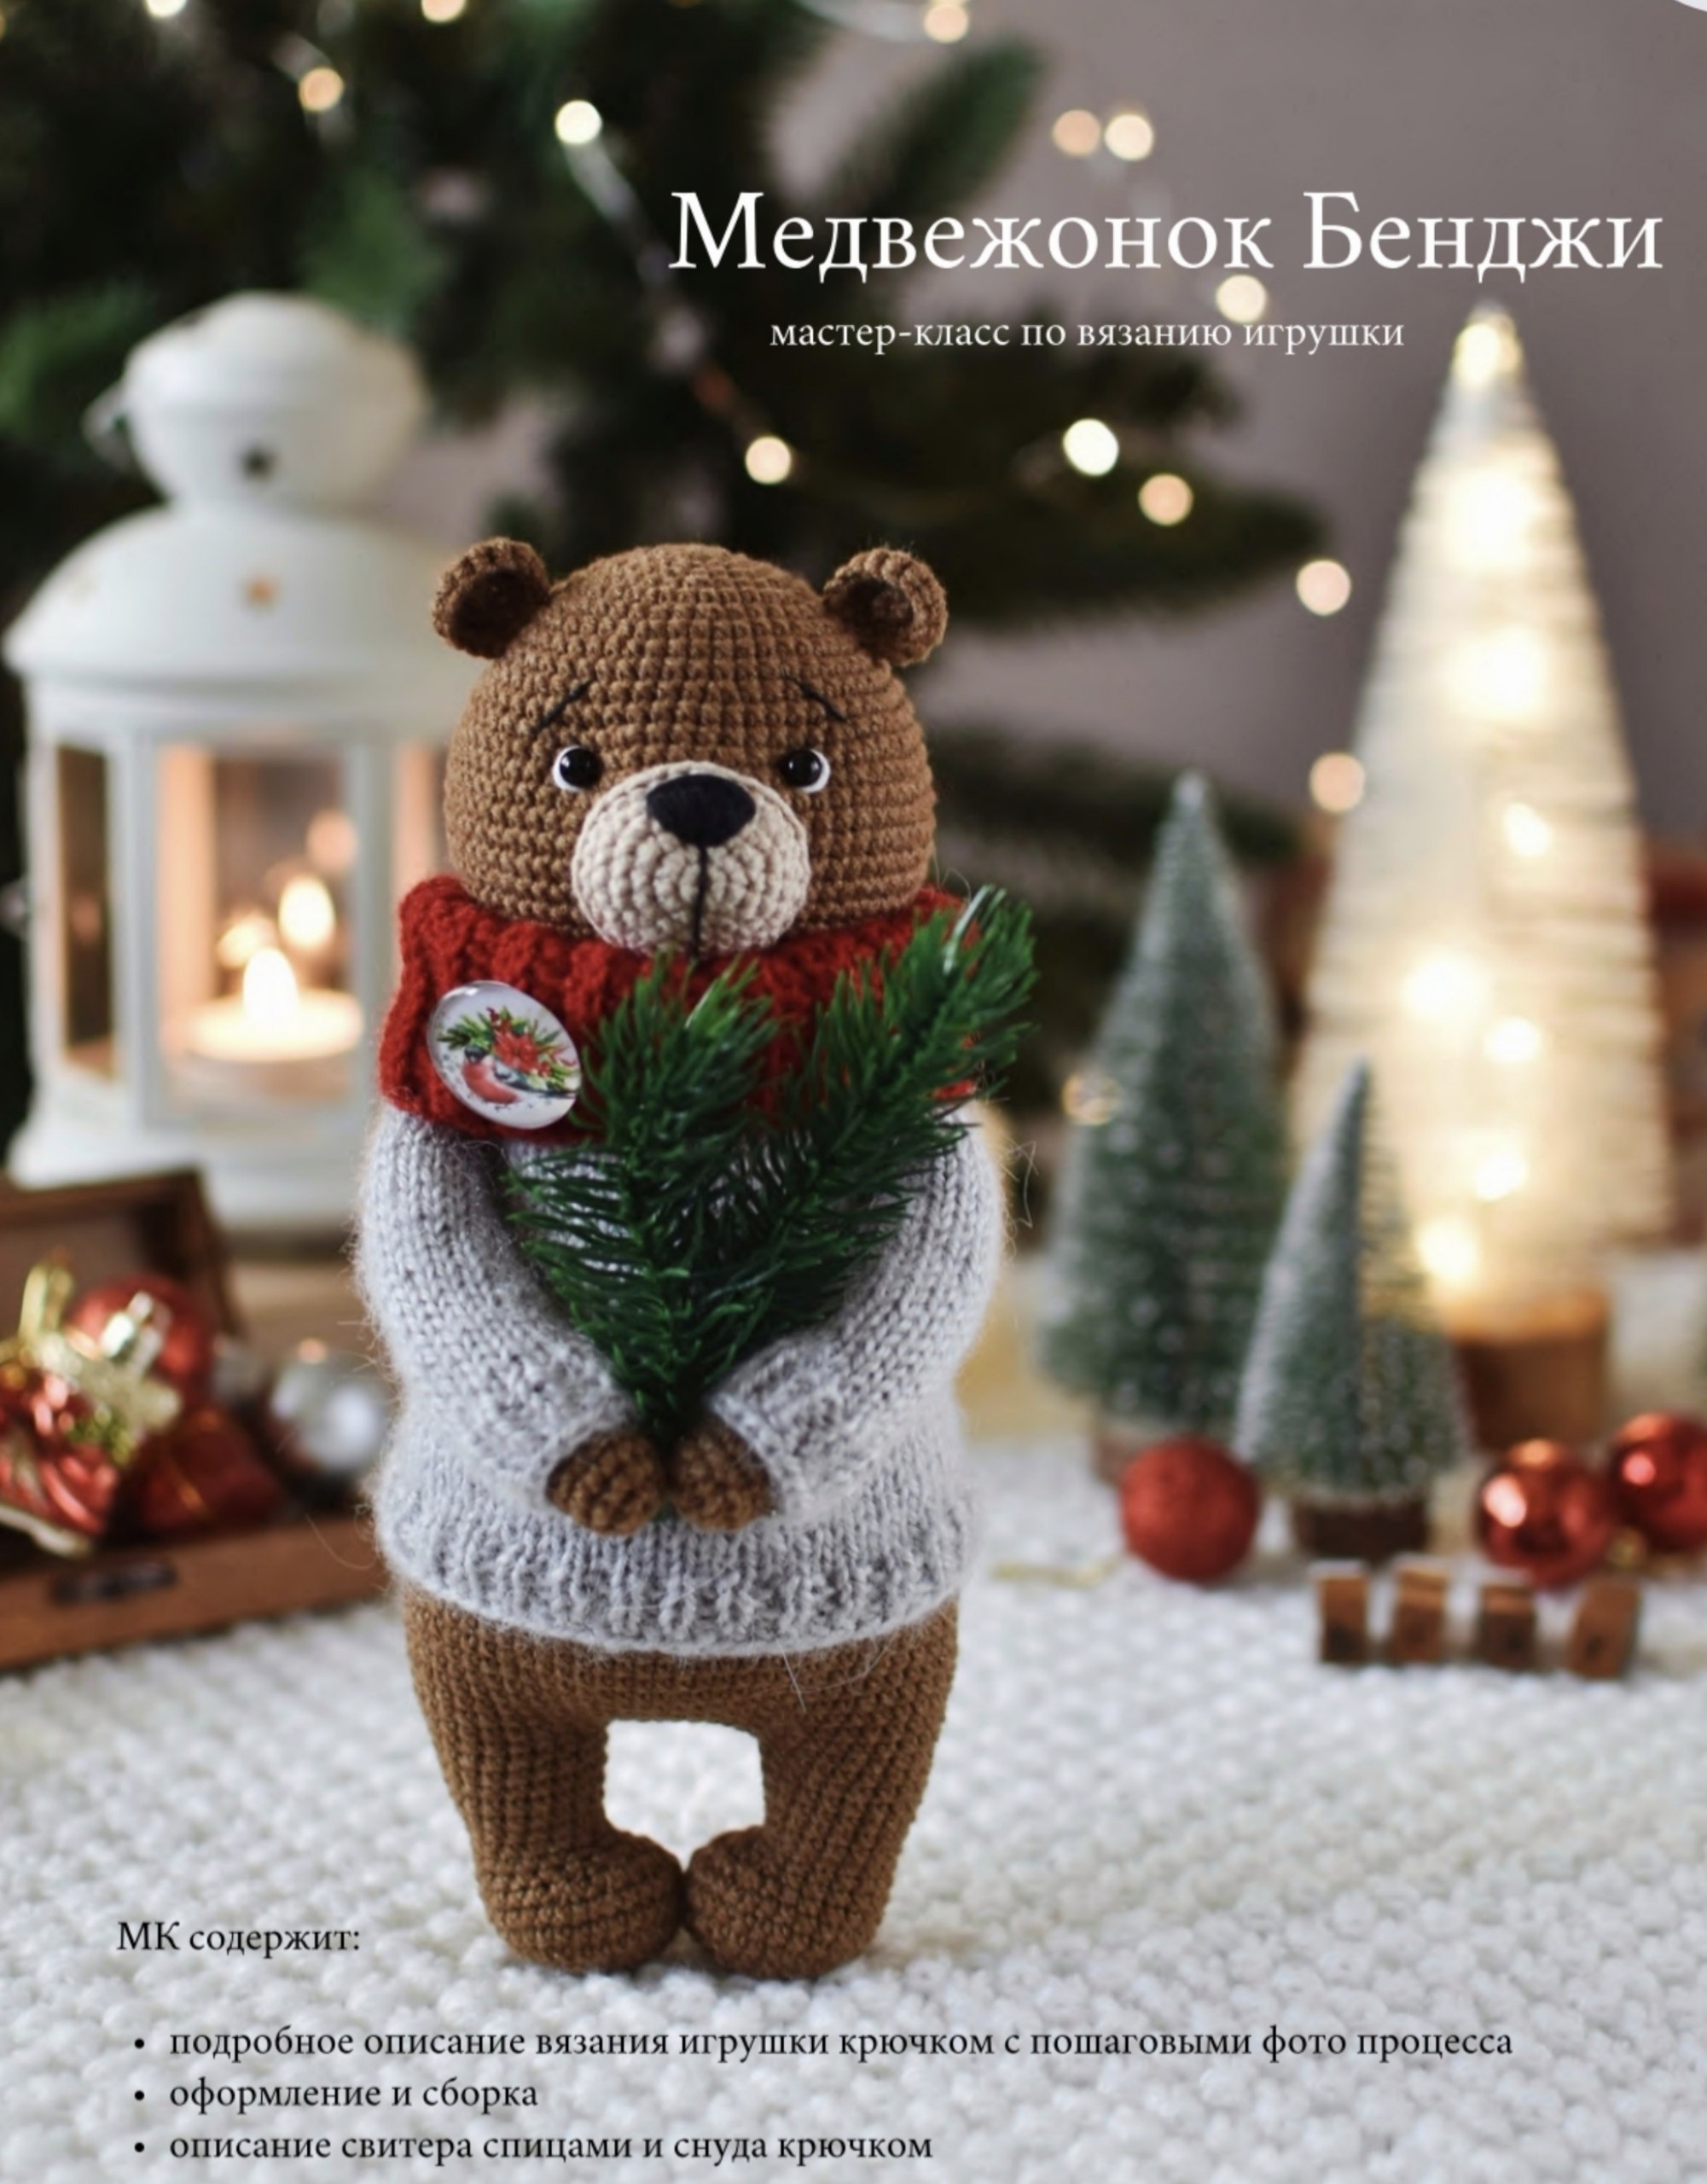
Are you looking for a cozy, heartwarming project to add to your handmade collection? This adorable crochet teddy bear is the perfect intermediate project for crafters who want to create a professional-looking, lifelike toy. Whether you are making it as a unique gift for a loved one or a charming nursery decoration, this bear—complete with a tiny knitted sweater and a bright red snood—is sure to bring a smile to anyone’s face.
This tutorial is designed to guide you through every step, from the initial magic ring to the final assembly. By the end of this project, you will have a charming companion approximately 9 inches tall.
Materials & Abbreviations
Materials Needed
- Yarn (Main Body): Medium weight cotton/acrylic blend (approx. 165 yards per 50g), color: Brown (e.g., #40).
- Yarn (Muzzle): Medium weight cotton/acrylic blend (approx. 165 yards per 50g), color: Cream/Beige (e.g., #87).
- Yarn (Sweater): Soft mohair or cotton blend (approx. 360 yards per 100g), color: Light Grey.
- Yarn (Snood): Medium weight wool blend (approx. 425 yards per 100g), color: Bright Red.
- Crochet Hook: 2mm.
- Knitting Needles: 2mm (a 5-needle set and circular needles).
- Stuffing: Poly-fill or hollowfiber.
- Eyes: 6mm black beads or safety eyes.
- Notions: Large tapestry needle, scissors, stitch markers, pins, black and white embroidery thread, one small button for the sweater, and a decorative brooch or button for the snood.
Abbreviations (US Terms)
- MR: Magic Ring
- ch: Chain
- sc: Single crochet
- inc: Increase (2 sc in one stitch)
- dec: Decrease (sc 2 together)
- hdc: Half double crochet
- sl st: Slip stitch
- BLO: Back loop only
- yo: Yarn over
- (…): Number of stitches in the row
- (…)*X: Repeat the sequence X times
Step-by-Step Instructions
Making the Head
Start with your main brown yarn.
- Row 1: 6 sc in MR (6)
- Row 2: inc in each st (12)
- Row 3: (1 sc, inc) * 6 (18)
- Row 4: 1 sc, inc, (2 sc, inc) * 5, 1 sc (24)
- Row 5: (3 sc, inc) * 6 (30)
- Row 6: 2 sc, inc, (4 sc, inc) * 5, 2 sc (36)
- Row 7: (5 sc, inc) * 6 (42)
- Row 8: 3 sc, inc, (6 sc, inc) * 5, 3 sc (48)
- Rows 9-10: 48 sc (2 rounds)
- Row 11: (7 sc, inc) * 6 (54)
- Row 12: 54 sc
- Row 13: 4 sc, inc, (8 sc, inc) * 5, 4 sc (60)
- Row 14: (9 sc, inc) * 6 (66)
- Rows 15-21: 66 sc (7 rounds)
- Row 22: (9 sc, dec) * 6 (60)
- Row 23: 4 sc, dec, (8 sc, dec) * 5, 4 sc (54)
- Row 24: (7 sc, dec) * 6 (48)
- Row 25: 3 sc, dec, (6 sc, dec) * 5, 3 sc (42)
- Row 26: (5 sc, dec) * 6 (36)
- Row 27: 2 sc, dec, (4 sc, dec) * 5, 2 sc (30)
- Row 28: (3 sc, dec) * 6 (24)
Fasten off, leaving a tail. Stuff the head firmly with poly-fill.
The Muzzle and Ears
The Muzzle
Use your cream/beige yarn.
- Row 1: 6 sc in MR (6)
- Row 2: inc in each st (12)
- Row 3: (1 sc, inc) * 6 (18)
- Row 4: 1 sc, inc, (2 sc, inc) * 5, 1 sc (24)
- Row 5: (3 sc, inc) * 6 (30)
- Row 6: 30 sc, sl st.
Fasten off, leaving a long tail for sewing.
The Ears (Make 2)
Use main brown yarn.
- Row 1: 7 sc in MR (7)
- Row 2: inc in each st (14)
- Row 3: 14 sc
Fasten off, leaving a long tail for sewing.
Creating the Arms
Make two arms using the main brown yarn. Stuff the bottom part and middle part firmly, but leave the top 1.2 inches (3cm) unstuffed.
- Row 1: 7 sc in MR (7)
- Row 2: inc in each st (14)
- Rows 3-14: 14 sc (12 rounds)
- Row 15: dec, 12 sc (13)
- Rows 16-25: 13 sc (10 rounds)
- Row 26: dec, 11 sc (12)
- Rows 27-32: 12 sc (6 rounds)
Fold the edges together and sc through both sides (6 sc). Fasten off and hide the tail.
The Legs and Main Body
This section is worked in one continuous piece to create the legs and the torso. Stuff firmly as you go.
- Row 1: 6 sc in MR (6)
- Row 2: inc in each st (12)
- Row 3: (1 sc, inc) * 6 (18)
- Row 4: 1 sc, inc, (2 sc, inc) * 5, 1 sc (24)
- Row 5: (3 sc, inc) * 6 (30)
- Rows 6-7: 30 sc (2 rounds)
- Row 8: 6 sc, (1 sc, dec) * 6, 6 sc (24)
- Row 9: 6 sc, dec, 6 sc (18)
- Row 10: 7 sc, 2 dec, 7 sc (16)
- Row 11: 16 sc
- Row 12: (inc, 7 sc) * 2 (18)
- Row 13: 18 sc
- Row 14: inc, 9 sc, inc, 7 sc (20)
- Rows 15-16: 20 sc (2 rounds)
To prepare for the second leg, work approximately 11 sc + 1 sl st. To ensure the legs face each other, place your marker on the inside of the body. Repeat the process for the second leg (using 2 sc for alignment). Do not fasten off.
- Row 17: 10 sc, ch 7, join to the first leg in the next stitch after the sl st. Work 20 sc around the first leg, 7 sc in the chains, and 10 sc (54)
- Row 18: 10 sc, inc, 5 sc, inc, 10 sc, inc, 9 sc, inc, 5 sc, inc, 9 sc, inc (60)
- Row 19: 60 sc
- Row 20: (9 sc, inc) * 6 (66)
- Rows 21-27: 66 sc (7 rounds)
- Row 28: 10 sc, dec, (20 sc, dec) * 2, 10 sc (63)
- Rows 29-31: 63 sc (3 rounds)
- Row 32: (19 sc, dec) * 3 (60)
- Rows 33-35: 60 sc (3 rounds)
- Row 36: (dec, 13 sc) * 4 (56)
- Rows 37-40: 56 sc (4 rounds)
- Row 41: (dec, 12 sc) * 4 (52)
- Rows 42-45: 52 sc (4 rounds)
- Row 46: (dec, 11 sc) * 4 (48)
- Rows 47-49: 48 sc (3 rounds)
- Row 50: (dec, 10 sc) * 4 (44)
- Rows 51-52: 44 sc (2 rounds)
- Row 53: (dec, 9 sc) * 4 (40)
- Rows 54-55: 40 sc (2 rounds)
- Row 56: (dec, 8 sc) * 4 (36)
- Row 57: 6 sc (attach first arm), 12 sc, 6 sc (attach second arm), 12 sc (36)
- Row 58: (4 sc, dec) * 6 (30)
- Row 59: 30 sc
- Row 60: (3 sc, dec) * 6 (24)
Fasten off and hide the yarn tail.
Finishing and Assembly
The “Live” Eye Technique
To give your bear a soul, follow this tensioning technique:
- Pin the muzzle onto the head between rows 14 and 25.
- Mark the eye positions (Points 1 and 2) between rows 14 and 15, roughly 3.5 inches (9 sc) apart.
- Mark the tension points (Points 3 and 4) by moving 0.4 inches (1 sc) outward from the eyes.
- Insert a long needle through the base of the head at Point 1 and pull it out at Point 3. Repeat for the other eye (Point 2 to Point 4). Pull tight to create the eye sockets and tie off.
- Attach the 6mm beads/eyes at the tension points. Use white thread to add small stitches around the eyes to make them look more lifelike.
Final Details
- Nose & Mouth: Use black thread to embroider the nose on the muzzle, followed by a small mouth and eyebrows.
- Ears: Pin the ears between rows 7 and 11 and sew them securely to the head.
- Head to Body: Pin the head to the body. Sew firmly around the circumference. If you notice a gap at the neck, add more stuffing before closing the seam completely.
The Accessories
The Knitted Sweater
Use your grey yarn and 2mm knitting needles. This is a raglan-style sweater worked in rows.
Cast on 32 stitches + 2 edge stitches. Work in rows.
- Row 1: Edge, 32 purl, edge (34)
- Row 2: Edge, 4 knit, raglan, 5 knit, raglan, 10 knit, raglan, 5 knit, raglan, 4 knit, edge (42)
- Row 3: Edge, all purl (use yarn overs for raglan lines to avoid holes), edge (42)
- Row 4: Edge, 40 knit, edge (42)
- Row 5: Edge, 5 purl, raglan, 7 purl, raglan, 12 purl, raglan, 7 purl, raglan, 5 purl, edge (50)
- Row 6: Edge, all knit (use yarn overs for raglan lines), edge (50)
- Row 7: Edge, 48 purl, edge (50)
- Row 8: Edge, 6 knit, raglan, 9 knit, raglan, 14 knit, raglan, 9 knit, raglan, 6 knit, edge (58)
- Row 9: Edge, all purl (yarn overs), edge (58)
- Row 10: Edge, 56 knit, edge (58)
- Row 11: Edge, 7 purl, raglan, 11 purl, raglan, 16 purl, raglan, 11 purl, raglan, 7 purl, edge (66)
- Row 12: Edge, all knit (yarn overs), edge (66)
- Row 13: Edge, 64 purl, edge (66)
- Row 14: Edge, 9 knit, pick up 13 sleeve stitches, 3 extra stitches, 20 knit, 13 sleeve stitches, 3 extra stitches, 9 knit, edge (46)
- Row 15: Edge, 44 purl, edge (46)
Transfer stitches to circular needles and distribute them: 11 + 12 + 12 + 11. Work in the round.
- Row 16: 46 knit
- Row 17: 5 knit, inc, (6 knit, inc) * 5, 5 knit (52)
- Rows 18-23: 52 knit (6 rows)
- Row 24: 5 knit, inc, (7 knit, inc) * 5, 6 knit (58)
- Rows 25-38: 58 knit (14 rows)
- Rows 39-42: (1 knit, 1 purl) * 29 (58) (4 rows)
Bind off loosely. For the button loop, use the remaining yarn from your cast-on to make a small chain of 6 (or desired length) and sew it onto the front.
The Crocheted Snood
Use your red yarn.
- Foundation: Chain 15 + 1 ch for height. Work in rows.
- Rows 1-40: 15 hdc in BLO. To avoid holes, work the last stitch of every row through both loops.
Sew the ends together using slip stitches and decorate with a brooch or button.
Tips
- Sweater Care: You can lightly hand-wash the knitted sweater. Doing so helps the button loop settle into a more natural shape, making the garment look even more professional.
- Tension Matters: Since this project uses very fine 2mm hooks and needles, keep your tension consistent to ensure the stuffing doesn’t peek through the stitches.
- Customization: Don’t be afraid to swap colors! A blue sweater or a yellow snood can completely change the bear’s personality.