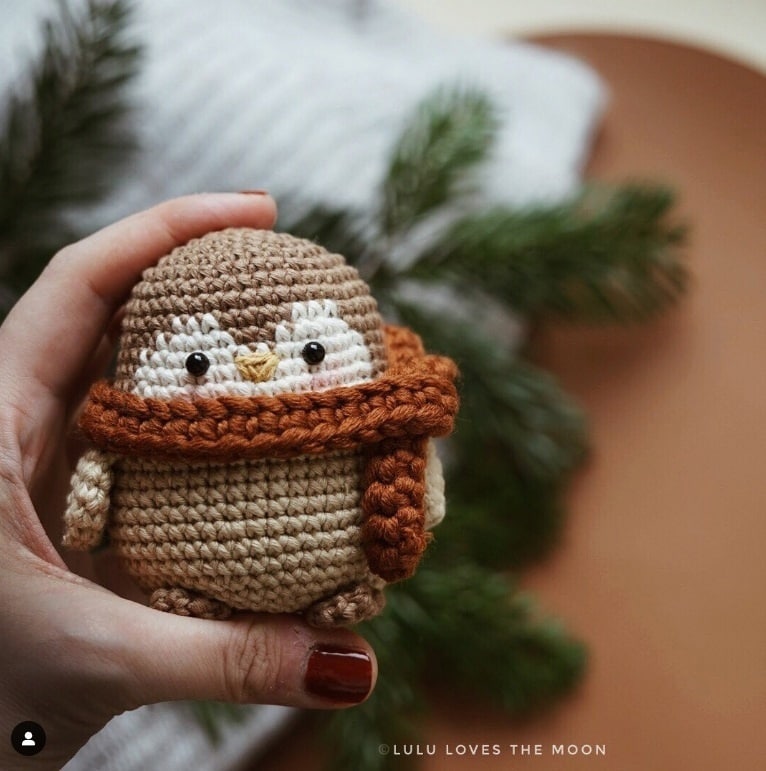
Adorable Mini Crochet Penguin Pattern: Free Step-by-Step Tutorial
Looking for a quick and cozy project to brighten up your winter crafting? There is nothing quite as charming as a tiny penguin! Whether you want to create a sweet ornament for your holiday tree, a cute keychain, or a small gift for a loved one, this mini penguin is the perfect project. This pattern is designed to be beginner-friendly, using basic amigurumi techniques to create a plump, huggable little bird.
In this tutorial, we will guide you through creating the penguin’s body, its cozy winter accessories, and the final assembly. By the end, you’ll have a festive little companion that is sure to bring a smile to anyone’s face. Let’s grab our hooks and get started!
Materials & Abbreviations
To ensure your penguin turns out perfectly, gather the following materials. We recommend using a cotton blend yarn for a clean, defined stitch that holds its shape well.
Materials Needed
- Yarn: Sport weight cotton blend yarn in the following colors:
- Color A: Light Gray or White (Body)
- Color B: Dark Gray or Black (Head, Wings, and Feet)
- Color C: White (Belly Patch)
- Accent Colors: Red and White for the hat, and Green for the scarf.
- Crochet Hook: 2.5mm (or a size that works best with your yarn to keep stitches tight).
- Safety Eyes: 5mm black safety eyes.
- Stuffing: High-quality polyester fiberfill.
- Tools: Yarn needle, scissors, and a small decorative button for the scarf.
- Extras: A small amount of gold thread for the hanging loop and pink blush or fabric marker for the cheeks.
Abbreviations (US Terms)
- MR: Magic Ring
- sc: Single Crochet
- inc: Increase (2 sc in the same stitch)
- dec: Decrease (sc 2 together)
- ch: Chain
- hdc: Half Double Crochet
- sl st: Slip Stitch
- (…) x6: Repeat the instructions inside the parentheses 6 times
Step-by-Step Instructions
Head and Body
The head and body are worked as one continuous piece from the top down. We will switch colors to create the cute white belly patch.
Round 1: Start with Color B. 6 sc in MR (6)
Round 2: 6 inc (12)
Round 3: (1 sc, 1 inc) x 6 (18)
Round 4: (2 sc, 1 inc) x 6 (24)
Round 5: (3 sc, 1 inc) x 6 (30)
Round 6: 2 sc, inc, (4 sc, inc) x 5, 2 sc (36)
Round 7: (5 sc, inc) x 6 (42)
Round 8: sc in each stitch around (42)
Round 9: 16 sc in Color B, 3 sc in Color C, 4 sc in Color B, 3 sc in Color C, 16 sc in Color B (42)
Round 10: 15 sc in Color B, 5 sc in Color C, 2 sc in Color B, 5 sc in Color C, 15 sc in Color B (42)
Rounds 11-14: 14 sc in Color B, 14 sc in Color C, 14 sc in Color B (42)
Important Note: Place your safety eyes between rounds 11 and 12, approximately 4 stitches apart. Now, begin stuffing the head firmly with fiberfill and continue stuffing as you work the rest of the body.
Round 15: (6 sc, inc) x 6 (48)
Rounds 16-20: sc in each stitch around (48)
Round 21: (7 sc, inc) x 6 (54)
Rounds 22-23: sc in each stitch around (54)
Round 24: (7 sc, dec) x 6 (48)
Round 25: sc in each stitch around (48)
Round 26: (4 sc, dec) x 8 (40)
Round 27: (3 sc, dec) x 8 (32)
Round 28: (2 sc, dec) x 8 (24)
Round 29: (1 sc, dec) x 8 (16)
Round 30: 8 dec (8)
Fasten off and weave in the ends securely inside the body.
Wings (Make 2)
Use Color B for the wings.
Round 1: 6 sc in MR (6)
Round 2: (inc, 2 sc) x 2 (8)
Round 3: (1 sc, inc) x 4 (12)
Round 4: sc in each stitch around (12)
Round 5: (2 sc, dec) x 3 (9)
Fold the opening in half and crochet 4 sc across the two sides to close the wing. Fasten off, leaving a long tail for sewing.
Feet (Make 2)
Use Color B for the feet.
Round 1: 6 sc in MR (6)
Round 2: (inc, 2 sc) x 2 (8)
Round 3: sc in each stitch around (8)
Fold the opening in half and crochet 4 sc across the two sides to close the foot. Fasten off, leaving a tail for sewing.
The Winter Hat
Start with Red yarn. Leave a long tail at the beginning to sew on a pompom later.
Round 1: Ch 8, starting in the 3rd chain from the hook: 5 hdc, join with a sl st to the first hdc (6)
Round 2: Ch 2, (2 hdc, inc) x 2, join with sl st (8)
Round 3: Ch 2, (hdc, inc) x 4, join with sl st (12)
Round 4: Ch 2, (2 hdc, inc) x 4, join with sl st (16)
Round 5: Ch 1, sc in each stitch around, join with sl st (16)
Fasten off, leaving a tail for sewing. Create a small white pompom and attach it to the top of the hat.
The Cozy Scarf
Use Green yarn.
Row 1: Ch 71. Starting in the 2nd chain from the hook: inc, 68 sc, 3 sc in the last chain to turn the corner, 69 sc, join with a sl st.
Fasten off and weave in the ends.
Finishing Touches
Now it is time to bring your penguin to life with some assembly!
- Beak: Using yellow yarn and your needle, embroider a small triangle beak between the eyes on Round 12. The beak should be 2 stitches wide.
- Assembly: Sew the wings to the sides of the body. Sew the feet to the bottom of the body, approximately 7 rounds up from the very last round.
- Accessories: Wrap the scarf around the penguin’s neck and sew a small button onto the front for a polished look. Sew the hat onto the top of the head.
- Details: Use a tiny bit of pink blush or a pink marker to give your penguin rosy cheeks. Finally, use gold thread to create a small loop at the top of the hat if you wish to hang it as an ornament.
Tips for Success
To make your mini penguin look professional, keep these tips in mind:
- Tension is Key: When working with amigurumi, keep your stitches tight. If you see gaps where the stuffing is peeking through, try dropping down half a hook size.
- Stitch Markers: Because we are working in continuous spirals, it is very easy to lose track of your rounds. Always use a stitch marker in the first stitch of every row.
- Invisible Decreases: For the cleanest look, use the “invisible decrease” method. Instead of a regular decrease, insert your hook into the front loop of the first stitch and then the front loop of the second stitch, completing the sc. This prevents gaps in the fabric.
- Perfect Stuffing: Stuff your penguin firmly but avoid overstuffing, which can stretch the stitches and make the shape look distorted.