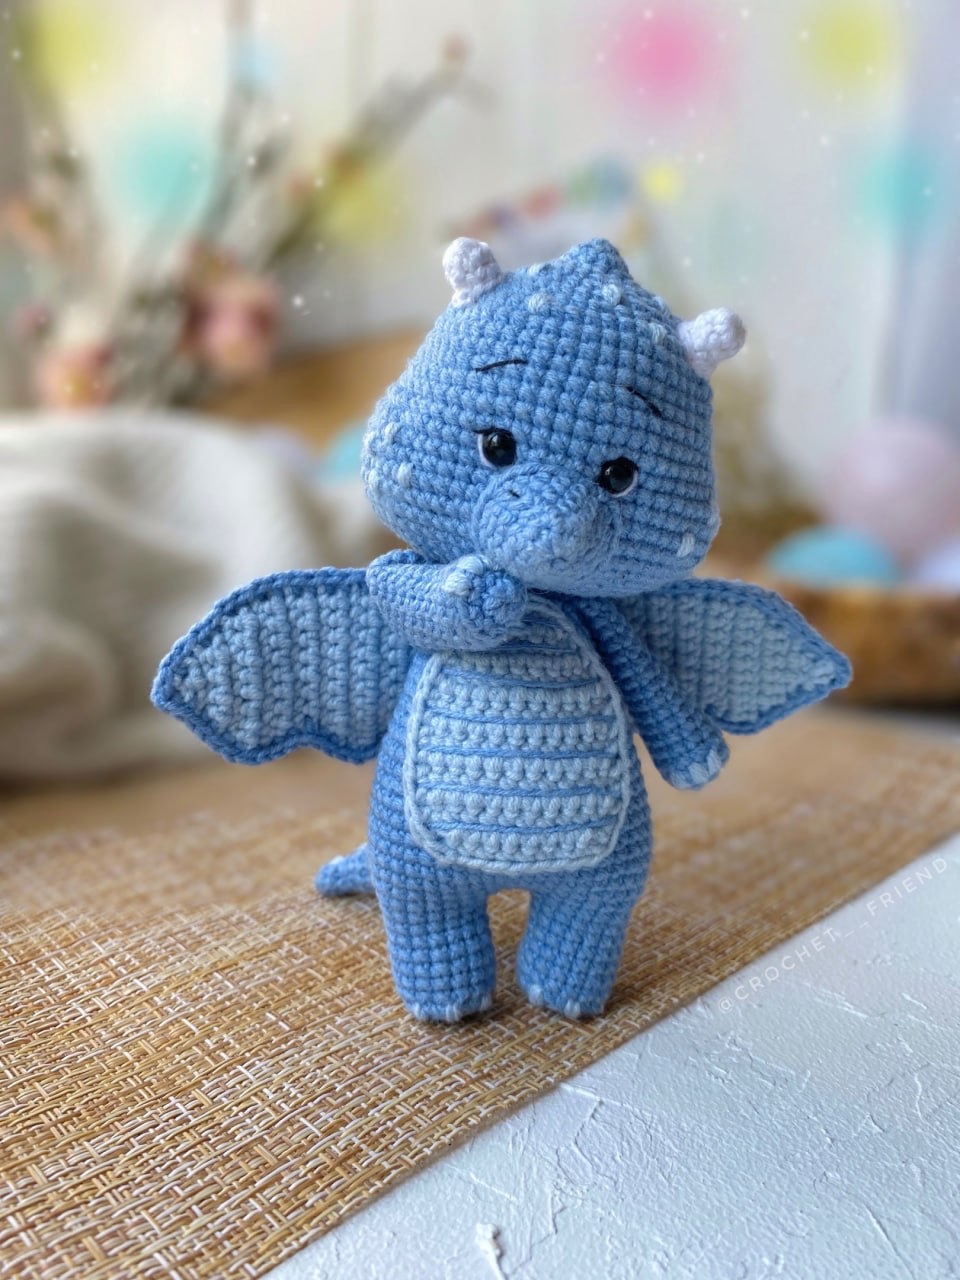
Crochet Mini Dragon Amigurumi Tutorial: A Cute Beginner-Friendly Pattern
Are you looking for your next adorable crochet project? This Mini Dragon Amigurumi is the perfect addition to your collection! Small enough to sit on a desk or serve as a charming nursery decoration, this little dragon is full of personality. This pattern is designed to be accessible for beginners or intermediate crocheters looking for a quick and rewarding project. Once finished, your dragon will stand approximately 4.7 inches tall, making it a perfect little companion.
Materials & Abbreviations
To ensure your dragon turns out as cute as the photos, I recommend using a cotton-blend yarn to keep the stitches crisp and defined.
Materials Needed
- Yarn: A cotton/acrylic blend (like Alize Cotton Gold Hobby or Yarnart Jeans) in the following colors:
- Main Color: Blue
- Secondary Color: Light Blue
- Accent Color: White
- Safety Eyes: 6 mm
- Embroidery Thread: Black and white for facial details
- Stuffing: Fiberfill or any similar polyester stuffing
- Crochet Hook: 1.75 mm (or a size that creates tight stitches for amigurumi)
- Other: Scissors, a yarn needle, and a long embroidery needle
Abbreviations (US Terms)
- MR: Magic Ring
- sc: Single Crochet
- inc: Increase (2 sc in one stitch)
- dec: Decrease (sc 2 stitches together)
- ch: Chain
- sl st: Slip Stitch
- BLO: Back Loop Only
- st(s): Stitch(es)
Step-by-Step Instructions
The Arms (Make 2)
Use Blue yarn. Note: Only stuff the arms halfway!
- Row 1: 6 sc in MR (6)
- Row 2: 6 inc (12)
- Row 3: 12 sc in BLO (12)
- Rows 4-18: 12 sc (15 rows total)
Fold the arm in half and crochet 6 sc through both layers to close the top. Fasten off, leaving a tail for sewing.
The Legs and Body
Use Blue yarn. Stuff the legs as you work.
- Row 1: 8 sc in MR (8)
- Row 2: 8 inc (16)
- Row 3: 16 sc in BLO (16)
- Rows 4-9: 16 sc (6 rows total)
For the first leg, fasten off and leave a tail. For the second leg, do not fasten off. Chain 3, then join the second leg to the first leg with a slip stitch to continue working in the round.
- Row 10: 16 sc around the first leg, 3 sc in the ch-3 space, 16 sc around the second leg, 3 sc in the ch-3 space (38)
- Row 11: 7 sc, inc, [9 sc, inc] repeat 3 times (42)
- Row 12: [6 sc, inc] repeat 6 times (48)
- Rows 13-18: 48 sc (6 rows)
- Row 19: [6 sc, dec] repeat 6 times (42)
- Rows 20-22: 42 sc (3 rows)
- Row 23: [5 sc, dec] repeat 6 times (36)
- Rows 24-26: 36 sc (3 rows)
- Row 27: [4 sc, dec] repeat 6 times (30)
- Rows 28-30: 30 sc (3 rows)
- Row 31: [3 sc, dec] repeat 6 times (24)
Joining the Arms (Row 32): 3 sc, 6 sc through both the arm and the body at once, 6 sc, 6 sc through both the second arm and the body at once, 3 sc (24).
Row 33: [2 sc, dec] repeat 6 times (18).
Fasten off and leave a long tail for sewing.
The Tail
Use Blue yarn.
- Row 1: 6 sc in MR (6)
- Rows 2-4: 6 sc (3 rows)
- Row 5: [1 sc, inc] repeat 3 times (9)
- Rows 6-8: 9 sc (3 rows)
- Row 9: [2 sc, inc] repeat 3 times (12)
- Rows 10-12: 12 sc (3 rows)
- Row 13: [3 sc, inc] repeat 3 times (15)
- Rows 14-16: 15 sc (3 rows)
- Row 17: [4 sc, inc] repeat 3 times (18)
- Rows 18-20: 18 sc (3 rows)
Fasten off, leaving a long tail for sewing. Stuff the tail firmly.
The Belly Patch
Use Light Blue yarn. This piece is worked in rows.
- Row 1: Ch 4. In the 2nd ch from the hook, work 3 sc. Ch 1, turn (3)
- Row 2: inc, 1 sc, inc, ch 1, turn (5)
- Row 3: inc, 3 sc, inc, ch 1, turn (7)
- Row 4: inc, 5 sc, inc, ch 1, turn (9)
- Row 5: inc, 7 sc, inc, ch 1, turn (11)
- Rows 6-13: 11 sc, ch 1, turn (8 rows)
- Row 14: dec, 7 sc, dec, ch 1, turn (9)
- Row 15: dec, 5 sc, dec, ch 1, turn (7)
Edge the entire shape with a single crochet round. Fasten off, leaving a long tail for sewing.
The Wings (Make 2)
Use Light Blue yarn. Important: To make the wings mirror images of each other, you must work one from the top down and the other from the bottom up.
- Row 1: Ch 5. In the 2nd ch from the hook, work 4 sc. Ch 1, turn (3)
- Row 2: inc, 2 sc, inc, ch 1, turn (6)
- Row 3: inc, 4 sc, inc, ch 1, turn (8)
- Row 4: 7 sc, inc, ch 1, turn (9)
- Row 5: inc, 8 sc, ch 1, turn (10)
- Row 6: 9 sc, inc, ch 1, turn (11)
- Row 7: inc, 10 sc, ch 1, turn (12)
- Row 8: 10 sc, dec, ch 1, turn (11)
- Row 9: dec, 9 sc, ch 1, turn (10)
- Row 10: 8 sc, dec, ch 1, turn (9)
- Row 11: dec, 7 sc, ch 1, turn (8)
- Row 12: 7 sc, inc, ch 1, turn (9)
- Row 13: inc, 8 sc, ch 1, turn (10)
- Row 14: 9 sc, inc, ch 1, turn (11)
- Row 15: dec, 7 sc, dec, ch 1, turn (9)
- Row 16: dec, 5 sc, dec, ch 1, turn (7)
- Row 17: dec, 3 sc, dec, ch 1, turn (5)
- Row 18: dec, 1 sc, dec, ch 1, turn (3)
- Row 19: dec, 1 sc, ch 1, turn (2)
- Row 20: dec (1)
Assembly: Crochet a second wing in Blue yarn (do not cut thread). Make an additional ch. Layer the light blue wing on top of the blue wing. Crochet around the entire edge with sc, working 2 sc in each corner to create a rounded shape.
The Head
Use Blue yarn.
- Row 1: 6 sc in MR (6)
- Row 2: [1 sc, inc] repeat 3 times (9)
- Row 3: [2 sc, inc] repeat 3 times (12)
- Row 4: [1 sc, inc] repeat 6 times (18)
- Row 5: 1 sc, inc, [2 sc, inc] repeat 5 times, 1 sc (24)
- Row 6: [3 sc, inc] repeat 6 times (30)
- Row 7: 2 sc, inc, [4 sc, inc] repeat 5 times, 2 sc (36)
- Row 8: [5 sc, inc] repeat 6 times (42)
- Row 9: 3 sc, inc, [6 sc, inc] repeat 5 times, 3 sc (48)
- Rows 10-12: 48 sc (3 rows)
- Row 13: [7 sc, inc] repeat 6 times (54)
- Rows 14-15: 54 sc (2 rows)
- Row 16: 9 sc, 6 inc, 20 sc, 6 inc, 13 sc (66)
Eye Holes: In the next row, create spaces for the safety eyes. If using sew-on eyes, simply continue with 66 sc. To create holes: 27 sc, ch 1, skip 1 st, 6 sc, ch 1, skip 1 st, 31 sc (66).
Rows 18-22: 66 sc (5 rows).
Stuff the head as you go, paying special attention to the cheeks to give them a cute, rounded shape.
Row 23: [9 sc, dec] repeat 6 times (60)
Fasten off and leave a long tail for sewing.
The Muzzle
Use Blue yarn.
- Row 1: 6 sc in MR (6)
- Row 2: [1 sc, inc] repeat 3 times (9)
- Row 3: [2 sc, inc] repeat 3 times (12)
- Row 4: [3 sc, inc] repeat 3 times (15)
- Row 5: [4 sc, inc] repeat 3 times (18)
- Row 6: [5 sc, inc] repeat 3 times, sl st (21)
Stuff the muzzle and sew it to the head just below where the eyes are placed.
The Horns (Make 2)
Use White yarn.
- Row 1: 6 sc in MR (6)
- Row 2: 6 sc (6)
- Row 3: [1 sc, inc] repeat 3 times, sl st (9)
Fasten off, leaving a long tail for sewing. Sew the horns onto the top of the head.
Finishing
Eye Tensioning
To ensure your dragon’s eyes look perfectly placed and not “sunken,” use this professional trick: Take a long needle and some main color yarn. Insert the needle at the bottom of the head and bring it up at the eye (Point 1). Move 1 sc away, insert the needle, and bring it out at the opposite eye (Point 3). Move 1 sc over and bring the needle back out at the bottom of the head (Point 4). Pull the thread tight, but not so tight that the eyes sink into the head. Tie off with two knots and hide the ends inside.
Embroidery and Assembly
- Face: Use thin white thread to embroider the whites of the eyes. Use thin black thread to embroider eyelashes, eyebrows, and nostrils.
- Details: Use light blue thread to embroider small scales on the head and cheeks, as well as on the tail. Embroider tiny claws on the hands and feet.
- Body Assembly:
- Sew the head to the body.
- Sew the belly patch to the body (embroider the line details on the belly with blue yarn).
- Sew the tail to the back.
- Sew the wings to the back.
Tips for Success
- Tight Stitches: When working with amigurumi, aim for very tight tension. This prevents the stuffing from showing through your stitches.
- Mirroring: When making the wings, don’t forget the “mirror” instruction. If you don’t work one wing in the opposite direction, they won’t sit symmetrically on the dragon’s back.
- Shaping: When stuffing the head, use your fingers to push the stuffing toward the cheeks. This creates that adorable, chubby dragon look!
- Patience with Eyes: Take your time with the eye tensioning. It is the most important step for giving your dragon its “soul” and expression.