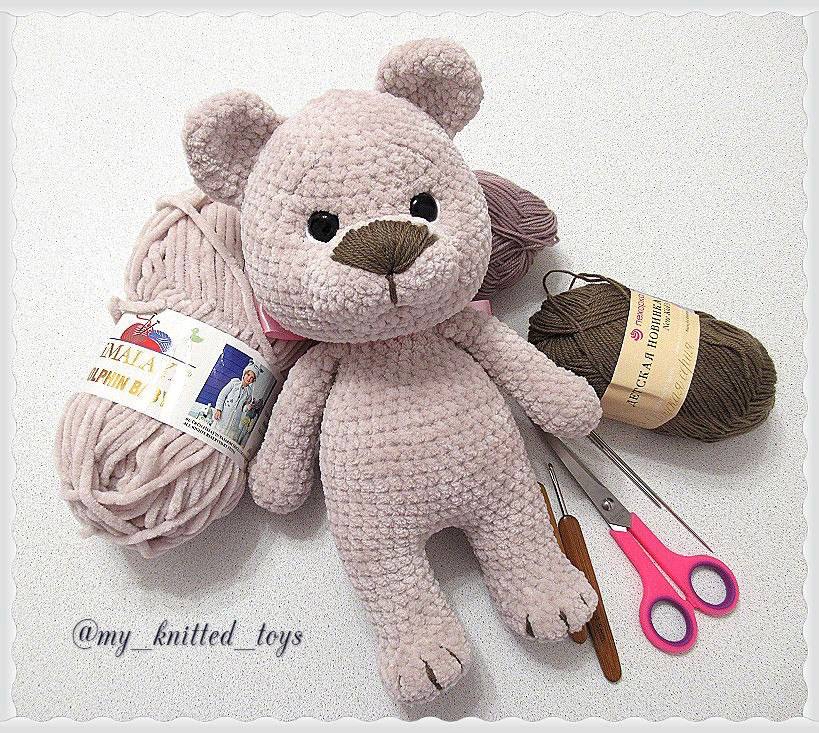
Free Plush Teddy Bear Crochet Pattern: Step-by-Step Amigurumi Guide
There is nothing quite like the cozy, huggable feel of a handmade plush toy. If you are looking for your next cuddle-worthy project, this free plush teddy bear crochet pattern is exactly what you need! Perfect for baby showers, birthday gifts, or just a sweet addition to your own nursery decor, this chunky amigurumi bear is incredibly soft and satisfyingly quick to make.
This beginner-friendly tutorial uses super bulky chenille-style yarn to create a delightfully squishy teddy bear. We will walk you through every step, from crocheting the contrast paw pads to shaping the adorable facial features. Grab your hooks, settle into your favorite crafting chair, and let’s get started!
Materials & Abbreviations
Materials Needed:
- Primary Yarn: Approx. 4.6 oz (approx. 130 yards) of Super Bulky (Category 6) plush chenille yarn (such as Himalaya Dolphin Baby or Bernat Blanket) in your chosen bear color.
- Secondary Yarn: Approx. 0.15 oz of Sport or Worsted weight acrylic or semi-cotton yarn in a contrasting color for the paw pads.
- Crochet Hooks:
- Size E/4 (3.5 mm) crochet hook (for the main plush body)
- Size B/1 (2.0 mm) crochet hook (for the paw pads and details)
- Safety Eyes: One pair of 18 mm (approx. 0.7 inches) safety eyes.
- Stuffing: Approx. 8.8 oz of premium polyester fiberfill.
- Tools: Tapestry needle, strong thread for face sculpting, dark embroidery floss/yarn for the nose and eyebrows, stitch markers, scissors, and a decorative satin ribbon.
Abbreviations (US Terms):
- ch: chain
- sc: single crochet
- inc: increase (work 2 single crochets into the same stitch)
- dec: decrease (invisible single crochet decrease recommended)
- st(s): stitch(es)
- MR: Magic Ring / Magic Circle
Step-by-Step Instructions
Legs (Make 2)
We begin by making the feet using the thinner acrylic/semi-cotton yarn and the smaller 2.0 mm hook to create smooth, neat paw pads, before transitioning to our plush yarn.
Using 2.0 mm hook and acrylic/semi-cotton yarn:
- Rnd 1: Work 6 sc into a MR. (6 sts)
- Rnd 2: Work 6 inc. (12 sts)
- Rnd 3: [1 sc, inc] x 6. (18 sts)
- Rnd 4: [2 sc, inc] x 6. (24 sts)
- Rnd 5: [3 sc, inc] x 6. (30 sts)
Switch to plush yarn (still using the 2.0 mm hook for one round to transition smoothly):
- Rnd 6: 30 sc around. (30 sts)
Switch to 3.5 mm hook:
- Rnd 7: 30 sc around. (30 sts)
- Rnd 8: 7 sc, 8 dec, 7 sc. (22 sts)
- Rnd 9: 5 sc, 6 dec, 5 sc. (16 sts)
- Rnds 10-15: 16 sc around. (16 sts for 6 rounds)
Fasten off the yarn for both legs, weave in the loose ends, and stuff the legs firmly with polyester fiberfill.
Body
The body and head of this plush bear are worked in one continuous piece. We will join the legs together in the first round of the body.
- Rnd 16: Position the legs side-by-side facing forward. Take the first leg and, starting from the inner middle side, work 16 sc around it. Chain 3, then join to the second leg. Work 16 sc around the second leg, and then work sc along both sides of the joining chain to end up with a total of 42 stitches around. (42 sts)
Tip: If you end up with slightly more or fewer stitches, adjust with minor increases or decreases in the next round to ensure you have exactly 42 stitches. - Rnds 17-26: 42 sc around. (42 sts for 10 rounds)
- Rnd 27: [5 sc, dec] x 6. (36 sts)
- Rnd 28: 36 sc around. (36 sts)
- Rnd 29: [4 sc, dec] x 6. (30 sts)
- Rnd 30: 30 sc around. (30 sts)
- Rnd 31: [3 sc, dec] x 6. (24 sts)
- Rnds 32-33: 24 sc around. (24 sts for 2 rounds)
- Rnd 34: [2 sc, dec] x 6. (18 sts)
- Rnds 35-36: 18 sc around. (18 sts for 2 rounds)
Stuff the body firmly with fiberfill as you progress, paying close attention to the hip area.
Head
We will now transition directly into the head without fastening off.
- Rnd 37: Work 18 inc. (36 sts)
- Rnd 38: 36 sc around. (36 sts)
- Rnd 39: [1 sc, inc] x 18. (54 sts)
- Rnds 40-49: 54 sc around. (54 sts for 10 rounds)
- Rnd 50: [7 sc, dec] x 6. (48 sts)
- Rnd 51: 48 sc around. (48 sts)
- Rnd 52: [6 sc, dec] x 6. (42 sts)
Place Safety Eyes: Locate the front center of your bear’s face. Insert the 18 mm safety eyes between Rounds 50 and 51, leaving about 5 to 6 visible stitches between them. Secure the backings firmly inside the head.
- Rnd 53: [5 sc, dec] x 6. (36 sts)
- Rnd 54: 36 sc around. (36 sts)
- Rnd 55: [4 sc, dec] x 6. (30 sts)
- Rnd 56: 30 sc around. (30 sts)
- Rnd 57: [3 sc, dec] x 6. (24 sts)
- Rnd 58: [2 sc, dec] x 6. (18 sts)
- Rnd 59: [1 sc, dec] x 6. (12 sts)
- Rnd 60: Work 6 dec. (6 sts)
Fasten off, leaving a yarn tail. Thread the tail through a tapestry needle, weave it through the front loops of the remaining 6 stitches, pull tight to close, and secure the end.
Arms (Make 2)
Using plush yarn and the 3.5 mm hook:
- Rnd 1: Work 5 sc into a MR. (5 sts)
- Rnd 2: Work 5 inc. (10 sts)
- Rnd 3: [1 sc, inc] x 5. (15 sts)
- Rnds 4-5: 15 sc around. (15 sts for 2 rounds)
- Rnd 6: 5 sc, 3 dec, 4 sc. (12 sts)
- Rnds 7-16: 12 sc around. (12 sts for 10 rounds)
Stuff the lower part of the arms lightly. Fold the top opening flat and crochet through both layers to close. Fasten off, leaving a tail for sewing.
Ears (Make 2)
Using plush yarn and the 3.5 mm hook:
- Rnd 1: Work 6 sc into a MR. (6 sts)
- Rnd 2: Work 6 inc. (12 sts)
- Rnd 3: [1 sc, inc] x 6. (18 sts)
- Rnd 4: [2 sc, inc] x 6. (24 sts)
- Rnd 5: 24 sc around. (24 sts)
- Rnd 6: [1 sc, dec] x 8. (16 sts)
Fold the flat edge closed and work single crochets across both layers to join. Fasten off, leaving a long tail for assembly.
Tail
Using plush yarn and the 3.5 mm hook:
- Rnd 1: Work 6 sc into a MR. (6 sts)
- Rnd 2: Work 6 inc. (12 sts)
- Rnds 3-4: 12 sc around. (12 sts for 2 rounds)
Fasten off, leaving a long tail for sewing. Stuff lightly with fiberfill.
Muzzle (Nose Base)
Using plush yarn and the 3.5 mm hook:
- Start: Chain 6.
- Rnd 1: Starting in the second chain from your hook, work 1 inc, then 4 sc. In the final stitch of the chain, work 3 sc to round the corner. Working back along the opposite side of the chain, work 5 sc. (14 sts)
- Rnd 2: Work 2 inc, 5 sc, 2 inc, 5 sc. (18 sts)
- Rnd 3: Work 3 inc, 6 sc, 3 inc, and sc in the remaining stitches to the end of the round. (24 sts)
- Rnds 4-6: 24 sc around. (24 sts for 3 rounds)
Fasten off, leaving a long tail for sewing to the face.
Finishing & Face Sculpting
To give your teddy bear that professional, character-rich look, we will do a simple face-sculpting process before sewing on the parts.
Cheek & Eye Sculpting
Because plush yarn stretches, the head can initially look slightly oversized. Sculpting is the secret step that pulls the eyes back to create cute defined cheeks:
- Thread a long piece of strong, matching sewing thread onto your needle.
- Insert the needle from the base of the neck up to the outer corner of the left eye.
- Pass the needle across to the inner corner of the eye, and bring it back down to the neck base.
- Pull gently to pull the eye inward, and tie a temporary knot.
- Repeat this process for the right eye.
- Adjust the tension until both eyes are symmetrically set, then tie a secure double knot at the base of the neck and hide the yarn tails inside the head.
Assembly
- Muzzle: Pin the muzzle centered on the face, overlapping slightly with the lower edge of the eyes. Stuff it lightly as you sew it in place.
- Ears: Sew the ears symmetrically onto the top-sides of the head, roughly between Rounds 45 and 52.
- Arms: Sew the arms to the sides of the body, just below the neck line.
- Tail: Position the tail on the lower back so that it acts as a support when the bear sits, and sew securely.
Details & Embroidery
Using a smaller hook and dark brown or black yarn, embroider a triangular nose onto the plush muzzle. Add a vertical line extending down from the nose to create a sweet mouth. To finish the look, add delicate eyebrows above the eyes and use white yarn or embroidery floss to stitch a highlight along the outer edges of the safety eyes. Tie a lovely satin ribbon around your bear’s neck to complete the classic look!
Top Tips for Crocheting with Plush Yarn
- Use Stitch Markers: Chenille and plush yarns make it notoriously difficult to see individual stitches. Always place a marker at the first stitch of every round.
- Mind the Tension: Avoid pulling plush yarn too tightly, as it can snap or shred. If your stitches have gaps, try dropping down a hook size instead of tightening your hold.
- Securing the Magic Ring: Since plush yarn can shed when pulled tightly to close a MR, you can start with a 2.0 mm hook to secure the ring, or chain 2 and work your first round of stitches into the second chain from hook.