Adorable Little Donkey Amigurumi Crochet Pattern
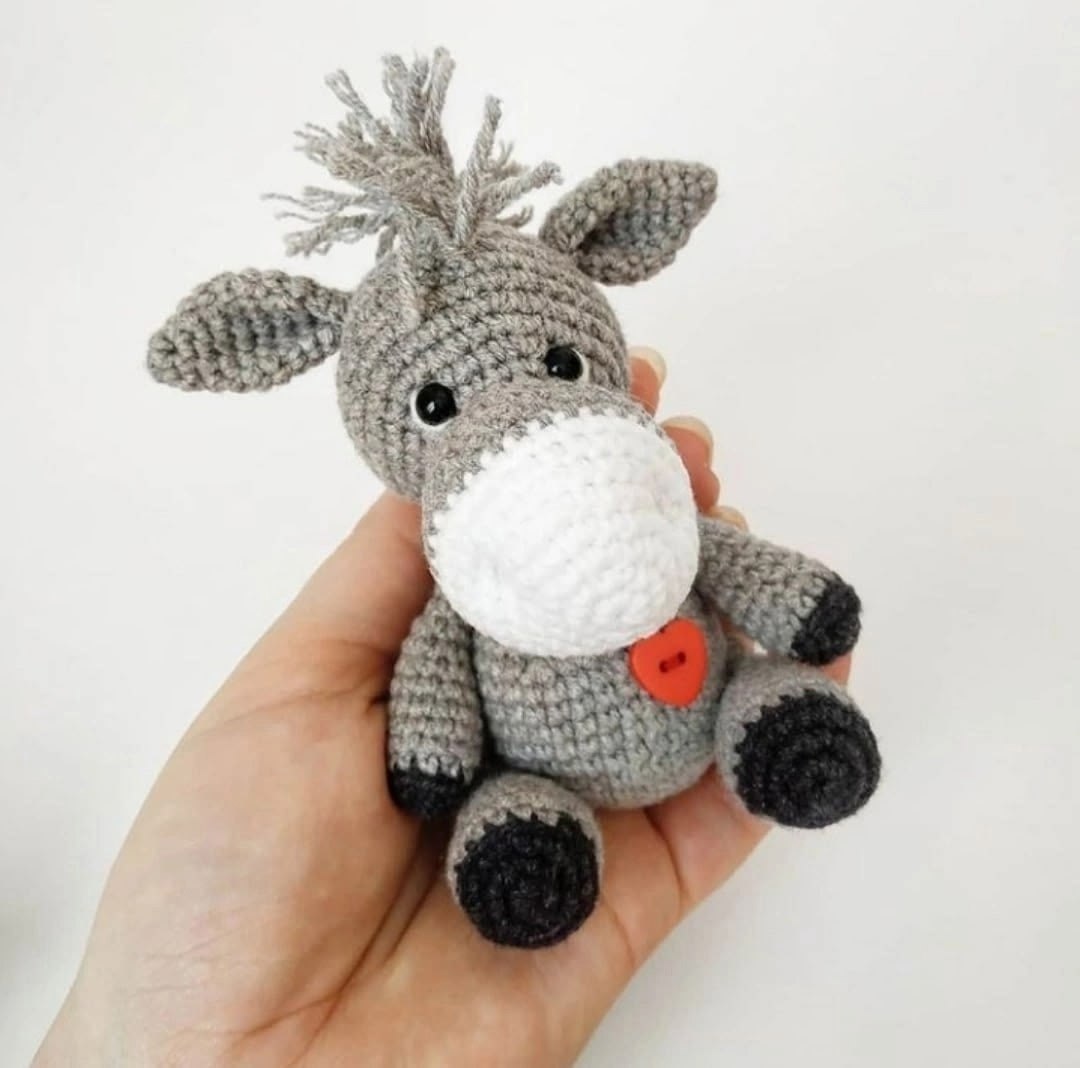
Are you looking for your next heartwarming crochet project? This adorable little donkey amigurumi is the perfect addition to your handmade collection. With its oversized snout, fuzzy mane, and sweet expression, this tiny donkey is a joy to create and even more wonderful to gift. Whether you are making a nursery decoration, a unique birthday present, or just want to treat yourself to a cute new desk companion, this pattern is designed to be accessible, fun, and highly rewarding.
This pattern is ideal for intermediate beginners—those who are comfortable with basic stitches like the single crochet and the magic ring, but are ready to tackle shaping and assembly. By the time you finish, you’ll have a charming, sit-down donkey that looks like it jumped straight out of a storybook!
Materials and Abbreviations
To ensure your donkey turns out just as cute as the photo, it is important to use the right materials. Using a slightly smaller hook than recommended for your yarn weight will help create tight, even stitches, which is essential for amigurumi to keep the stuffing from peeking through.
Supplies Needed
- Yarn: Medium weight (DK) cotton yarn in White, Gray, and Black.
- Crochet Hook: 2.25mm (B) or a size between 1.75mm and 2.25mm.
- Safety Eyes: 6mm screw-on safety eyes.
- Stuffing: Polyfill or any soft fiberfill.
- Notions: A tapestry needle, scissors, and a small red heart-shaped button for the chest.
Abbreviations (US Terms)
- MR: Magic Ring
- sc: Single crochet
- inc: Increase (2 sc in one stitch)
- dec: Decrease (sc 2 stitches together)
- BLO: Back Loops Only
- st(s): Stitch(es)
Step-by-Step Instructions
The Head
We begin the head using white yarn to create the characteristic donkey snout.
Starting with White:
- R1: 6 sc in a MR (6)
- R2: 6 inc (12)
- R3: (1 sc + inc) repeat 6 times (18)
- R4: (2 sc + inc) repeat 6 times (24)
- R5: (3 sc + inc) repeat 6 times (30)
- R6-R8: 30 sc (30)
Change to Gray:
- R9-R11: 30 sc (30)
- R12: (3 sc + dec) repeat 6 times (24)
- R13: (2 sc + dec) repeat 6 times (18)
- R14-R15: 18 sc (18)
- R16: (2 sc + inc) repeat 6 times (24)
- R17: (3 sc + inc) repeat 6 times (30)
- R18: (4 sc + inc) repeat 6 times (36)
- R19: (5 sc + inc) repeat 6 times (42)
- R20-R24: 42 sc (42)
- R25: (5 sc + dec) repeat 6 times (36)
- R26: (4 sc + dec) repeat 6 times (30)
- R27: (3 sc + dec) repeat 6 times (24)
- R28: (2 sc + dec) repeat 6 times (18)
- R29: (1 sc + dec) repeat 6 times (12)
- R30: 6 dec (6)
Face Details:
Insert the 6mm safety eyes between rounds 15 and 16. Ensure they are spaced 6 stitches apart. To create the nostrils, take a piece of gray yarn. Insert the needle at the bottom of the head between rounds 15 and 16, pull it up through the top between rounds 5 and 6, then bring it back down through 2 stitches, and finally out through 1 stitch near the starting point. Tie a knot and repeat for the second nostril.
The Body
Starting with White:
- R1: 6 sc in a MR (6)
- R2: 6 inc (12)
- R3: (1 sc + inc) repeat 6 times (18)
- R4: (2 sc + inc) repeat 6 times (24)
- R5: (3 sc + inc) repeat 6 times (30)
- R6: (4 sc + inc) repeat 6 times (36)
- R7-R12: 36 sc (36)
Shaping the Body:
- R13: (7 sc + dec) repeat 4 times (32)
- R14: (6 sc + dec) repeat 4 times (28)
- R15: (5 sc + dec) repeat 4 times (24)
- R16: (4 sc + dec) repeat 4 times (20)
- R17-R18: 20 sc (20)
- R19: (3 sc + dec) repeat 4 times (16)
- R20: 16 sc (16)
Fasten off, leaving a long tail (about 12-16 inches) for sewing. Stuff the body firmly.
The Ears
The ears are worked in one piece and folded in half.
- R1: 6 sc in a MR (6)
- R2: 6 sc (6)
- R3: (1 sc + inc) repeat 3 times (9)
- R4: (2 sc + inc) repeat 3 times (12)
- R5: (3 sc + inc) repeat 3 times (15)
- R6-R8: 15 sc (15)
- R9: (1 sc + dec) repeat 5 times (10)
Fold the ear in half and crochet 5 sc through both layers to close it. Do not stuff the ears. Leave a tail for sewing.
The Arms
Start with Black:
- R1: 6 sc in a MR (6)
- R2: 6 inc (12)
Change to Gray:
- R3: 12 sc in BLO (12)
- R4-R8: 12 sc (12)
- R9: 1 dec + 10 sc (11)
- R10-R11: 11 sc (11)
- R12: 6 sc + 1 dec + 3 sc (10)
- R13: 10 sc (10)
- R14: 1 dec + 8 sc (9)
- R15: 9 sc (9)
Stuff the bottom portion of the arm. Fold the arm in half and crochet 4 sc through both layers to close. Leave a tail for sewing.
The Legs
Start with Black:
- R1: 6 sc in a MR (6)
- R2: 6 inc (12)
- R3: (1 sc + inc) repeat 6 times (18)
Change to Gray:
- R4: 18 sc in BLO (18)
- R5-R6: 18 sc (18)
- R7: (4 sc + dec) repeat 3 times (15)
- R8-R9: 15 sc (15)
- R10: (3 sc + dec) repeat 3 times (12)
- R11-R12: 12 sc (12)
- R13: (2 sc + dec) repeat 3 times (9)
- R14-R16: 9 sc (9)
Stuff the bottom portion. Fold the leg in half and crochet 4 sc through both edges to close. Leave a tail for sewing.
The Tail
To create a realistic, fuzzy tail, we will use a loop method. At the back of the body, between rounds 6 and 7, pull up a loop. Using the four strands of yarn currently attached, crochet 4 chain stitches into that loop. Pull all the yarn ends through the final chain stitch and tighten. Trim the ends to your desired length and carefully brush out the fibers with a fine-toothed comb or brush to create a fluffy tail.
Finishing
Assembly Instructions
Assembly is where your little donkey truly comes to life! Take your time to position each limb correctly.
- Body to Head: Sew the body to the head between rounds 15 and 20 of the head.
- Ears: Fold the ears and sew them to the head between rounds 22 and 24.
- Arms: Sew the arms to the body at rounds 17 and 18. Angle them slightly forward so the donkey looks like it is ready for a hug!
- Legs: Sew the legs between rounds 4 and 9 of the body. This will ensure the donkey sits upright. For extra stability, use a few stitches to secure the leg to round 12 of the body so they don’t flop outward.
The Mane and Final Touches
For the signature messy mane, cut several strands of gray yarn, each about 2 to 3 inches long. Fold the strands in half, pull the folded loop through a stitch on the head, and pull the ends through the loop to secure them (the lanyard method). Once you have added enough strands, trim them to a uniform length and brush them out to create a soft, fuzzy texture.
Finally, sew your small red heart button onto the center of the donkey’s chest. If you prefer not to use a button, you can crochet a tiny red heart and sew that on instead!
Tips for Amigurumi Success
- Tension is Key: Try to keep your tension consistent. If your stitches are too loose, the stuffing will show; if they are too tight, the project will become difficult to work with.
- Use Stitch Markers: Amigurumi is worked in continuous spirals. Always use a stitch marker to keep track of the beginning of your rounds to avoid getting lost.
- Stuffing Technique: When stuffing, add small amounts at a time and use your crochet hook to push the stuffing into the corners. This prevents lumps and ensures a smooth, professional shape.
- Safety First: If you are making this toy for a very young child, consider embroidering the eyes with black yarn instead of using plastic safety eyes to prevent choking hazards.