The Legs (Make 2)
Start with the contrast color for the paw pads.
- Round 1: 6 sc in MR (6)
- Round 2: [4 sc in the first st, 2 sc] x 2 (12)
- Round 3: sc, inc x 3, 3 sc, inc x 3, 2 sc (18)
- Round 4: 2 sc, inc x 3, 6 sc, inc x 3, 4 sc (24)
- Round 5: 3 sc, [inc, sc] x 3, 6 sc, [inc, sc] x 3, 3 sc (30)
- Round 6: 4 sc, [sc, inc] x 3, 9 sc, [sc, inc] x 3, 5 sc (36)
Change to the main color.
- Round 7: 6 sc, [inc, 2 sc] x 3, 9 sc, [inc, 2 sc] x 3, 3 sc (42)
- Round 8-12: sc in each st around (42)
- Round 13: [12 sc, dec] x 3 (39)
- Round 14: [11 sc, dec] x 3 (36)
- Round 15: sc in each st around (36)
- Round 16: 4 sc, [sc, dec] x 4, 20 sc (32)
- Round 17: 4 sc, [sc, dec] x 2, 22 sc (30)
- Round 18: sc in each st around (30)
- Round 19: [3 sc, dec] x 6 (24)
- Round 20: sc in each st around (24)
- Round 21: [2 sc, dec] x 6 (18)
- Round 22-24: sc in each st around (18)
- Round 25: [sc, dec] x 6 (12)
- Round 26: sc in each st around (12)
- Round 27: dec x 6 (6)
Fasten off and leave a tail. Note: Do not overstuff the top of the legs to ensure they sit correctly when sewn.
The Arms (Make 2)
Use the main color.
- Round 1: 6 sc in MR (6)
- Round 2: inc in each st around (12)
- Round 3: [sc, inc] x 6 (18)
- Round 4: [2 sc, inc] x 6 (24)
- Round 5: [3 sc, inc] x 6 (30)
- Round 6-8: sc in each st around (30)
- Round 9: 8 sc, dec x 3 (27)
- Round 10: 7 sc, dec x 3 (24)
- Round 11: 9 sc, dec x 3, 9 sc (21)
- Round 12-14: sc in each st around (21)
- Round 15: [5 sc, dec] x 3 (18)
- Round 16-21: sc in each st around (18)
- Round 22: [sc, dec] x 6 (12)
- Round 23: sc in each st around (12)
- Round 24: dec x 6 (6)
Fasten off and leave a tail.
The Tail
- Round 1: 6 sc in MR (6)
- Round 2: inc in each st around (12)
- Round 3: [sc, inc] x 6 (18)
- Round 4-5: sc in each st around (18)
- Round 6: [sc, dec] x 6 (12)
Fasten off and leave a tail.
The Patches
Use your contrast color yarn. These are worked in rows.
Large Patch
- Row 1: Ch 7. Starting in the 2nd ch from hook, 6 sc. Ch 1, turn.
- Row 2-5: 6 sc across. Ch 1, turn.
Fasten off, leaving a tail.
Small Patch
- Row 1: Ch 6. Starting in the 2nd ch from hook, 5 sc. Ch 1, turn.
- Row 2-5: 5 sc across. Ch 1, turn.
Fasten off, leaving a tail.
Finishing & Assembly
Now comes the most creative part: bringing your bear to life!
Face Assembly
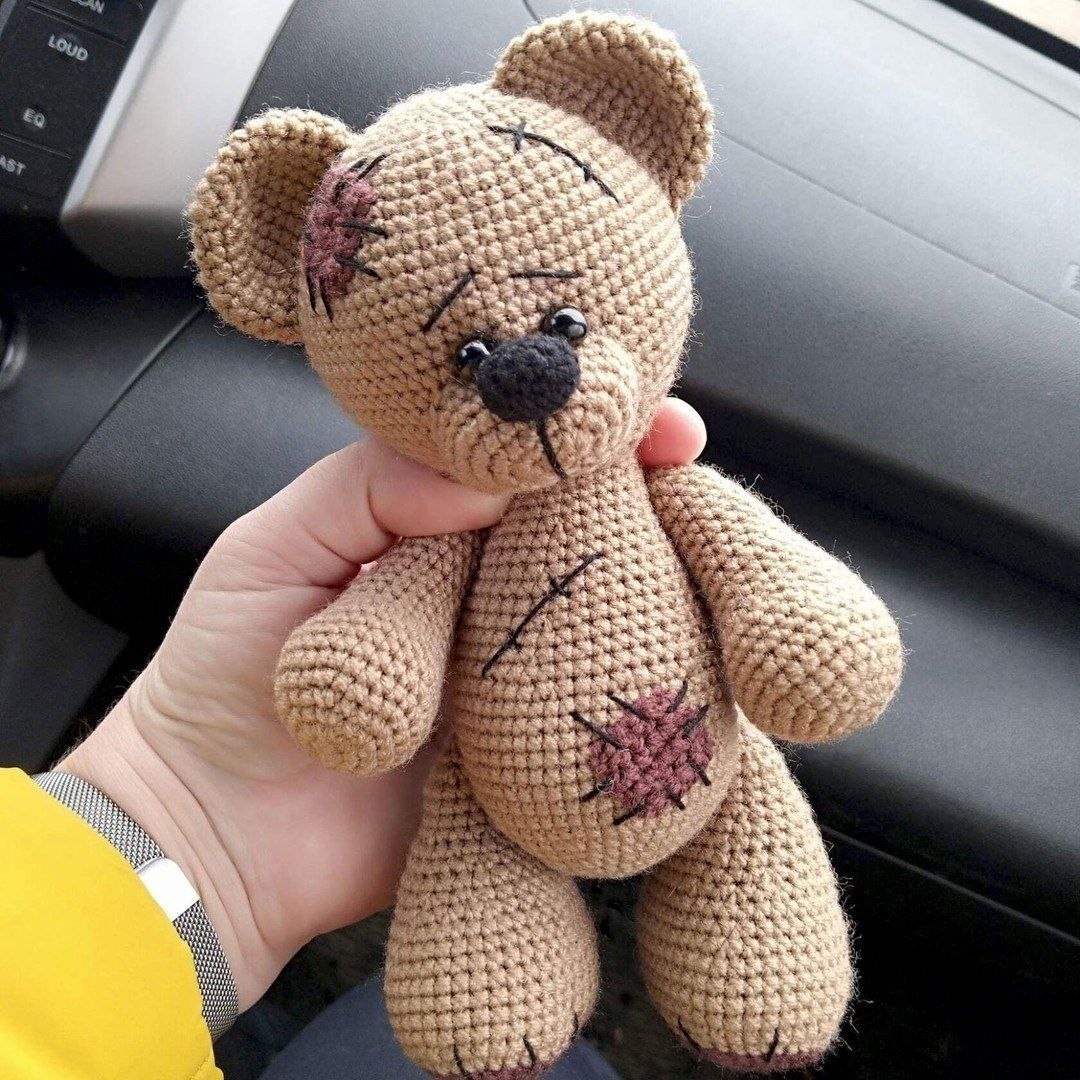
Place the safety eyes on the head, roughly between rounds 15 and 18, centered above where the muzzle will be. Sew the muzzle to the head between rounds 20 and 29. Finally, center the black nose on top of the muzzle and sew it firmly in place.
Body and Limbs
Sew the head to the body. Attach the legs between rounds 11 and 12 of the body. Attach the arms between rounds 5 and 6 of the body. Sew the tail to the lower back of the bear.
The “Well-Loved” Details
To give your bear its signature character, sew the large patch on the belly and the small patch on the head or shoulder. Use your tapestry needle and black yarn to create “repair” stitches—simple cross-stitches (X shape) over the edges of the patches and in random spots on the head and body. This gives the bear its charming, handmade, and repaired look.
Tips for Success
- Tension is Key: Amigurumi requires tight stitches so that the stuffing doesn’t peak through. If you see gaps, try dropping down a hook size.
- Invisible Decreases: To make the bear look professional, use the “invisible decrease” method (front loops only) for all dec stitches.
- Stuffing Strategy: Stuff the head and body firmly, but keep the neck slightly softer to prevent the head from wobbling too much or leaning.
- Customization: Feel free to change the contrast color of the patches to create a “rainbow” bear or a monochrome version for a more modern look.