Free Olaf the Snowman Crochet Pattern: DIY Disney-Inspired Amigurumi
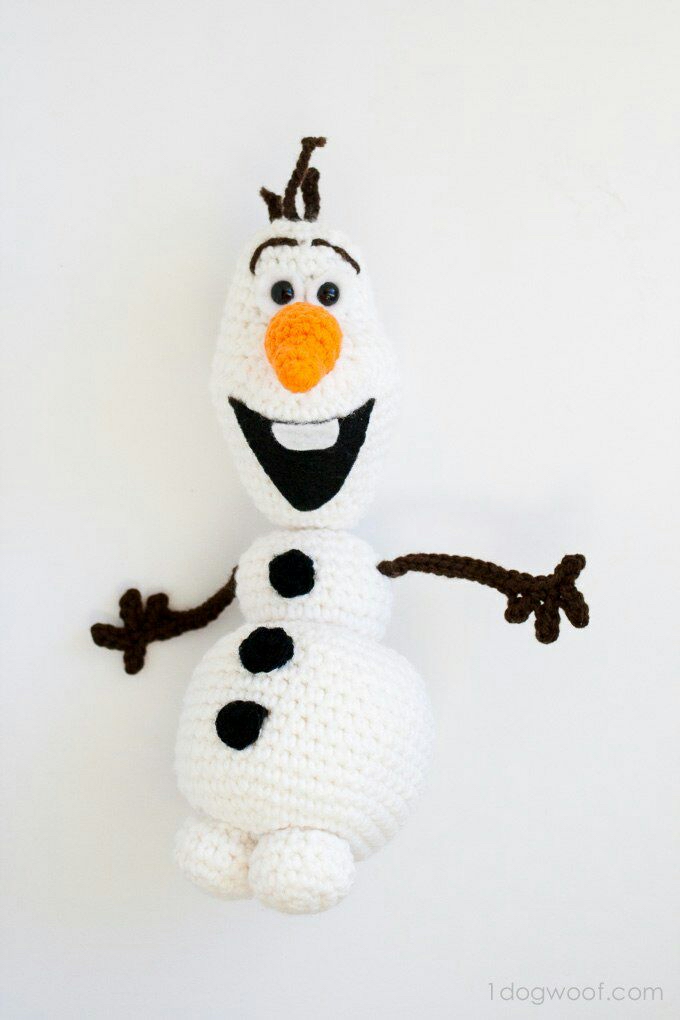
Do you want to build a snowman? Bring the magic of your favorite winter fairy tale into your home with this adorable, free Olaf-inspired snowman crochet pattern! This lovable, huggable amigurumi snowman is the perfect project for winter crafting, holiday gifting, or adding a touch of whimsical Disney magic to your nursery decor.
This beginner-friendly tutorial will guide you step-by-step through crocheting your very own happy snowman, complete with his signature carrot nose, twig arms, and buck-toothed smile. Grab your crochet hook, put on your favorite animated soundtrack, and let’s start stitching!
Materials & Abbreviations
Supplies Needed
- Yarn: Medium weight / worsted weight yarn (Size 4) in the following colors:
- White (approx. 80-100 yards)
- Brown (approx. 15 yards for arms, hair, and eyebrows)
- Orange (scraps for the carrot nose)
- Black (scraps for the button details)
- Crochet Hook: Size US E/4 (3.5 mm) or G/6 (4.00 mm) crochet hook (choose a size that keeps your stitches tight so stuffing doesn’t peek through)
- Safety Eyes: One pair of 9mm black safety eyes
- Felt: Small scraps of black and white craft felt
- Stuffing: High-quality polyester fiberfill
- Tools: Yarn needle, embroidery scissors, and fabric glue (or hot glue) to secure the felt pieces
Crochet Terms & Abbreviations (US Terms)
- ch: chain
- st(s): stitch(es)
- MR: magic ring (magic circle)
- sc: single crochet
- inc: single crochet increase (work 2 single crochets into the same stitch)
- dec: single crochet decrease (single crochet 2 stitches together)
- hdc: half double crochet
- dc: double crochet
- hdc dec: half double crochet decrease
- dc dec: double crochet decrease
- sc3tog: single crochet 3 stitches together (decrease over 3 stitches)
- sl st: slip stitch
Step-by-Step Instructions
The Head
The snowman’s head has a unique, elongated shape with expressive cheeks. Read the decrease steps in Row 15 carefully to get the perfect structural shape!
Using White yarn:
- Round 1: Work 6 sc into a magic ring. (6 sts)
- Round 2: 6 inc. (12 sts)
- Round 3: (1 sc, inc) 6 times. (18 sts)
- Round 4: 18 sc. (18 sts)
- Round 5: (8 sc, inc) 2 times. (20 sts)
- Round 6: (9 sc, inc) 2 times. (22 sts)
- Round 7: (10 sc, inc) 2 times. (24 sts)
- Round 8: (11 sc, inc) 2 times. (26 sts)
- Round 9: (12 sc, inc) 2 times. (28 sts)
- Round 10: (13 sc, inc) 2 times. (30 sts)
- Round 11: (14 sc, inc) 2 times. (32 sts)
- Round 12: (15 sc, inc) 2 times. (34 sts)
- Round 13: (16 sc, inc) 2 times. (36 sts)
- Round 14: 11 sc, 5 inc, 4 sc, 5 inc, 11 sc. (46 sts)
- Round 15: 1 sc, 1 dec, 7 sc, sc3tog, 2 dec, 1 hdc dec, 4 dc dec, 1 hdc dec, 2 dec, sc3tog, 7 sc, 1 dec, 1 sc. (30 sts)
- Round 16: 1 sc, 1 dec, 7 sc, 2 hdc, 6 dc, 2 hdc, 7 sc, 1 dec, 1 sc. (28 sts)
- Round 17: 7 sc, 7 dec, 7 sc. (21 sts)
- Round 18-19: 21 sc. (21 sts)
- Round 20: 1 sc, 1 dec, 15 sc, sc3tog. (18 sts)
Assembly Tip: Insert the 9mm safety eyes between Rounds 19 and 20, keeping them centered with the facial shaping. Begin stuffing the head firmly with fiberfill, ensuring you sculpt the cheeks as you fill.
- Round 21-22: 18 sc. (18 sts)
- Round 23: (1 sc, dec) 6 times. (12 sts)
- Round 24: 6 dec. (6 sts)
Fasten off, weave the tail through the remaining stitches to pull the opening closed, and hide your thread tail inside the head.
Upper Body segment
The snowman is built in three distinct stacked sections. Let’s make the smaller upper chest section next.
Using White yarn:
- Round 1: Work 6 sc into a magic ring. (6 sts)
- Round 2: 6 inc. (12 sts)
- Round 3: (1 sc, inc) 6 times. (18 sts)
- Round 4: (2 sc, inc) 6 times. (24 sts)
- Round 5-9: 24 sc. (24 sts)
- Round 10: (2 sc, dec) 6 times. (18 sts)
- Round 11: (1 sc, dec) 6 times. (12 sts)
Stuff this piece firmly with fiberfill.
- Round 12: 6 dec. (6 sts)
Fasten off, leaving a long white tail for sewing this segment to the lower body segment.
Lower Body segment
This is the largest snowball segment that forms the base of your snowman.
Using White yarn:
- Round 1: Work 6 sc into a magic ring. (6 sts)
- Round 2: 6 inc. (12 sts)
- Round 3: (1 sc, inc) 6 times. (18 sts)
- Round 4: (2 sc, inc) 6 times. (24 sts)
- Round 5: (3 sc, inc) 6 times. (30 sts)
- Round 6: (4 sc, inc) 6 times. (36 sts)
- Round 7: (5 sc, inc) 6 times. (42 sts)
- Round 8-16: 42 sc. (42 sts)
- Round 17: (5 sc, dec) 6 times. (36 sts)
- Round 18: (4 sc, dec) 6 times. (30 sts)
- Round 19: (3 sc, dec) 6 times. (24 sts)
- Round 20: (2 sc, dec) 6 times. (18 sts)
- Round 21: (1 sc, dec) 6 times. (12 sts)
Stuff this base segment firmly so it holds its round snowball shape.
- Round 22: 6 dec. (6 sts)
Fasten off, leaving a long white tail for sewing.
Feet (Make 2)
Using White yarn:
- Round 1: Work 6 sc into a magic ring. (6 sts)
- Round 2: 6 inc. (12 sts)
- Round 3: (1 sc, inc) 6 times. (18 sts)
- Round 4: (4 sc, dec) 3 times. (15 sts)
- Round 5: 15 sc. (15 sts)
- Round 6: (3 sc, dec) 3 times. (12 sts)
- Round 7: 6 dec. (6 sts)
Fasten off, leaving a tail on each foot to sew them onto the bottom of the lower body segment.
Carrot Nose
Using Orange yarn:
- Round 1: Work 4 sc into a magic ring. (4 sts)
- Remaining Rounds: Continue working in rounds of single crochet, gradually adding increases to form a tapered, cone-shaped carrot nose to your desired length (approx. 1 to 1.5 inches long).
Fasten off, leaving a tail for sewing the nose onto the center of the face.
Coal Buttons (Make 3)
Using Black yarn:
- Round 1: Work 6 sc into a magic ring. Join with a slip stitch to the first stitch. (6 sts)
Fasten off, leaving a sewing tail for each button.
Branch Arms (Make 2 directly on the body)
Instead of crocheting these separately and sewing them on, you will join your yarn directly to the body for a clean finish.
- Make a slip knot with Brown yarn and place it on your hook.
- Insert your crochet hook into the side of the Upper Body segment where you want the first arm to begin, and attach with a slip stitch (sl st).
- Chain 13.
- Starting in the second chain from your hook, work 2 sl sts back down the chain.
- First Finger: Chain 4. Starting in the second chain from your hook, work 3 sl sts, then work 1 sc into the main arm chain to secure it.
- Second Finger: Chain 4. Starting in the second chain from your hook, work 3 sl sts, then work 1 sc into the main arm chain.
- Third Finger: Chain 3. Starting in the second chain from your hook, work 2 sl sts, then work 1 sc into the main arm chain.
- Work a slip stitch into each remaining chain down the main branch arm back to the body.
- Fasten off, leaving a short tail. Tie the starting tail and the ending tail together tightly at the base to secure the arm. Using your yarn needle, tuck both ends inside the body segment to hide them.
Twig Hair
Using Brown yarn:
- Make a slip knot, place it on your hook, and insert the hook into the top center of the Head. Attach with a sl st.
- Chain 3, 4, or 5 (vary the chain lengths to give the twig hairs a cute, asymmetrical look).
- Fasten off and cut your yarn. Repeat this process 2 to 3 times to create a small bunch of twig hair on top of his head. Secure the ends and tuck them into the head.
Finishing & Assembly
1. Stacking the Body
Align the Head, Upper Body segment, and Lower Body segment vertically. Using your yarn needle and the long yarn tails, stitch the segments together securely. Make sure to pull your stitches tight so the snowman doesn’t lean!
2. Attaching the Feet and Details
- Sew the two feet side-by-side onto the very bottom of the Lower Body segment so your snowman can sit upright.
- Sew the three black coal buttons onto his front: two on the lower body segment and one on the upper chest segment.
- Sew the orange carrot nose directly onto the face, centered just below the eyes.
3. Facial Embroidery & Felt Details
- Using Brown yarn, embroider two thin, curved eyebrows above his safety eyes to give him his classic happy, surprised expression.
- Cut a wide, smiling mouth shape out of your black craft felt sheet.
- Cut a single, rectangular tooth out of your white felt sheet. Glue the white tooth to the top center of the black felt mouth.
- Carefully glue the entire mouth assembly onto the front of the head, just under the carrot nose, using fabric glue or hot glue.
Tips for Amigurumi Success
- Keep Your Stitiches Tight: If you find your stuffing is visible through your stitches, try dropping down a hook size. Amigurumi requires a tighter gauge than normal blankets or garments.
- Invisible Decrease: For the cleanest look on your decrease stitches (dec), use the invisible decrease method. Simply insert your hook into the front loops only of the next two stitches, yarn over, and complete your single crochet.
- Felt Placement: Use sewing pins to hold the felt mouth in place before you glue it. This allows you to step back and make sure his smile is perfectly straight!