Cute Mini Amigurumi Teddy Bear Keychain: Free Crochet Pattern
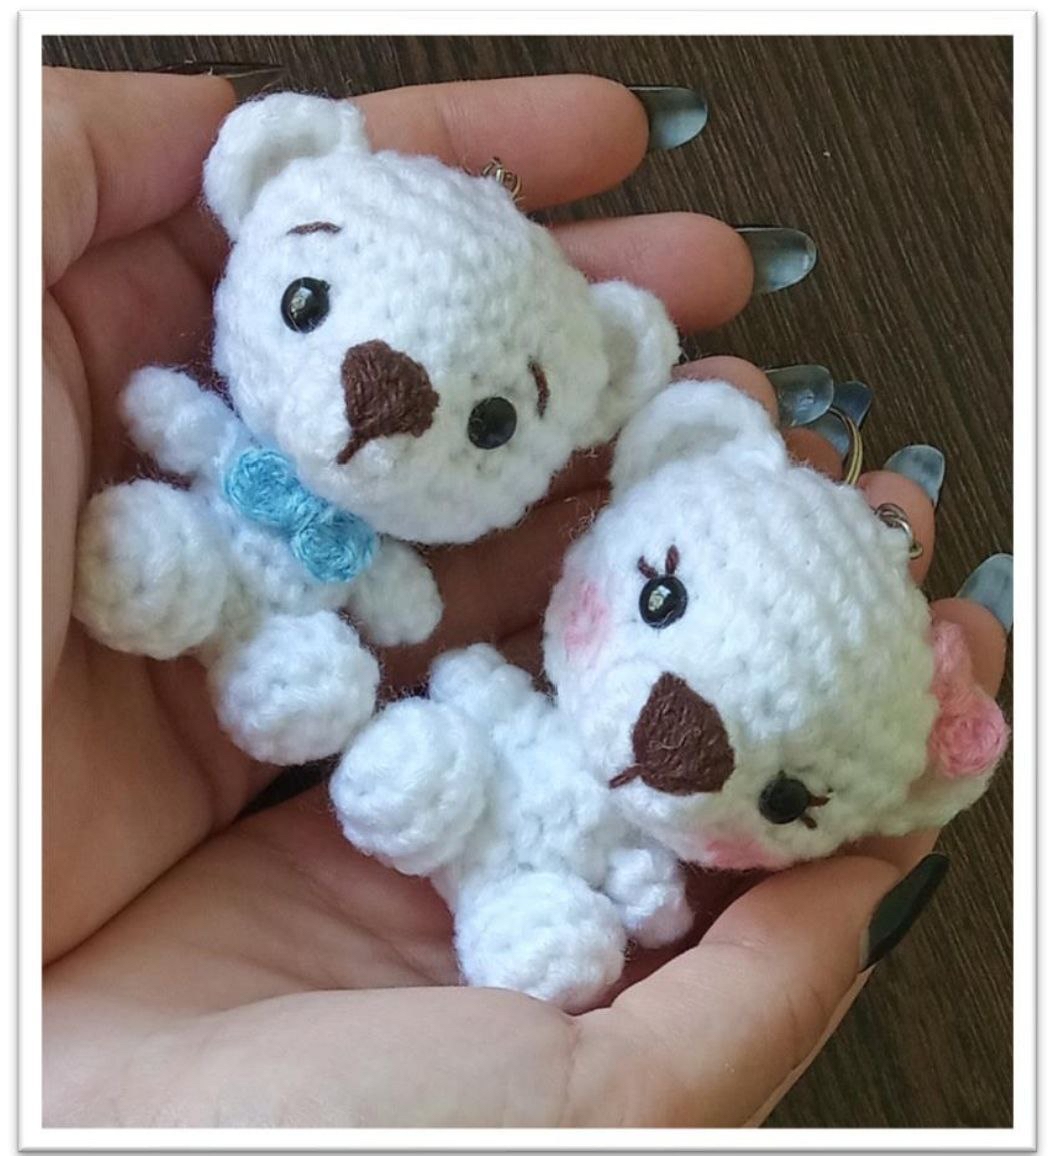
Looking for a quick, adorable, and stash-busting crochet project? This mini amigurumi teddy bear pattern is the perfect afternoon craft! Standing at just about 2.5 inches tall, these tiny plush bears make fantastic keychains, backpack charms, party favors, or sweet handmade gifts for friends and loved ones. You can create a matching pair in different accent colors or tweak their accessories to give each little bear its own unique personality.
This tutorial is written using standard US crochet terminology and is suitable for adventurous beginners who are comfortable working in the round. Grab your crochet hook, a tiny bit of yarn, and let’s bring these sweet pocket-sized bears to life!
Materials & Abbreviations
Supplies Needed
- Yarn: Sport weight (Category 2) or fine acrylic yarn in white (approx. 20–25 yards) for the main body. A small scrap of lace weight or embroidery floss in brown for facial embroidery, plus accent color yarn (light blue or pink) for the bow tie.
- Crochet Hooks: Size US E/4 (3.5 mm) for the bear body, and Size US B-1 or C-2 (2.0 mm) for the tiny bow accessory.
- Safety Eyes: 1 pair of 5 mm (No. 6) plastic safety eyes per bear.
- Stuffing: Premium polyester fiberfill stuffing.
- Notions: Tapestry needle, stitch marker, scissors, keychain ring with chain, and optional pink cheek blush with a small makeup brush.
Abbreviations (US Terms)
- MR: Magic Ring (Magic Circle)
- ch: Chain stitch
- sc: Single crochet
- inc: Single crochet increase (work 2 sc in the same stitch)
- dec: Single crochet decrease (sc2tog or invisible decrease)
- sl st: Slip stitch
- dc: Double crochet
- st(s): Stitch(es)
- *…*: Repeat instructions between asterisks as indicated
Step-by-Step Instructions
Work in continuous spiral rounds without joining at the end of each round unless otherwise instructed. Use a stitch marker to track the beginning of each round.
Head
Using main color yarn and the 3.5 mm (US E/4) crochet hook:
- Round 1: Work 7 sc into a MR. (7 sts)
- Round 2: Work 1 inc in each stitch around. (14 sts)
- Round 3: *1 sc, 1 inc* repeat around. (21 sts)
- Round 4: *2 sc, 1 inc* repeat around. (28 sts)
- Rounds 5–9: 1 sc in each stitch around. (28 sts for 5 rounds)
- Round 10: *2 sc, 1 dec* repeat around. (21 sts)
- Round 11: *1 sc, 1 dec* repeat around. (14 sts)
Insert the 5 mm safety eyes between Rounds 7 and 8, placing them approximately 6 stitches apart. Stuff the head firmly with polyester fiberfill. Fasten off, leaving a long yarn tail for sewing.
Muzzle
Using main color yarn and the 3.5 mm (US E/4) crochet hook:
- Round 1: Work 6 sc into a MR. (6 sts)
- Round 2: 1 inc, 2 sc, 1 inc, 2 sc. (8 sts)
- Round 3: 1 sc in each stitch around. (8 sts)
Fasten off, leaving a yarn tail for attaching to the face.
Ears (Make 2)
Using main color yarn and the 3.5 mm (US E/4) crochet hook:
- Row 1: Work 6 sc into a MR. Do not pull the ring tight into a full circle—leave it as a semi-circle. ch 1, turn. (6 sts)
- Row 2: Work 1 sc in each of the 6 stitches across. (6 sts)
Fasten off, leaving a long tail for sewing onto the head.
Body
Using main color yarn and the 3.5 mm (US E/4) crochet hook:
- Round 1: Work 6 sc into a MR. (6 sts)
- Round 2: Work 1 inc in each stitch around. (12 sts)
- Rounds 3–5: 1 sc in each stitch around. (12 sts for 3 rounds)
- Round 6: *1 sc, 1 dec* repeat around. (8 sts)
Stuff the body firmly with fiberfill. Fasten off, leaving a yarn tail for assembly.
Arms (Make 2)
Using main color yarn and the 3.5 mm (US E/4) crochet hook:
- Round 1: Work 5 sc into a MR. (5 sts)
- Rounds 2–3: 1 sc in each stitch around. (5 sts for 2 rounds)
Fasten off without stuffing, leaving a tail for sewing.
Legs (Make 2)
Using main color yarn and the 3.5 mm (US E/4) crochet hook:
- Round 1: Work 6 sc into a MR. (6 sts)
- Round 2: *1 sc, 1 inc* repeat around. (9 sts)
- Round 3: 1 sc in each stitch around. (9 sts)
- Round 4: 3 sc, 2 dec, 2 sc. (7 sts)
Stuff the lower foot lightly with fiberfill. Fasten off, leaving a yarn tail for sewing.
Tail
Using main color yarn and the 3.5 mm (US E/4) crochet hook:
- Round 1: Work 4 sc into a MR. (4 sts)
Fasten off, leaving a tail for assembly.
Mini Bow Accent
Using accent color yarn (light blue or pink) and the smaller 2.0 mm (US B-1/C-2) crochet hook:
- In a Magic Ring, work the following sequence: (ch 2, 2 dc, ch 2, sl st into MR) twice.
Pull the magic ring tight to form two bow wings. Fasten off, leaving a 6-inch yarn tail. Wrap the tail tightly around the center of the bow several times to create the center knot, then secure with a small node on the back.
Finishing & Assembly
Putting your amigurumi bear together is where its personality shines! Follow these steps for seamless assembly:
- Attach the Muzzle: Position the muzzle centrally on the lower half of the head between Rounds 7 and 9, directly centered between the safety eyes. Sew in place using a tapestry needle.
- Embroider Facial Details: Using fine brown yarn or embroidery thread, stitch a small triangular nose on top of the muzzle, adding a thin vertical line straight down to create the mouth.
- Attach the Ears: Sew the curved ears onto the top left and right sides of the head (around Rounds 3 to 6). Ensure they are evenly spaced relative to the eyes.
- Connect Head & Body: Stitch the open top of the body securely to the bottom opening of the head. Add extra stuffing before closing the gap if needed.
- Attach Limbs:
- Sew the arms to the sides of the body just below the neck line.
- Sew the legs to the bottom front of the body so the bear appears to be sitting neatly.
- Attach Tail: Center the small tail on the lower back of the body and sew into place.
- Add Accessories:
- For a classic necktie look, sew the mini bow centered at the neck joint. For a hair bow look, attach it right beside one of the ears!
- Optional: Dip a small makeup brush into soft pink blush and gently apply small rosy circles to the cheeks beneath the eyes.
- Attach Keychain: Securely stitch or attach the metal keychain jump ring to the top center of the bear’s head between the ears.
Tips for Amigurumi Success
- Use the Invisible Decrease: For a clean finish without gaps, use the invisible decrease technique. Insert your hook into the front loops only of the next two stitches, yarn over, pull through two loops, yarn over, and complete the single crochet.
- Keep Tension Tight: Amigurumi requires a tighter gauge than standard garments to prevent fiberfill stuffing from showing through your stitches. If your stitches look loose, drop down a hook size.
- Stuff Firmly as You Go: Amigurumi loses shape over time if under-stuffed. Fill the head and body firmly, pushing stuffing out into the sides to achieve a rounded look.
- Customize Colors: Feel free to experiment with classic teddy colors like honey brown, warm beige, dark chocolate, or soft pastel shades!