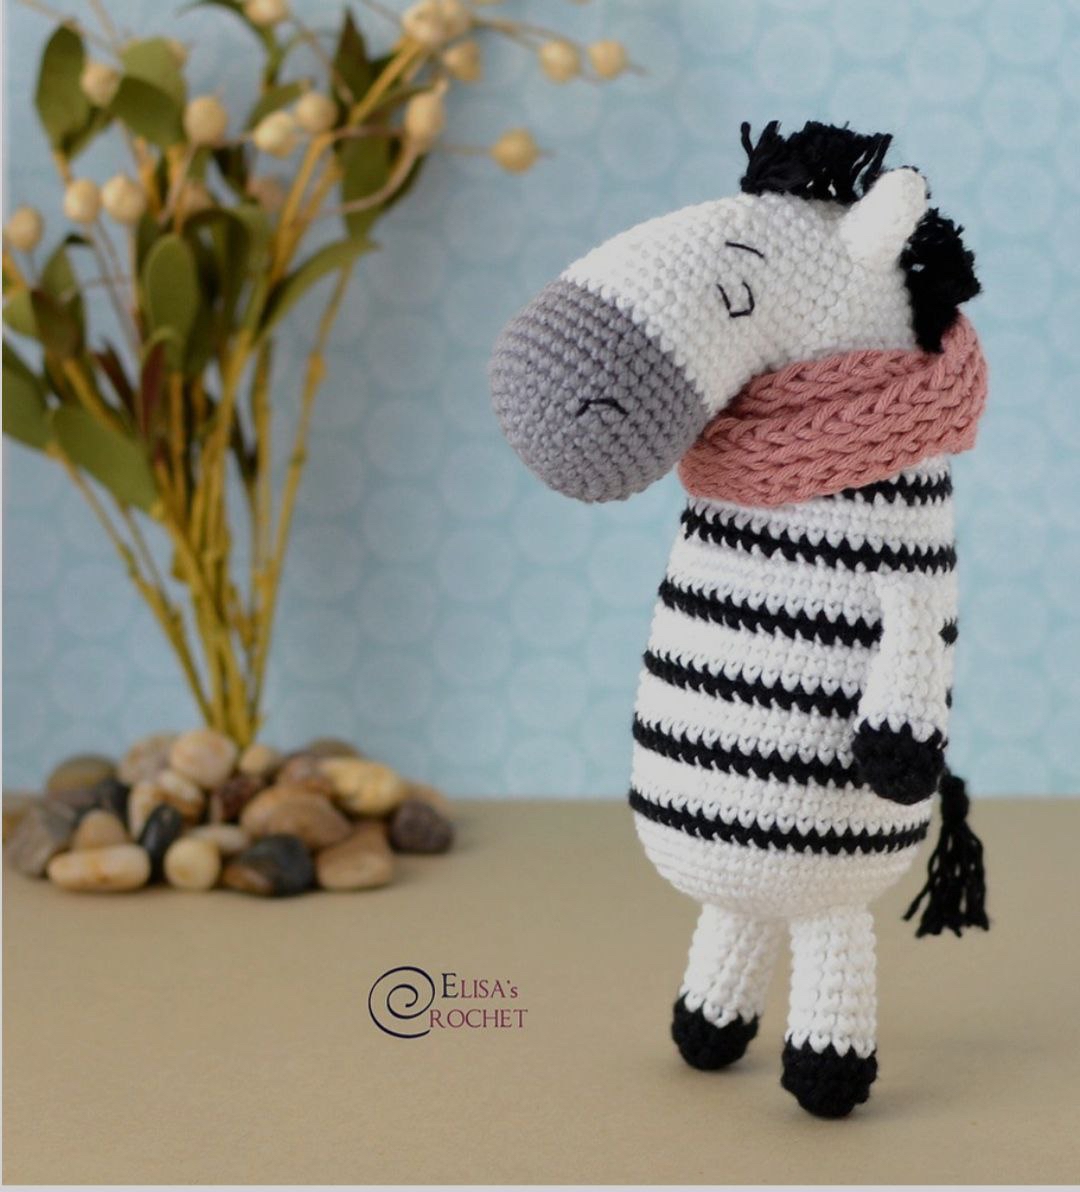
Free Zebra Crochet Pattern: How to Make an Adorable Amigurumi Zebra
If you are looking for your next cute and cozy amigurumi project, this free zebra crochet pattern is just what you need! Featuring charming black and white stripes, a textured brushed-yarn mane, and a cozy knit-look infinity scarf, this sweet zebra stands approximately 7.5 inches tall by 4 inches wide when completed. It makes a wonderful hand-crafted toy, nursery decoration, or gift for any animal lover.
One of the best design features of this pattern is how the muzzle and body are joined seamlessly in one piece before shaping the head. This eliminates tricky assembly work while giving your finished zebra a polished, natural shape. Follow along with our detailed step-by-step instructions below to create your very own zebra friend!
Materials & Abbreviations
Supplies Needed
- Yarn: Light weight / DK (Category 3) yarn in White, Black, Gray, and Pink (approx. 50-70 yards of white, 30-40 yards of black, 15 yards of gray, and 15 yards of pink)
- Embroidery Thread: Classic black cotton thread (for embroidering facial details)
- Crochet Hooks: Size C-2 (2.75 mm) standard crochet hook and Size H-8 (5.0 mm) Tunisian crochet hook
- Stuffing: Polyester fiberfill stuffing
- Tools: Tapestry/yarn needle, stitch marker, scissors, and a small wire slicker brush or fine comb (for brushing out the mane and tail)
Project Specifications
- Skill Level: Intermediate
- Finished Size: Approximately 7.5 inches high by 4 inches wide
- Gauge: Not critical for this project, but stitches should be tight enough to prevent fiberfill stuffing from showing through.
Crochet Abbreviations (US Terms)
- mr = magic ring
- ch = chain
- st(s) = stitch(es)
- sl st = slip stitch
- sc = single crochet
- hdc = half double crochet
- sc inc = single crochet increase (work 2 sc into the same stitch)
- sc dec = single crochet decrease (sc 2 stitches together)
- TSS = Tunisian simple stitch
- F/O = fasten off
Pattern Note: Work in continuous or joined rounds as indicated. Unless stated otherwise, join each round with a sl st to the first stitch and ch 1 at the end of the round.
Step-by-Step Instructions
1. Muzzle
Worked from snout to back using Gray and White yarn.
Start with Gray yarn and a 2.75 mm (C-2) hook.
- Round 1: 6 sc in a mr (6 sts)
- Round 2: sc inc in each st around (12 sts)
- Round 3: *1 sc, 1 sc inc*, repeat *-* around (18 sts)
- Round 4: *2 sc, 1 sc inc*, repeat *-* around (24 sts)
- Round 5: *3 sc, 1 sc inc*, repeat *-* around (30 sts)
- Round 6: *4 sc, 1 sc inc*, repeat *-* around (36 sts)
- Rounds 7–9: sc in each st around (36 sts)
- Round 10: *4 sc, 1 sc dec*, repeat *-* around (30 sts)
- Round 11: sc in each st around (30 sts)
- Round 12: Switch to White yarn, sc in each st around (30 sts)
- Rounds 13–15: sc in each st around (30 sts)
Fasten off, cut the yarn leaving a short tail, and stuff the muzzle firmly with fiberfill.
2. Body
Worked from the base upward using White and Black yarn to create stripes.
Start with White yarn and a 2.75 mm (C-2) hook.
- Round 1: 8 sc in a mr (8 sts)
- Round 2: sc inc in each st around (16 sts)
- Round 3: *1 sc, 1 sc inc*, repeat *-* around (24 sts)
- Round 4: *2 sc, 1 sc inc*, repeat *-* around (32 sts)
- Round 5: *3 sc, 1 sc inc*, repeat *-* around (40 sts)
- Round 6: *4 sc, 1 sc inc*, repeat *-* around (48 sts)
- Rounds 7–9: sc in each st around (48 sts)
- Round 10: Switch to Black yarn, sc in each st around (48 sts)
- Round 11: Switch to White yarn, sc in each st around (48 sts)
- Rounds 12–13: sc in each st around (48 sts)
- Round 14: Switch to Black yarn, sc in each st around (48 sts)
- Round 15: Switch to White yarn, sc in each st around (48 sts)
- Rounds 16–17: sc in each st around (48 sts). Begin stuffing the body with fiberfill.
- Round 18: Switch to Black yarn, sc in each st around (48 sts)
- Round 19: Switch to White yarn, sc in each st around (48 sts)
- Rounds 20–21: sc in each st around (48 sts)
- Round 22: Switch to Black yarn, sc in each st around (48 sts)
- Round 23: Switch to White yarn, sc in each st around (48 sts)
- Rounds 24–25: sc in each st around (48 sts). Continue adding stuffing.
- Round 26: Switch to Black yarn, *4 sc, 1 sc dec*, repeat *-* around (40 sts)
- Round 27: Switch to White yarn, sc in each st around (40 sts)
- Rounds 28–29: sc in each st around (40 sts)
- Round 30: Switch to Black yarn, *3 sc, 1 sc dec*, repeat *-* around (32 sts)
- Round 31: Switch to White yarn, sc in each st around (32 sts)
- Rounds 32–33: sc in each st around (32 sts)
Do not cut the yarn at the end of Round 33. Chain 1 instead to prepare for joining the body and muzzle together.
3. Merging the Body and Muzzle
Now you will connect the open top of the body to the open edge of the muzzle to form the neck and head structure seamlessly.
- Round 34: Join the working white yarn with a sl st to any stitch on the last round of the muzzle. Ch 1 and sc in that same stitch. Work 29 sc around the muzzle. Next, work 1 hdc into the chain stitch located between the muzzle and body. Transition back to working around the body: *2 sc, 1 sc dec*, repeat *-* 8 times (24 sts on body). Finally, work 1 hdc into the chain stitch between the body and muzzle. (Total: 56 sts)
- Round 35: *3 sc, 1 sc dec*, repeat *-* 6 times, then sc in the remaining 26 sts (50 sts)
- Rounds 36–37: sc in each st around (50 sts)
- Round 38: *3 sc, 1 sc dec*, repeat *-* around (40 sts)
- Round 39: sc in each st around (40 sts). Keep stuffing the neck and head firmly.
- Round 40: *3 sc, 1 sc dec*, repeat *-* around (32 sts)
- Round 41: sc in each st around (32 sts)
- Round 42: *2 sc, 1 sc dec*, repeat *-* 4 times, then sc in the remaining 16 sts (28 sts)
- Round 43: *5 sc, 1 sc dec*, repeat *-* around (24 sts)
- Round 44: *1 sc, 1 sc dec*, repeat *-* around (16 sts). Finish stuffing the head.
- Round 45: sc dec 8 times around (8 sts).
Fasten off, weave the tail through the front loops of the remaining 8 stitches, pull tightly to close the hole, and weave in your ends.
4. Ears (Make 2)
Use White yarn and a 2.75 mm (C-2) hook.
- Round 1: 4 sc in a mr (4 sts)
- Round 2: *1 sc, 1 sc inc*, repeat *-* twice (6 sts)
- Round 3: *2 sc, 1 sc inc*, repeat *-* twice (8 sts)
- Round 4: sc in each st around (8 sts)
- Round 5: *3 sc, 1 sc inc*, repeat *-* twice (10 sts)
Fasten off, leaving a long yarn tail for sewing. Do not stuff the ears; flatten them flat instead.
5. Arms (Make 2)
Start with Black yarn and a 2.75 mm (C-2) hook.
- Round 1: 5 sc in a mr (5 sts)
- Round 2: sc inc in each st around (10 sts)
- Round 3: sc in each st around (10 sts)
- Round 4: Switch to White yarn, sc in each st around (10 sts)
- Round 5: sc in each st around (10 sts)
- Round 6: *3 sc, 1 sc dec*, repeat *-* twice (8 sts)
- Round 7: sc in each st around (8 sts)
- Round 8: *2 sc, 1 sc dec*, repeat *-* twice (6 sts)
- Rounds 9–10: sc in each st around (6 sts)
Fasten off, leaving a long tail for assembly. Do not stuff the arms.
6. Legs (Make 2)
Start with Black yarn and a 2.75 mm (C-2) hook.
- Round 1: 8 sc in a mr (8 sts)
- Round 2: *3 sc, 1 sc inc*, repeat *-* twice (10 sts)
- Round 3: sc in each st around (10 sts)
- Round 4: Switch to White yarn, sc in each st around (10 sts)
- Rounds 5–10: sc in each st around (10 sts)
Fasten off, leaving a long tail for sewing. Stuff the legs lightly with fiberfill.
7. Tail
Use Black yarn and a 2.75 mm (C-2) hook.
- Leaving a long starting tail, ch 5.
- Sl st into the 2nd chain from hook, then work 1 sl st in each of the remaining 3 chains across (4 sts total).
- Fasten off, leaving a long end. Unravel and comb out the fibers at the tip of the tail to create a fringe, then trim to your desired length.
8. Knit-Look Tunisian Scarf
Use Pink yarn and the 5.0 mm (H-8) Tunisian crochet hook.
- Foundation Chain: Chain 4.
- Row 1 Forward Pass: Insert hook into the 2nd ch from hook, yarn over, pull up a loop. Insert hook into next ch, yarn over, pull up a loop. Repeat for the last ch (4 loops on hook).
- Row 1 Return Pass: Yarn over, pull through 1 loop on hook. *Yarn over, pull through 2 loops on hook*, repeat *-* until 1 loop remains on hook.
- Row 2 Forward Pass (TSS): Insert hook from right to left under the vertical bar of the 2nd stitch, yarn over, pull up a loop. Repeat for each vertical bar across (4 loops on hook).
- Row 2 Return Pass: Complete as described in Step 3.
- Rows 3–53: Repeat the TSS Forward and Return Passes for a total of 53 rows.
Fasten off, leaving a long tail. Sew the first and last rows together to form an infinity loop scarf.
Finishing & Assembly
Embroidering Facial Features
Using classic black embroidery thread and a tapestry needle:
- Nostrils: Embroider two small vertical lines between Rounds 5 and 8 of the muzzle, spaced about 14 stitches apart.
- Eyes: Embroider two inverted U-shaped eyes between Rounds 16 and 19 of the head/muzzle section, spaced about 10 stitches apart.
- Eyebrows: Embroider short angled lines between Rounds 19 and 21, approximately 6 stitches apart.
Attaching Components
- Ears: Sew the flattened ears onto the top of the head between Rounds 39 and 43.
- Arms: Sew the flat tops of the arms onto the sides of the body between Rounds 24 and 26.
- Legs: Sew the stuffed legs onto the bottom of the body between Rounds 2 and 6 so your zebra can stand balanced.
- Tail: Attach the un-fringed end of the tail to the back of the body between Rounds 12 and 13 using yarn tails.
Adding the Brushed Mane
- Cut 15 strands of black yarn, each about 6 inches long.
- Fold each strand in half to form a U-shaped loop.
- Insert your crochet hook under a stitch along the back ridge of the neck (from top of head down to the scarf line).
- Catch the looped bend with your hook and pull it partially through the stitch.
- Pass the two loose ends of the strand through the loop and pull tight to secure (lark’s head knot). Repeat down the length of the neck.
- Using a slicker brush or fine comb, gently brush the attached yarn strands to separate the fibers into a soft, fluffy texture.
- Trim the mane evenly to a height of approximately 0.5 inches.
Finally, wrap the cozy pink infinity scarf around your zebra’s neck, and your charming amigurumi creation is complete!
Tips for Amigurumi Success
- Maintain Tight Tension: Amigurumi requires firm tension to keep the stuffing securely contained inside. If you notice gaps between your single crochet stitches, try dropping down a hook size.
- Seamless Stripe Transitions: When changing colors from white to black on the body, execute the color change on the final yarn over of the last single crochet stitch of the round prior. This creates crisp, clean stripe lines.
- Stuff Gradually: Add small clumps of polyfill as you work rather than attempting to push large handfuls in at the end. This keeps your zebra’s body smooth and free of bumps.
- Brushing Technique: When fluffing the yarn mane, start brushing gently at the tips of the strands and gradually work your way down toward the knot to avoid pulling the strands out of your stitches.